Description
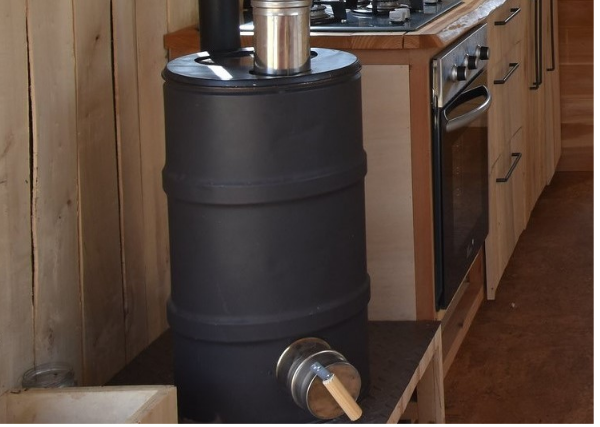
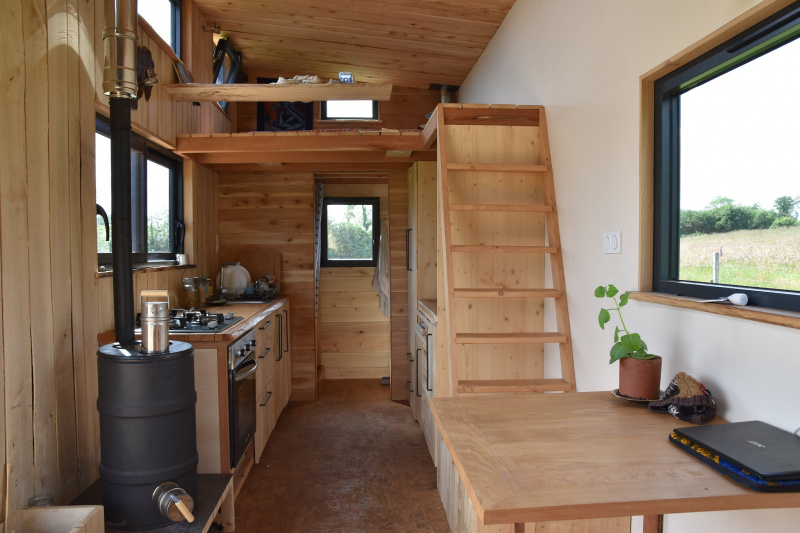
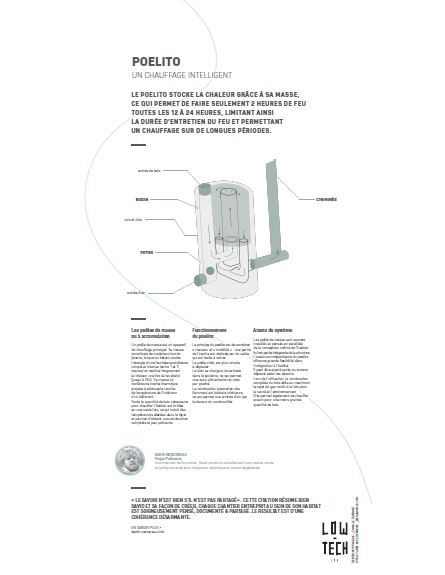
Semi-removable inertia mass stove. A mass storage stove or ‘heat storage stove’ is a primary heating device. Its mass, which is made up of heavy material (stone, brick and concrete), stores energy from a fire that burns once during the day (lasting between 1 and 3 hours). Once the fire has gone out, it then continues to give out heat over a prolonged period (for up to 24 hours). Its mass provides thermal inertia which helps to keep an even temperature inside a building (which is why these stoves are often also called “inertia stoves”). The whole of the quantity of wood needed to heat the dwelling is burnt in one go, making it burn hotter which allows complete and more environmentally-friendly combustion. It is a storage device which is designed to absorb the bulk of the energy that is generated from combustion and exhaust gases, which cool down considerably once out of the stove. Accumulated heat is mainly diffused by radiation and, in a few cases, by convection. This particular type of heating, i.e. that uses radiation, is best located in the centre of the dwelling and therefore, most mass stoves these days are positioned in the main room which opens out onto the lounge, dining room and kitchen. As yield tends tend to be in the majority of cases higher than 80%, these stoves are considered to be one of the most efficient wood-fuelled heating devices. Watch the tutorial video here [1]
Sommaire
Sommaire
[masquer]- 1 Description
- 2 Sommaire
- 3 Video d'introduction
- 4 Étape 1 - Provision of Materials
- 5 Étape 2 - How the Device is made up:
- 6 Étape 3 - Sizingː
- 7 Étape 4 - Fundamental Health and Safety Rules
- 8 Étape 5 - Different types of Concrete: how to make them up and what goes in them.
- 9 Étape 6 - Preparing the drum
- 10 Étape 7 - Making the Ash Tray and Smoke Exhaust Holes
- 11 Étape 8 - Fitting the Ash Tubes and Smoke Exhaust
- 12 Étape 9 - Fitting the Moulds
- 13 Étape 10 - Making the stopper for the ash tray
- 14 Étape 11 - Casting the protective bottom
- 15 Étape 12 - Making the Moulds
- 16 Étape 13 - Positioning the Moulds.
- 17 Étape 14 - Pouring the Refractory Concrete
- 18 Étape 15 - Removing the Moulds
- 19 Étape 16 - How to Make the Wood Feed Pipe.
- 20 Étape 17 - How to make the Wood Feed Stopper
- 21 Étape 18 - Making the Grate
- 22 Étape 19 - How to Make the Heat Riser.
- 23 Étape 20 - Making the Bell Chamber
- 24 Étape 21 - Cutting out the glass
- 25 Étape 22 - Cutting out the lid
- 26 Étape 23 - Painting
- 27 Étape 24 - Installation
- 28 Étape 25 - Filling it up with sand
- 29 Étape 26 - Fitting the glass
- 30 Étape 27 - Directions for use
- 31 Étape 28 - Maintenance
- 32 Étape 29 -
- 33 Étape 30 - Contenu pédagogique à télécharger
- 34 Étape 31 - Modèle 3D à télécharger
- 35 Étape 32 - Vous faire aider / poser vos questions
- 36 Notes et références
- 37 Commentaires
{{Introduction
|Introduction=
Youtube
Matériaux
Metalwork
- Metal drum
- Pipework (tubes of differing diameters and T-tube)
- Sewer grate
Ironmongery:
- Self-tapping screws,
- Nuts and bolts
Concrete:
- Tamper for packing down and applying the concrete,
- Wire,
- An old cloth to put in the drum to deaden the noise whilst you are working.
Moulds:
- Plastic packaging (cellophane),
- Gaffer tape
- Masking tape,
- Corrugated cardboard,
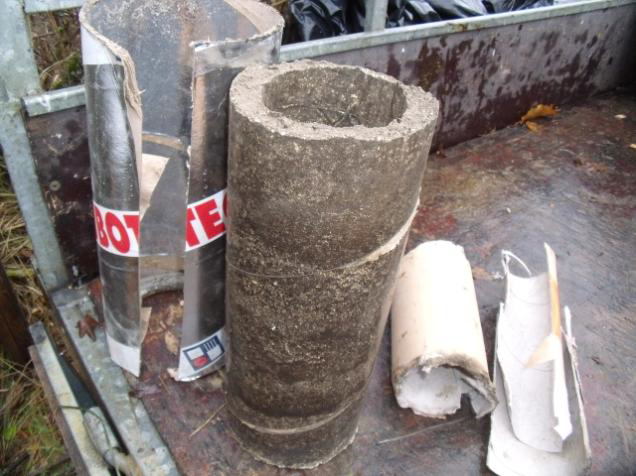
- Cardboard tubes of 80, 100, 130mm diameters respectively
Outils
Health and Safety:
- Gloves,
- Goggles,
- Ear defenders/ earplugs,
- Dust masks
- First aid kit containing saline solution in case cements gets into eyes.
For Marking/Measuring:
- Tape measure,
- Pencil,
- Marker
- String (2 metres approx.),
- Spirit level
For the Metalwork:
- Hammer/sledgehammer/chisel,
- Pincers
- Adjustable pliers
- Tin snips (often more practical that using an electric device)
- Jigsaw + metal blades
- Clamp
- Drill + metal drill bits
- Wire brush for drill
- Angle grinder + cutting, grinding and flap disks,
- Sander (optional)
Concrete:
- Tarpaulin
- 1 litre measuring cup,
- Trowel
- 2 x 10 litre buckets, mixing tray, container or bin for mixing concrete
- Hand mixer
- Power drill with paddle or manual mixer or cement mixer (optional)
Casting:
- Cutter,
- Scissors,
- Handsaw
Étape 1 - Provision of Materials
There are a number of items that are needed to build this stove, which can either be bought from new or salvaged.
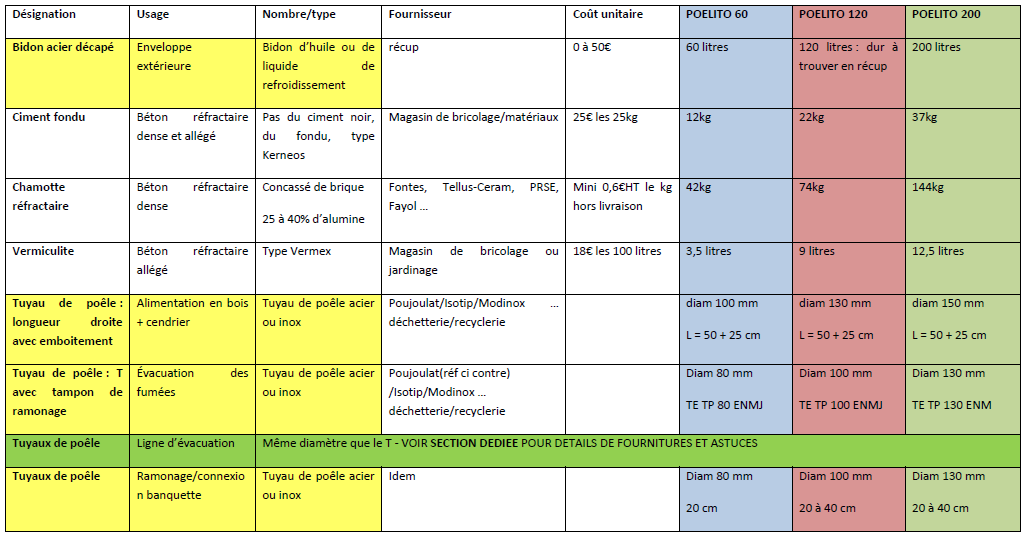
- The drums are easy to obtain, apart from the 120 litre ones, which are rare... and it can cost 50€ (excluding taxes) to buy one of this size from new.
- The stove pipes, which form the fire pit, are very easy to salvage and will be considerably more expensive if bought from new.
NB 1: the 2 pipes that are used for the (fixed) ash tray and the (removable) feed pipe must have a male fitting at one of their ends to accommodate the stopper. NB 2: A rigorous approach must be adopted when producing the exhaust system, using pipes which are compatible with one another. It is important to avoid leaks (condensates as well as smoke) and also the risk of fire .
- Concrete can be made up of sand and fire cement but this will not be as durable as using chamotte concrete/fire cement. Chamotte consists of ground-up fire brick and must contain 25 to 40% alumina. To contact manufacturers of fire bricks, see list in the annex.Grain size of 0 to 10 mm grade is ideal, but 0 to 5 mm can also be used.
AVOID making concrete with ordinary cement or ‘black’ cement (unlike fire cement, it does not contain alumina)
- Vermiculite: mixed with cement acts to insulate the bottom of the container. You can find this in builder's merchants and garden centres mostly under the names of “Vermex” or “Effiperl” (NB the latter also contains perlite and is a French brand)
- Ceramic glass: this is specialist glass which does not expand when exposed to heat and is resistant to thermal shocks of up to 800°C ! You can buy it in the shops (for about €400 to €600 per m²) but you can also salvage it from old inserts, electric hobs, oven doors (inner glass only, otherwise it is likely to have little resistance to heat). Do not use ordinary glass ! To test salvaged glass, stand on a flat surface and put the glass onto a gas camping stove. If it resists the heat, then that is a good sign.
The final thing to do for the ‘crash test’ is pour a glass of cold water over it. If there is no reaction, then it is specialist glass. Do not put it on the grass in case it breaks.
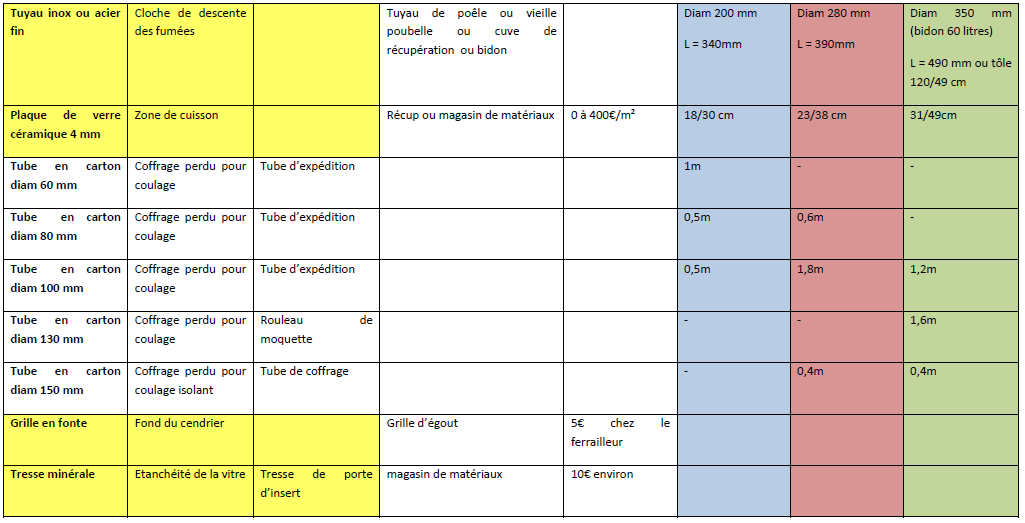
In this image, you will find the average supply costs for the different models. Taking the drum and the smoke exhaust out of the equation, the pipework will be a major part of the budget.
Étape 2 - How the Device is made up:
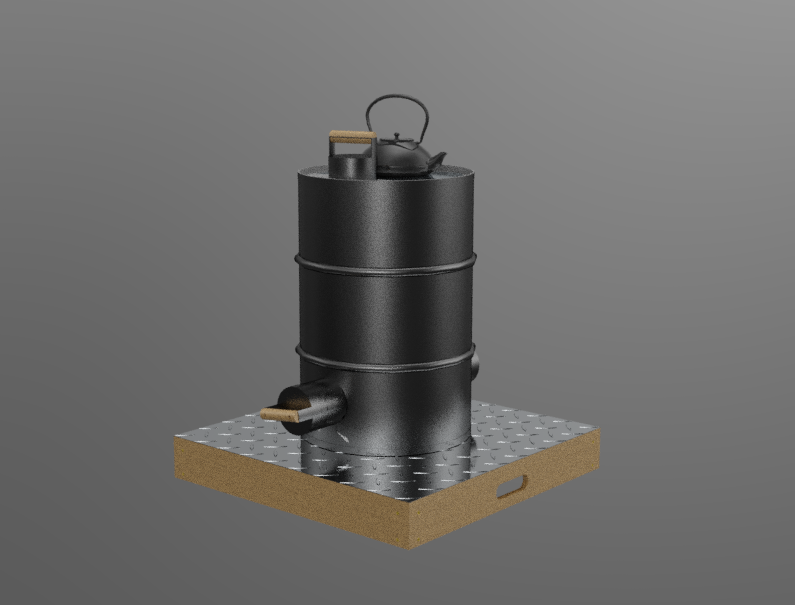
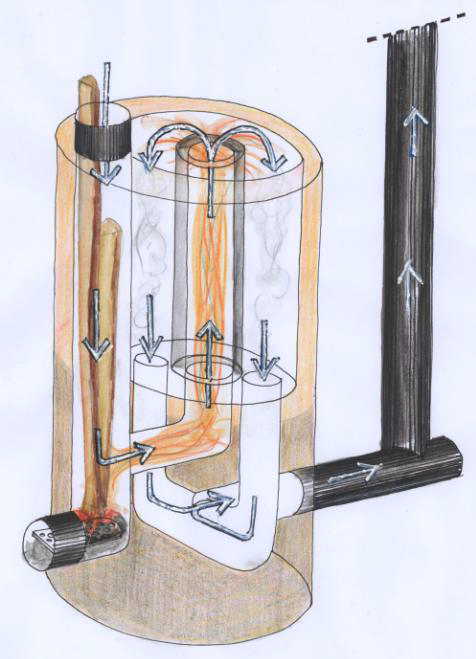
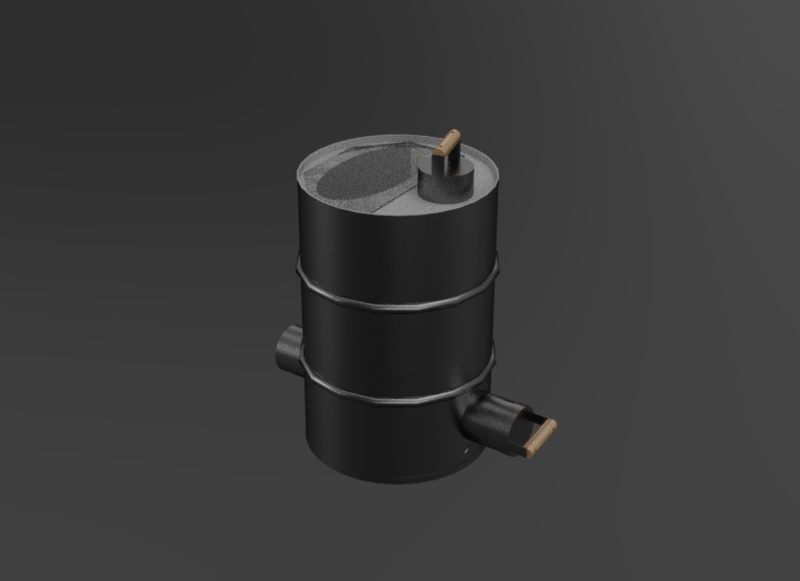
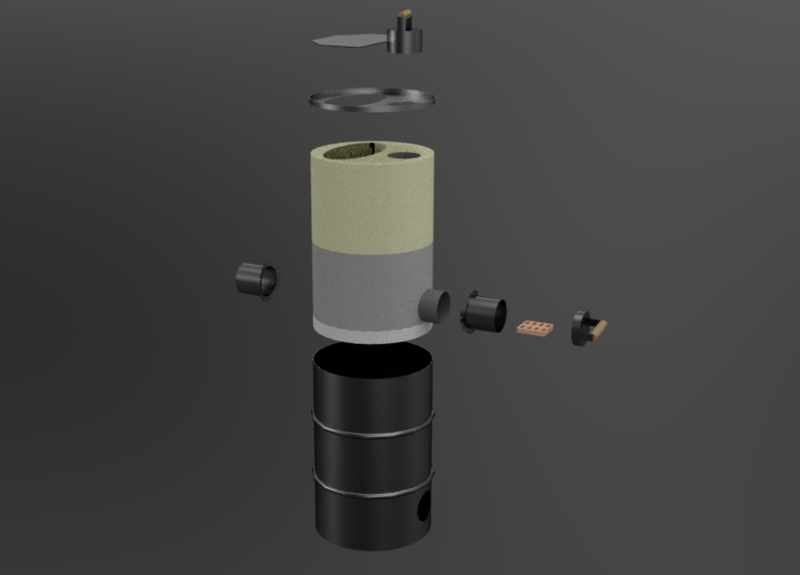
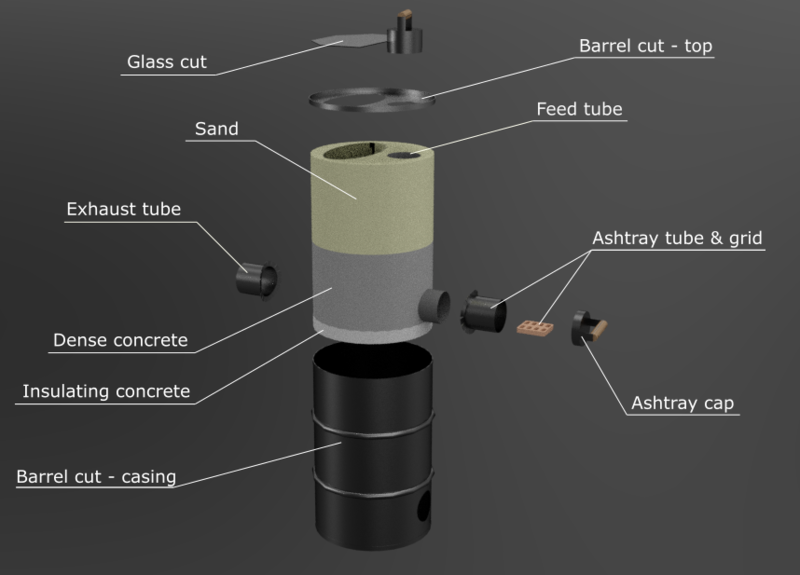
The idea behind the Poelito is to build a rocket stove inside a drum. The bottom of the drum is lined with an insulating mix of concrete; however the stove still needs to stand on a fire-proof support.The bottom part of the stove is cast in refractory concrete around a mould made of cardboard tubes. This is the area where the fire develops.Tubes are used to make the hollowed-out conduits: these are the routes which the smoke and fire take. The lower part forms the base of the fire pit and is a fixed body of material. The upper half is made up of removable metal pipes and is filled up with sand. This can either be left standing or transported separately. The fire pit can be closed to the outside either by a cast iron plate or by a pane of ceramic glass which can then be covered over by the drum lid as a finishing touch. The exhaust pipe is on the outside of the drum to which connection is made by a T joint with cap for cleaning out. Any pipes that go along the ceiling and to roof vents (or anything which goes outside of the dwelling) must be insulated.
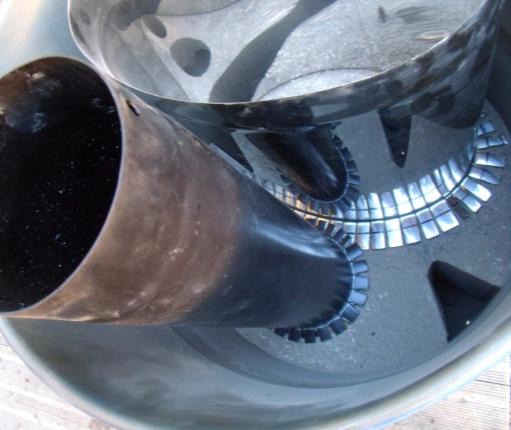
On voit sur l'image le bas du conduit d’alimentation vertical avec vers le premier plan son cendrier, et vers l’arrière-plan le départ horizontal des flammes : ce premier ensemble constitue le brûleur. A l’arrière-plan on voit les 2 reprises des fumées, une de chaque côté du conduit de départ de flamme. Ces 2 reprises se rejoignent par en dessous via un collecteur, qui envoie les fumées vers l’arrière, en direction de l’évacuation des fumées). Cet ensemble constitue le collecteur. Raccordement au conduit d’évacuation par T avec tampon
Étape 3 - Sizingː
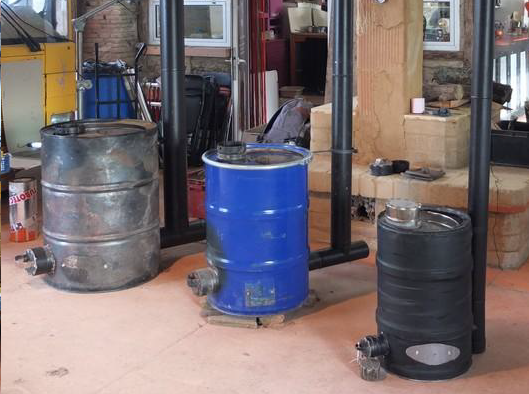
It is possible to make the Poelito in three different sizes which will be depend on the type of dwelling, the space that is to be heated, the exterior temperature and how well the dwelling is insulatedː
- PITO 60 made from a 60 litre drum (Ø35 cm H 65 cm): suitable for a truck or small caravan. Allow for 80kg
It is low power and low mass and is only suitable for small buildings with, at the very least, good insulation. As an example, in a large caravan (7m long), it is OK for temperatures down to 0°C but when the temperature drops to -5°C you cannot expect any more than 12°C in the morning if you lit a fire in the evening. Heavy use of an under-sized stove makes it less durable.The cooking area is fairly small and only allows use of small pans.
- PITO 120 is made with a 120 litre drum (Ø45 cm H 75 cm) and is suitable for a yurt of up to 5m in diameter if well insulated. It is perfect for a large caravan or a mobile home. Allow for 160 kg
This is the best compromise in the terms of bulk v power and transportability. It also is suitable for a studio. It has a good cooking area with the possibility of a water heating option.
- PITO 200 is made with a 200 litre drum (Ø60 cm H 90 cm) which can be used in a yurt which is larger than 5m in diameter, a small house, a small narrow-boat....allow for 250 kg.
This design is most suitable for lightweight dwellings with a floor-space of more than 20 m² or for a solidly-built, moderately insulated dwelling with a floor-space of more than 35 m² .A device which does not need to be moved very often and requires options such as water heating and heated seating would be suitable for this size of dwelling
Étape 4 - Fundamental Health and Safety Rules
User’s responsibility
The authors of this guide and the organisation which makes it available disclaim all liability resulting from the use of the Poelito. You are solely responsible for the implementation of the proposed device. Take precautions, remain calm and composed when in action. Above all, question any so-called “good ideas” you may have (e.g. “that will be OK like that”...).
Safety during construction
Always use safety equipment required for the task undertaken. Metal can be a dangerous material to work with and cement may be toxic if inhaled. Ensure you have an suitable work plan and only use the right tools to assemble pieces when machining (clamp, vice, locking pliers)
Installing the stove
Like all stoves, it is important to respect safety rules in order to not put yourself or your dwelling at risk.
Weight /foundations:This device is of a substantial weight.In a lightweight dwelling, it is imperative that you put something under the floor to withstand the weight and avoid it collapsing. As a minimum, you will need at least a block which stands on the hard surface to sufficiently support the floor. If needed, insert a transverse beam between existing supports (to form a joist) and a block for maximum effect. In conjunction with this, a ground protection mat is recommended as the floor can be relatively flexible and can become distorted in places due to the weight being concentrated in a given area (at points of bearing heavy loads). This means laying any such material on the floor that is sufficiently rigid and of a size to distribute the weight over a larger area than that on which the device normally stands.
Ground Protection: Where appropriate, it needs to be placed on a thick metal plate which is large enough to distribute the weight. If installing the device on top of combustible material e.g. a plank of wood, the device must be lifted up to allow air flow underneath or placed onto an additional mass or thick insulation.
Spacing between walls:The stove must be placed 15 cm minimum away from all walls. If there is less than 45 cm between the stove and nearest wall, it must be protected with fireproof insulation such as rockwool. It must not under any circumstances be in contact with combustible material.
Conduits:The smoke exhaust pipe must comply with current standards. These are basic standards and prevent fire from breaking out in the dwelling. There must be a safe distance of 30cm between any wall made of combustible material and a single-skin pipe. A double-skin pipe is to be used for going up inside the roofing and for outside (with a safe distance of 10 cm for it to go through the roofing). A build-up of heat must be avoided at all costs: the 10 cm collar which goes around the pipe where it goes through the roof should not be left unfilled. It will need to be filled with fire-retardant insulation. The temperature could rise sufficiently to catch fire in an empty space (especially if it is closed off from the outside).
Chimney Height: The layout will have an effect on air circulation. Obstructions which cause air disturbances should be avoided. The smoke exhaust pipe, in particular, must 40cm higher than the top of the roof. For flat roofs, it must be higher than 120 cm (in this case, it must be properly secured). According to standards, the pipe must also be higher than any obstruction which is less than 8m away (e.g. trees)
Choosing a place to put the stove:Where you put the stove will be often dictated by the possible paths in which the smoke ducts in the roof can take. Clearly, you need to take into consideration the layout of the room. Avoid raising the device up too much as the room should be heated at ground level. If it is placed next to a wall, you should not only pay attention to safe distances but also to the accessibility needed for drawing air in to light the fire and for cleaning out.
Étape 5 - Different types of Concrete: how to make them up and what goes in them.
As part of the process of making the Poelito, you will need to make up concrete. Fire cement is corrosive to the skin and an irritant to the eyes and respiratory tracts: handle using gloves, wear goggles and an anti-dust mask.
You need to make two different mixesː
- An insulating mix used for the bottom of the drum and the heat riser;
- And, for the remainder, a dense mix which used to store in the heat.
You can find details below on how to make it and what materials are needed. Reference to this will be made at different times during this tutorial.
How to make up the refractory concrete
- 1 part water
- 1 part fire cement
- 1.3 parts vermiculite
- Calculate the volumes needed for casting and increase it by 20 %
- Put the water into the container in which you are going to mix it all up.
- Pour in the cement.
- Mix it up until you have a smooth paste
- Pour all the vermiculite in and mix in until you have an even mixture. The granules should have all turned black and the mix should be sufficiently wet.
- Add more water if necessary.
How to make up the dense refractory concrete
- 1 part water
- 1.3 fire cement
- 3.3 parts refractory chamotte
- Calculate the volumes needed for casting and increase it by 10 %
- Put the chamotte into the container where you are going to make the mix.
- Pour in the cement on top.
- Mix them together dry.
- Add ¾ of the volume of water needed
- Mix
- Gradually add more of the remaining water to adjust consistency
As with all binding agents which set hydraulically, losing moisture or drying out too quickly inhibits chemical reactions needed for it to set.
- Cover whilst it is setting if the weather is hot, do not make mortar in direct sunlight or in freezing weather. It sets fairly quickly: in about ½ hour.
- Only make up amounts that you can work with within this time-frame.
- Avoid contact with rainwater which may be acidic and prevent the binding agent from working properly.
- Avoid using warm water as it speeds up the setting process.
Étape 6 - Preparing the drum
Scouring
It is better to scour down the drum before starting construction.In all cases, this should be done before lighting the first fire as this will blister the paintwork which is not designed for resisting high temperatures. The simplest way to scour it down is by using abrasive discs on a grinding machine. It is also possible to use a sander or attach a wire brush to a drill.
Cutting
Unless you have a drum with a detachable lid with strapping, you will need to cut the top off of the drum. The top of the drum is used as the cover for the stove once it has been finished. Avoid damaging it and choose the bottom of the drum (which is a complete unit) in preference to the top (which is where the bungs go). This means turning the drum upside down.
Using an angle-grinder and protective gear for hands, eyes and ears, cut just below the rim taking care to not cut the second layer of the metal sheet. That way, the lid can be replaced. A metal saw also works very well. Tip: Start with using an angle grinder (for easiness) and finish with the saw (for precision). Remember to protect the ground with tarpaulin as the remnants of liquid in the drum may leak out from the area you are cutting.
Cleaning
Now that the drum is opened up, it should be cleaned out as it will almost certainly still have remains of oil in it. Use sawdust or sand to get rid of the bulk of the residual oil content. Dispose of the contents as recommended (most likely as toxic waste, you will need to take to a waste disposal site)
Étape 7 - Making the Ash Tray and Smoke Exhaust Holes
Two diametrically opposite holes must be drilled in the drum allowing you to insert the pipes.The front tube (100/130/150 mm in diameter) is to be used as an air inlet and for ash removal.The back tube (80/100/130 mm in diameter) is to be used to connect the smoke exhaust pipe (the respective diameters of PITO model - 60/120/200)
The two tubes should be 6 cm from the bottom of the drum. This is the thickness of the base layer of concrete. When measuring, you need to take into consideration the rim that protrudes beyond the bottom of the drum (If you are filling to 6 cm from the bottom of inside the drum, you then need to add on the thickness of this rim which will be approximately 1.5 cm)
- Using string, go around the barrel, mark the point at which it meets on the string with a felt-tipped pen: this will give you the circumference of the barrel.
- Fold the string in half and make a new mark half way between: i.e. half of the circumference.
- Draw around the tubes which are to be inserted to mark where you need to make the holes.
- Use string to locate the centres of the 2 apertures opposite each other.
- Cut out the two circles staying well inside the lines.
- Hammer the edge of the hole (towards the outside) in order to fit the tube.
- Keep the cut-out circles to make the stoppers for the ash tray and feed.
Étape 8 - Fitting the Ash Tubes and Smoke Exhaust
Ash tray side:
- Feed the 100/130/150 tube through the hole you made earlier on the drum, male side on the outside with the ridge against the outer wall of the barrel.
- Mark, on the tube from the inside, the point where it meets the wall of the barrel.
- Take off the tube and cut 15 mm beyond the line.
- Then cut out fins in this 15mm band stopping at the marked line using metal shears, a jigsaw or a grinder. These should be 1cm wide so that the they are easy to fold back.
- When all these have been cut out, re-position the pipe and fold the fins back.
- If necessary, put a few rivets or self-tapping screws to fix it securely.
Smoke Exhaust side:
On the smoke exhaust side, attach a short sleeve with a female fitting in the same way. The female fitting is on the outside.
Étape 9 - Fitting the Moulds
There is a risk that the moulds (which are to be made next) will be displaced when pouring the concrete. They should be secured down to ensure the dimensions are correct.
- Turn the barrel back over.
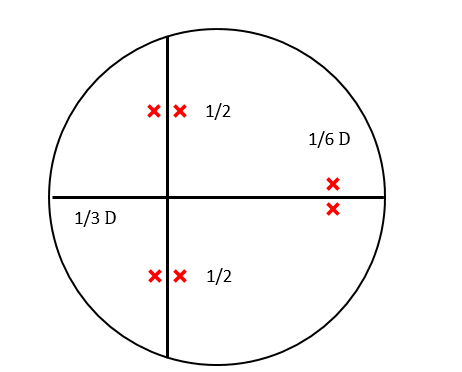
- Drill 3 pairs of holes to the diameter of the wire (as per the diagram opposite). It does not have to be exact.
- Loop 1m approx. of wire through. This will help to keep the cardboard moulds in place whilst pouring the concrete.
The wires need to point to the inside of drum.
Étape 10 - Making the stopper for the ash tray
This stopper allows you to shut off the ash tray and regulate primary air intake.
- Take one end of the tube which slots onto the (male) ash tray outlet .
- Cut, adding 15 mm onto the length needed.
- In this 15mm strip, cut out fins a centimetre apart trying to have an even number as this will look better.
- Fold every second fin towards the inside.
- Reuse the cut out circle from the drum to close down the lid.
- Place the circle on the folded back fins
- Fold the other fins over.
- Add a handle and a small door to control air intake.
The system of controlling primary air (in the ash tray) should be rigorous and efficient.This allows you to control the power from combustion.
Étape 11 - Casting the protective bottom
The bottom of the stove consists of 2 different layers: 3 cm insulating mix then 3cm dense mix. The purpose of this is to insulate the bottom of the barrel to protect the ground from heat.
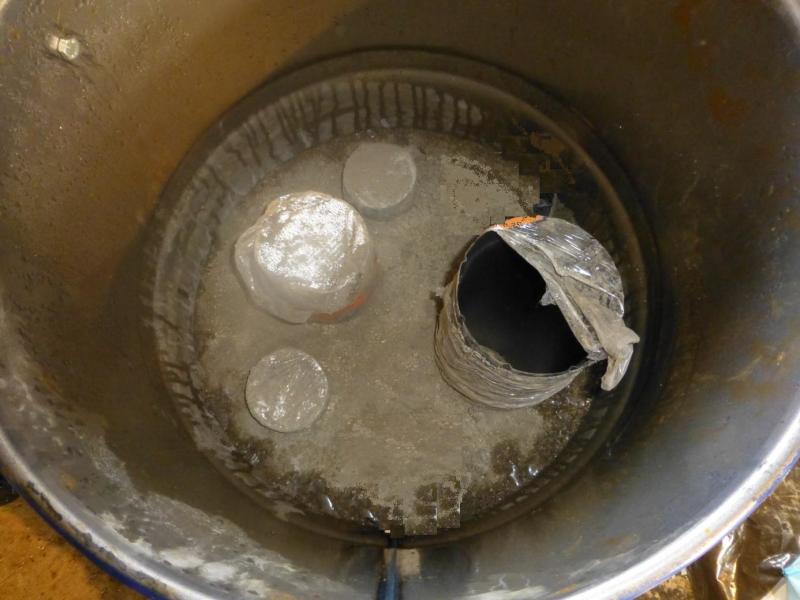
- Mark inside of the barrel the height where the two layers come up to, which is 3 and 6 cm.
- Ensure that the drum is on a level surface when the concrete is poured.
Insulating Mix:
- Calculate the volume needed for the insulating https://drive.google.com/file/d/1vtasWBKad9EEFBpeoNq38jT7SOasalra/view
- Make up the mix referring to the instructions on how to make up the insulating mix and what goes in it Step X.
- Pour the insulating mix up to the 3cm mark.
- As you are doing this, pack down the mix using a tamper .
- Ensure the wires which hold in the moulds are sticking out.
- Wait two hours until the first layer is surface-dry so that you can then pour on the dense mix.
Tip: Once the mixture has started to set, scarify the surface of the concrete in order that the second layer sticks to it well.
Dense Mix:
- Calculate the volume needed for the dense mix https://drive.google.com/file/d/1vtasWBKad9EEFBpeoNq38jT7SOasalra/view
- Make up the mix referring to the instructions on how to make up the dense mix and what goes in it in Step X.
- Pour in the 3cm of the dense mix up to the 6cm mark.
- As you are doing this, pack down the mix using a tamper .
- Ensure the wires which hold in the moulds are sticking out.
- Wait 24 hours before pouring the remainder.
Étape 12 - Making the Moulds
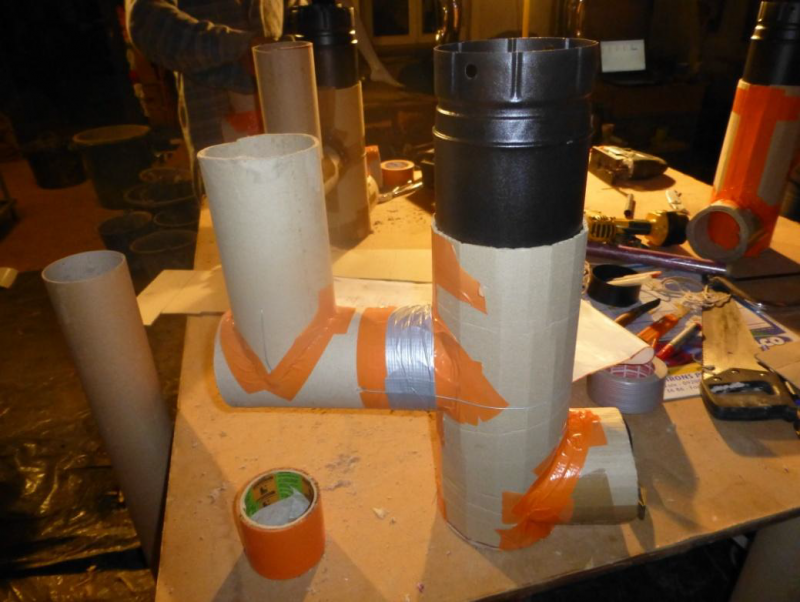
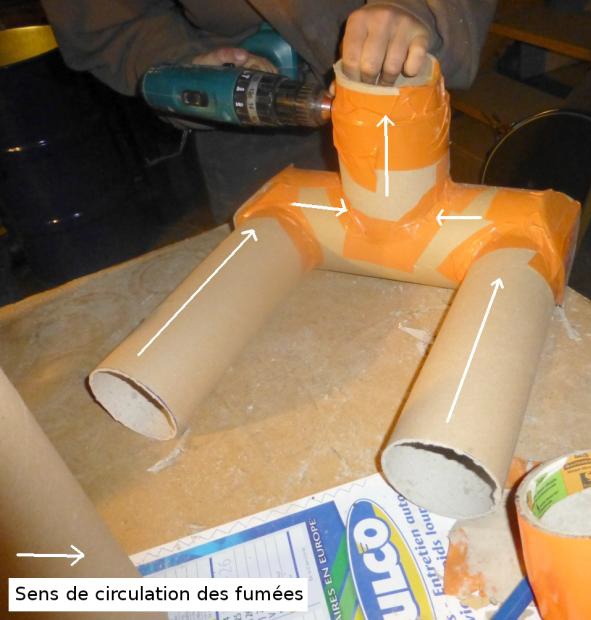
You will need to make the moulds so that you can pour the refractory concrete. This is effectively making the conduits where heat and gases circulate. For this, you will need to make moulds for the different conduits using cardboard which then need be taken out after the concrete has been cast. They need to be made solid enough to withstand the pressure of the concrete but equally be easy as possible to take out once it has all dried.
The minimum thickness for the concrete must be 3 cm between the various components themselves and between the components and the barrel. There is a risk that the concrete might crack underneath making the stove not very durable. There is also a danger of the smoke circulating poorly which means the stove will not work very effectively. That needs to be borne in mind when making the moulds, especially when they are positioned in the concrete when casting the mix .
Cutting
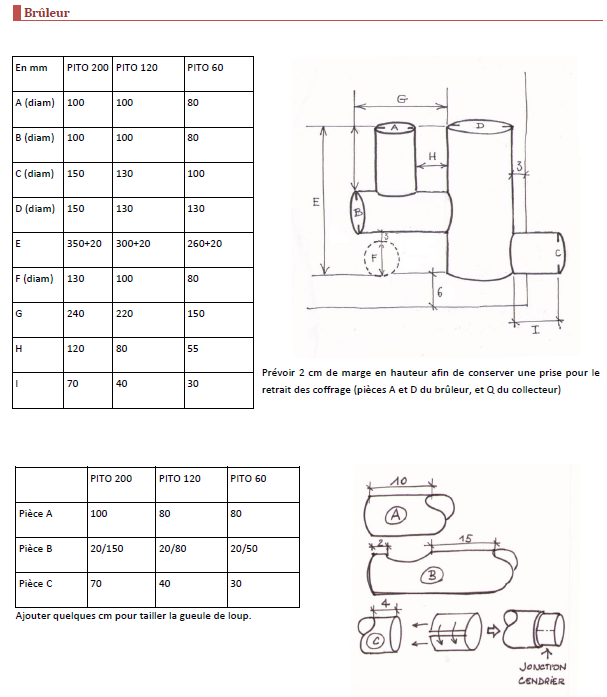
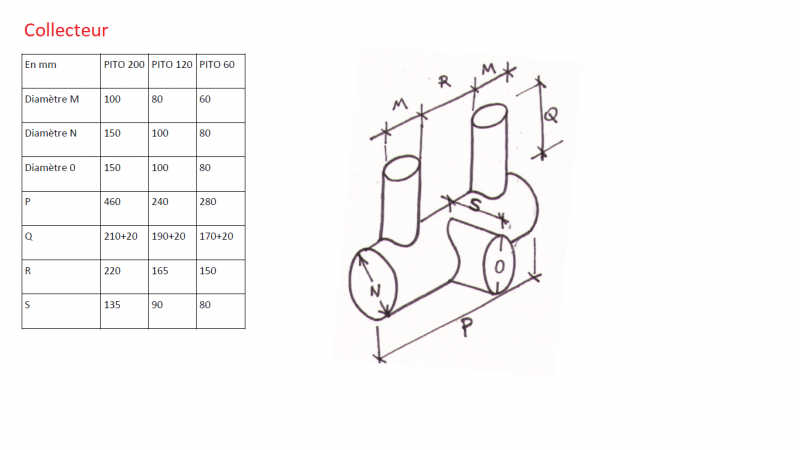
- As the pipes are effectively cylinders, you need to make an opening so that they can be joined. When cutting out the cardboard tubes, add a few cms to the sides (côtes) listed in the tables e.g. to join a 100mm tube onto a 100mm one, the depth of the opening is 5cm. For thick carton, cut it with a saw (a good way of doing this is with a jigsaw) and a cutter.
- Use the dimensions in the tables as shown.
Assembly
- Wrap the tubes individually in protective plastic.
- Position the tubes relative to one another as depicted in the diagrams.
- Hold the tubes in place with gaffer tape.
Be careful to ensure the junctions are well covered so that the concrete does not soak into the tubes.
TIP: For connection with the ash tray or smoke exhaust, narrow the gaps with another bit of rigid cardboard. Remove a strip in order to reduce the diameter so that you can slot it into the cardboard mould. TIP: Allow for a 2 cm margin in height so that you have something to get hold of when taking out the castings. TIP: Once the manifold and the horizontal tube where the fire is lit has been completed (these are the hardest to remove), it is possible to cut them longitudinally into 2 or 3 pieces and put them back together. This will make it easier to remove.
Étape 13 - Positioning the Moulds.
Once the cardboard castings have been finished and encased, they need to be placed in the barrel and fastened.
- Slot the cardboard tube into the metal opening of drum.
- Fasten tightly with 2 strands of wire .
- Cut off any redundant wire.
Do the same with the ash tray mould.
- Hold onto the wires and pass them over top the pipe which comes horizontally out of where you light the fire .
- Wedge the different pieces between each other with bits of wood. This will help to maintain the gaps between the pieces whilst the dense concrete is being poured.
Étape 14 - Pouring the Refractory Concrete
- Mark either with a pen or with tape inside the drum, the height from the bottom layer of concrete to which the dense concrete needs to be poured (350/300/260)
- Prepare the mix referring to how to make concretes up and what goes in them in Stage X.
- Pour the concrete in 5 cm max. passes.
- Pack the concrete down after each pass in a consistent manner. If the concrete is packed down too much on one side, the cardboard mould will not stay in.
- Make sure the thicknesses are uniform and symmetrical as to not allow any movement in the moulds.
- If necessary, re-position the wedges as you are pouring the concrete.
- Repeat until you have reached the specified height.
Étape 15 - Removing the Moulds
Removing the moulds can be done 12 hours after pouring the concrete. This can be quite a tedious task.
- Use gloves to avoid damage to hands from the concrete when poking them into the holes.
- Pull out all that you are able to retrieve from the orifices either by hand or with a pair of pliers.
- Once you have taken out as much as you can, light a fire in the hole to burn off and get rid of that which is left inside.
- Use methylated spirits to facilitate the process of burning the bits you want to get out . However, care must be taken to never put alcohol onto the fire. When the fire gets going, use little pieces of dry wood to keep the fire burning.
Étape 16 - How to Make the Wood Feed Pipe.
The length of the wood feed must be adjusted so that its upper end goes through the lid and you can fit a stopper onto it. However, it must be as short as possible as the draught effect produced when lit works against the outlet line. The shorter it is, the easier it is to light.
- Take the length between the level of the concrete and the top of the barrel, add 15mm for the fins and whatever the height of the stopper is. The top of the tube has to have a male fitting in so you can fit a stopper onto it.
- Cut out the tube.
- Make 15mm high fins every centimetre on the lower part.
- Fold back every other fin towards the outside.
Étape 17 - How to make the Wood Feed Stopper
It is the same process for the feed pipe as it would be for the ash tray but without adding the air inlet.
- Take one end of the tube which fits onto the (male) outlet feed pipe
- Cut, adding 15 mm onto the length needed.
- In this 15mm strip, cut out fins a centimetre apart trying to have an even number as this will look better.
- Fold every second fin towards the inside.
- Reuse the cut-out circle from the drum to close down the lid.
- Place the circle on the folded back fins
- Fold over the other fins on top.
- Add a handle.
To adjust the secondary air flow, all you need is to put the lid half-on. The lid will never be totally closed down during use. At the end of use, the lid is to be closed. This stops the hot stove from sucking in air into the unit, warming it up and escaping out.
Étape 18 - Making the Grate
he system works even better with a grate fitted to the fire pit and with primary air coming in underneath (onto the ashtray). This allows the embers to keep reducing down as you refuel.
ut the drain grate into a tongue shape so that it can be positioned mid-way up the height of the ash tray, It needs to go just at the back of the fire pit to stop the embers from falling out.
Étape 19 - How to Make the Heat Riser.
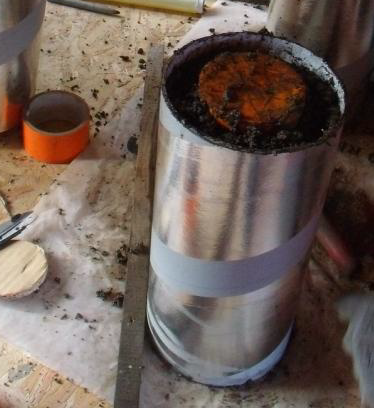
To make this tube out of concrete, you need to make a mould using 2 cardboard tubes, one inside the other. The diameter of the inside tube should match the mould (100/100/80). The diameter of the outside tube must be approximately 6cm larger than the inside one in for the thickness of the tube to be 3cm. This will need to be 2 to 3cm shorter than the bell chamber in order to leave a space under the glass so that the smoke can circulate.
- Cut the outside cardboard tube.
- Cover the inside surface in plastic.
- Cut the inside cardboard tube.
- Cover the outside surface in plastic.
- Cut out two rings from cardboard. These will be used as spacers between the inside and the outside tubes.
- Cover them in plastic.
- Put the spacers at the bottom to close up the mould.
- Fill with the insulating mix (fire cement and vermiculite) a bit at a time.
- Spread the mix out and pack down tightly with a small tamper.
TIP:If you don’t have any cardboard tubes of the right diameter, you can make them by rolling up cardboard. Roll it up with the flutes going vertically.
ALTERNATIVE : For the PITO60, it is possible to make a mould made out of the insulating mix or, alternatively, cut out a tube from thick metal, for example a fire extinguisher (not if made of aluminium) since the gap is very narrow.
Étape 21 - Cutting out the glass
The glass should cover the whole of the bell chamber.Before cutting it, check the sides on the Poelito. It is important to make sure that the template is the right size.
Ceramic glass should be used as it is resistant to high temperatures. See Step 1 - Provision of Materials
If you buy this in a DIY shop (€/400 - 700€/M²), get it cut on the premises (TEMPLATES)
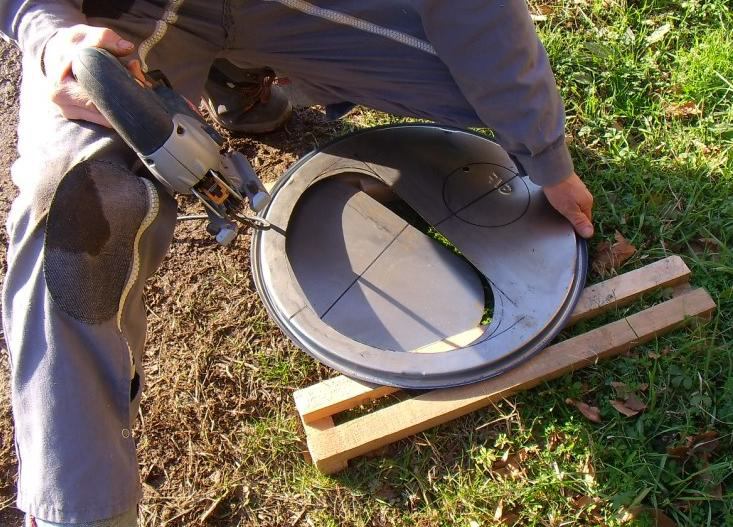
Étape 22 - Cutting out the lid
The lid closes off the top of the Poelito. It does not have any particular purpose in the system.
- Mark the feed pipe and bell chamber positions on the bottom of the lid.
- Cut out using a jigsaw.
- Position it on the stove.
Étape 23 - Painting
ou have now finished making the stove. Before installing it in your future dwelling, it would a good idea to paint it.
- Use special paints for stove which are resistant to high temperatures.
Étape 24 - Installation
The stove is now complete. It is now time to take it out of the workshop to find it a place to keep it long term to get the benefit of it during the long winter nights.
Take care to respect Health and Safety rules in Step 4
Étape 25 - Filling it up with sand
Once the device has been installed in the correct position, onto an appropriate base and with the pipe fitted onto it, you now need to put the bell chamber and the feed pipe in place.
- Position the wood feed pipe and the bell chamber (without any mortar or sealant) as a dummy run and adjust any gaps.
Put the lid on the top to check the alignments.
Use the fins to adjust (fold back to straighten them up if they are a bit skewed)
- Once in place, put small blobs of clay mortar onto the junction where the fins and masonry meet, spreading it out gradually until it is all covered. This prevents the sand leaking out of any spaces between the fins.
Clay mortar: clay soil (which is sticky) and sand in variable proportions. Generally, 1 part clay to 3 to 5 parts sand, with enough water to make balls that hold and stick . If it is used for sealing or as masonry, it is best to ensure you have the right proportions. However, in this case, this is not important.
Étape 26 - Fitting the glass
Place the glass on the bell chamber without sealing it.
- Light fires to allow the sand to settle.
Add more sand as necessary.
- Fill up with sand to just above the height of the bell chamber.
- Attach mineral rope on the top so you are able carry the stove (available in hardware stores)
- Reposition the glass.
- Put the lid back on. Installation is complete.
- Make the most of the stove before the Spring arrives!
Étape 27 - Directions for use
Préparation du combustible
Wood must be bone-dry. If not, the stove will not heat up properly and will get clogged up. You need 2 types of fuel:
- Fire-lighting wood: this is small thin bits of wood about 10 to 20cm long and is a maximum of 4 to 5 cm thick. Ideally this should be softwood as it is easy to catch fire.
- Firewood: of variable lengths (from 30cm up to the height of the ceiling!). Preferably, it should be straight and reasonably thin. *
If 10 to 15cm sections of the wood feed pipe (according to the model) are filled with one big log, then it will not burn very well at all. You need wood of varying and complementary sizes for filling up the conduit properly. Twisted wood is not the ideal for fuelling and should therefore be arranged in such a way that the twigs overlap where they are twisted. Avoid having differing lengths; otherwise, any fuel will do as long at it is wood that is bone-dry.
Chargement de la flambée de préchauffage
Put the following into the feed pipe via the opening at the top in the following order:
- A handful of loose fire-lighting material (cardboard, shredded paper, coarse shavings)
- A handful of well broken pieces of crate.
- A handful of finely chopped fire-lighting wood (ideally softwood)
- A handful of thicker fire-lighting wood (4 to 5 cm max thick)
- Check the horizontal exit towards the flame area is not obstructed by the wood.
- Before lighting, check the ash levels and empty if there is too much.
Amorçage du tirage et allumage
Placer un peu de cendre ou de sable dans le bouchon du T au pied de la ligne d’évacuation (seulement la 1ère fois)
- Pour on 5cl of methylated spirits
- Light and quickly put the stopper back in.
- Light the fire in the ash tray
- Put the two lids half back on (on the feed pipe and the ash tray). Draughts which are produced by burning methylated spirits provide a fast and practical way to light the fire every time.
- If smoke escapes from the top, close the feed-pipe lid right down and reduce the ashtray opening.
Chargement
Once the fuel used for fire-lighting has been well set alight, add enough wood from the top to fill up the whole of the feed pipe without cramming it in. These are the right conditions for the wood to burn properly: combustion is better if the whole of the pipe is filled. The fire develops best in the fire zone and not so well in the feed pipe.
Take care to not constrict the wood too much and it needs to fall naturally whilst it is burning.
Gestion du feu et rechargement
Check periodically that the wood is only burning in the bottom part and is getting stuck.Shake the wood up to move it down the pipe if needed. Controlling the draught: it is necessary to retain a small opening on the ash tray to prevent the embers from building up. If this opening is too big, the fire can become wild to the point of rising up and smoking from above. The important thing is that the air should come in from the top of the feed pipe: reduce by a half maximum but never any more than that ǃ
If the glass goes black, one of three thing are wrong: the wood is not dry, it is burning too intensely (too much air in the ashtray), there is not enough air supply from the top.
<u>ATTENTION : </u> During burning, the device requires little surveillance and maintenance.However, with very long pieces of wood, the flames can go up the feed pipe and become wild, especially with softwood. If this is the case, squirt some water in the wood feed pipe to dampen it.
Étape 28 - Maintenance
Entretien courant
The only maintenance you need to do is to empty out the ashes. If the there is too much ash, then there will be a build-up of embers up to the point that it will clog up the lateral draught towards the area where the flames are: this will mean that it will stop suddenly after a good smoking!
Yearly maintenance. The law states that all users of wood stoves must clean out the flue twice a year, on one of these occasions, the stove must be burning. Clean out this pipe using a nylon brush with a diameter appropriate to the cleaning out cap. Push it up to the top and then back down again. If you do this whilst the stove is still hot, the draught will push the dust out the top rather than come down into the dwelling. It is also important to empty the deposits of ash which are produced at the bottom of the fire and especially at the back of the manifold. This is where it is the ash tends to fly around before being deposited. This is why is it useful to have the door providing access for cleaning opposite the manifold.
Étape 29 -
Got two minutes? Whether or not you would like to do this low-tech, your answer to this form would help us improve our tutorials. Thank you in advance for your help!
As all the work of the Low-tech Lab, this tutorial is participative, do not hesitate to add the modifications which seem important to you, and to share your achievements in comments.
Étape 30 - Contenu pédagogique à télécharger
Vous pouvez télécharger une fiche pédagogique créée par le Low-tech Lab à l'occasion de l'exposition "En Quête d'un Habitat Durable" dans la partie "Fichiers" du tutoriel (onglet au niveau de la section "Outils-Matériaux")
Étape 31 - Modèle 3D à télécharger
Vous pouvez télécharger un modèle 3D du poêle de masse décrit dans ce tutoriel, version PITO200, au format STEP.
Étape 32 - Vous faire aider / poser vos questions
Si vous avez des questions, un forum d'entraide / de témoiniage dédier aux poêles de masse open source est désormais à votre disposition : https://forum.poeledemasse.org/poelito/
Notes et références
- Find everything and even more on our sister site des2mains :
- More information on the use of poelito and other solutions on David's website :
and
- Super retour d'expérience sur la construction et l'utilisation du poêlito de Jacob Karhu: https://www.youtube.com/watch?v=ltxlY5X3hRk
Published



 Français
 English
 Deutsch
 Español
 Italiano
 Português