Description
Semi-removable inertia mass stove. A mass storage stove or ‘heat storage stove’ is a primary heating device. Its mass, which is made up of heavy material (stone, brick and concrete), stores energy from a fire that burns once during the day (lasting between 1 and 3 hours). Once the fire has gone out, it then continues to give out heat over a prolonged period (for up to 24 hours). Its mass provides thermal inertia which helps to keep an even temperature inside a building (which is why these stoves are often also called “inertia stoves”). The whole of the quantity of wood needed to heat the dwelling is burnt in one go, making it burn hotter which allows complete and more environmentally-friendly combustion. It is a storage device which is designed to absorb the bulk of the energy that is generated from combustion and exhaust gases, which cool down considerably once out of the stove. Accumulated heat is mainly diffused by radiation and, in a few cases, by convection. This particular type of heating, i.e. that uses radiation, is best located in the centre of the dwelling and therefore, most mass stoves these days are positioned in the main room which opens out onto the lounge, dining room and kitchen. As yield tends tend to be in the majority of cases higher than 80%, these stoves are considered to be one of the most efficient wood-fuelled heating devices. Watch the tutorial video here [1]
Sommaire
Sommaire
- 1 Description
- 2 Sommaire
- 3 Introduction
- 4 Video d'introduction
- 5 Étape 1 - Provision of Materials
- 6 Étape 2 - How the Device is made up:
- 7 Étape 3 - Sizingː
- 8 Étape 4 - Fundamental Health and Safety Rules
- 9 Étape 5 - Different types of Concrete: how to make them up and what goes in them.
- 10 Étape 6 - Préparation du bidon
- 11 Étape 7 - Réalisation des trous du cendrier et de la sortie fumées
- 12 Étape 8 - Mise en place les tubes cendrier et évacuation des fumées
- 13 Étape 9 - Fixation des coffrages perdus
- 14 Étape 10 - Fabrication du bouchon du cendrier
- 15 Étape 11 - Coulée du fond de protection
- 16 Étape 12 - Réalisation des coffrages perdus
- 17 Étape 13 - Positionnement des coffrages
- 18 Étape 14 - Coulée de béton réfractaire
- 19 Étape 15 - Retrait des coffrages perdus
- 20 Étape 16 - Fabrication du conduit d’alimentation bois
- 21 Étape 17 - Fabrication du bouchon d'alimentation en bois
- 22 Étape 18 - Réalisation de la grille
- 23 Étape 19 - fabrication de la remontée de flammes
- 24 Étape 20 - Fabrication de la cloche
- 25 Étape 21 - Découpe de la vitre
- 26 Étape 22 - Découpe du couvercle
- 27 Étape 23 - Peinture
- 28 Étape 24 - Installation
- 29 Étape 25 - Remplissage de sable
- 30 Étape 26 - Pose de la vitre
- 31 Étape 27 - Notice d'utilisation
- 32 Étape 28 - Entretien
- 33 Notes et références
- 34 Commentaires
Introduction
The Poelito is a wood-burning inertia stove for small and/or non-fixed dwellings (e.g. motor homes, yurts, caravans, mobile homes, narrow boats etc.). Such dwellings have the following characteristics: - they are less spacious inside and therefore only need a small amount of power to heat. Because of this, a conventional stove is often excessive as it heats the space up too quickly. It therefore needs to burn when it is not giving any real benefit which leads to pollution, soot deposits and poor performance. - Inertia is low which means that there is very little mass that can absorb excess heat and later release it. It therefore gets cold quickly once the source of heat has gone. A storage heater is the perfect answer to these problems.It stores a vast amount of heat and only needs to be burning for 2 hours every 12 to 24 hours; therefore the fire needs to be maintained for less time and heat can be given out over longer periods.
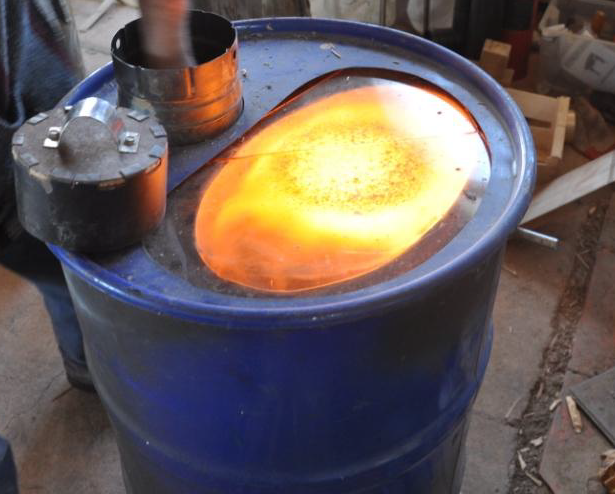
It works on the basis of combining “mass” with “portability”: the sand, which can be easily taken out, provides some of the inertia. If the stove is emptied out then it is easier to move. Whilst in use, the Rocket stove has a vertical feed mechanism which means wood can be supplied to it automatically using gravity. During combustion, the flame is sucked sideways across the bottom which allows air to be supplied from above the fuel. It is an original design guaranteeing efficiency but needs supervision when in use.
This tutorial has been produced by David Mercereau. This is a transcript of work carried out by Vital BIES, who are at the forefront of the idea behind the design of the Poelito and authors of the manual : https://drive.google.com/file/d/1SDJ3YHpDVMU- OoX5gND9xs4qdx8HZaNJ/view.
We would like to thank them for the work they have done for our community. Only the construction and operating instructions are included in this tutorial. Additional options are covered in the Vital manual which include the doors providing access for cleaning and adding extra features such as heated seating or a water heater. We will also not be covering the openings from which the sand is removed as this will add to the complexity of building it. The sand can be removed at any time from the top of the stove.
Matériaux
Metalwork
- Metal drum
* Pipework (tubes of differing diameters and T-tube)
- Sewer grate
Ironmongery:
- Self-tapping screws,
- Nuts and bolts
Concrete:
- Tamper for packing down and applying the concrete,
- Wire,
- An old cloth to put in the drum to deaden the noise whilst you are working.
Moulds:
- Plastic packaging (cellophane),
- Gaffer tape
- Masking tape,
- Corrugated cardboard,
- Cardboard tubes of 80, 100, 130mm diameters respectively
Outils
Health and Safety:
- Gloves,
- Goggles,
- Ear defenders/ earplugs,
- Dust masks
- First aid kit containing saline solution in case cements gets into eyes.
For Marking/Measuring:
- Tape measure,
- Pencil,
- Marker
- String (2 metres approx.),
- Spirit level
For the Metalwork:
- Hammer/sledgehammer/chisel,
- Pincers
- Adjustable pliers
- Tin snips (often more practical that using an electric device)
- Jigsaw + metal blades
- Clamp
- Drill + metal drill bits
- Wire brush for drill
- Angle grinder + cutting, grinding and flap disks,
- Sander (optional)
Concrete:
- Tarpaulin
- 1 litre measuring cup,
- Trowel
- 2 x 10 litre buckets, mixing tray, container or bin for mixing concrete
- Hand mixer
- Power drill with paddle or manual mixer or cement mixer (optional)
Casting:
- Cutter,
- Scissors,
- Handsaw
Étape 1 - Provision of Materials
There are a number of items that are needed to build this stove, which can either be bought from new or salvaged.
- The drums are easy to obtain, apart from the 120 litre ones, which are rare... and it can cost 50€ (excluding taxes) to buy one of this size from new.
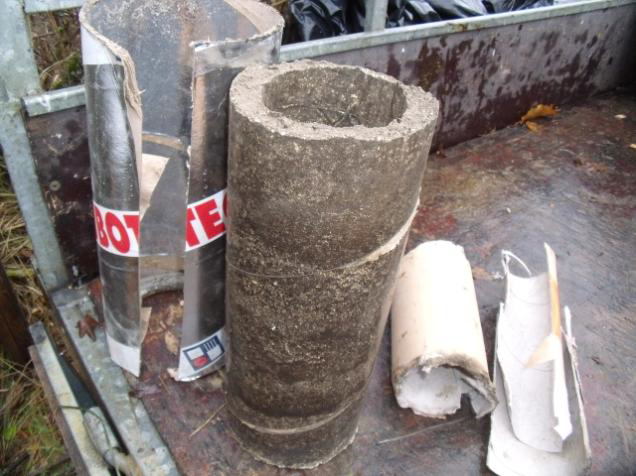
- The stove pipes, which form the fire pit, are very easy to salvage and will be considerably more expensive if bought from new.
NB 1: the 2 pipes that are used for the (fixed) ash tray and the (removable) feed pipe must have a male fitting at one of their ends to accommodate the stopper. NB 2: A rigorous approach must be adopted when producing the exhaust system, using pipes which are compatible with one another. It is important to avoid leaks (condensates as well as smoke) and also the risk of fire .
- Concrete can be made up of sand and fire cement but this will not be as durable as using chamotte concrete/fire cement. Chamotte consists of ground-up fire brick and must contain 25 to 40% alumina. To contact manufacturers of fire bricks, see list in the annex.Grain size of 0 to 10 mm grade is ideal, but 0 to 5 mm can also be used.
AVOID making concrete with ordinary cement or ‘black’ cement (unlike fire cement, it does not contain alumina)
- Vermiculite: mixed with cement acts to insulate the bottom of the container. You can find this in builder's merchants and garden centres mostly under the names of “Vermex” or “Effiperl” (NB the latter also contains perlite and is a French brand)
- Ceramic glass: this is specialist glass which does not expand when exposed to heat and is resistant to thermal shocks of up to 800°C ! You can buy it in the shops (for about €400 to €600 per m²) but you can also salvage it from old inserts, electric hobs, oven doors (inner glass only, otherwise it is likely to have little resistance to heat). Do not use ordinary glass ! To test salvaged glass, stand on a flat surface and put the glass onto a gas camping stove. If it resists the heat, then that is a good sign.
The final thing to do for the ‘crash test’ is pour a glass of cold water over it. If there is no reaction, then it is specialist glass. Do not put it on the grass in case it breaks.
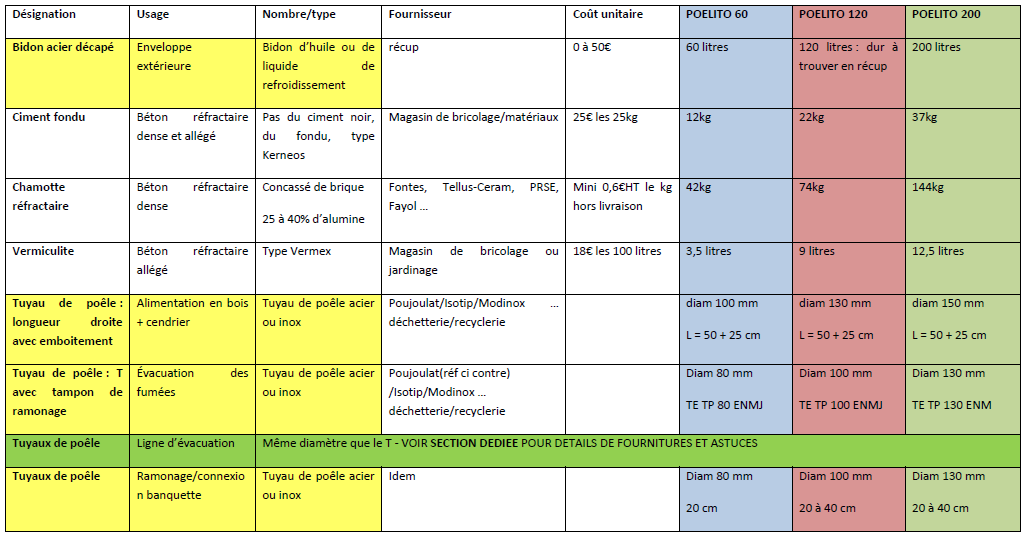
In this image, you will find the average supply costs for the different models. Taking the drum and the smoke exhaust out of the equation, the pipework will be a major part of the budget.
Étape 2 - How the Device is made up:
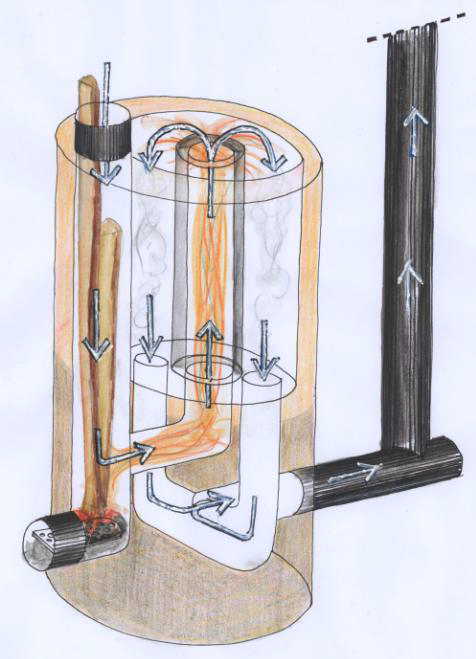
The idea behind the Poelito is to build a rocket stove inside a drum. The bottom of the drum is lined with an insulating mix of concrete; however the stove still needs to stand on a fire-proof support.The bottom part of the stove is cast in refractory concrete around a mould made of cardboard tubes. This is the area where the fire develops.Tubes are used to make the hollowed-out conduits: these are the routes which the smoke and fire take. The lower part forms the base of the fire pit and is a fixed body of material. The upper half is made up of removable metal pipes and is filled up with sand. This can either be left standing or transported separately. The fire pit can be closed to the outside either by a cast iron plate or by a pane of ceramic glass which can then be covered over by the drum lid as a finishing touch. The exhaust pipe is on the outside of the drum to which connection is made by a T joint with cap for cleaning out. Any pipes that go along the ceiling and to roof vents (or anything which goes outside of the dwelling) must be insulated.
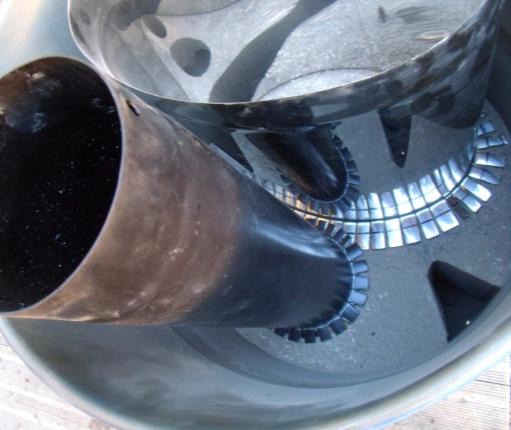
In the picture, you can see the bottom of the vertical feed pipe and the ash tray at the front and, behind, the pipe where the fire is lit . This together forms the burner.
Towards the back, there are 2 pipes where the smoke is forced down. These are situated on either side of the pipe where the fire lit. These pipes join up underneath by means of a manifold which directs the smoke towards the back in the direction of the smoke exhaust which forms the manifold. Connection to the exhaust pipe is by means of a T with cap.
Étape 3 - Sizingː
It is possible to make the Poelito in three different sizes which will be depend on the type of dwelling, the space that is to be heated, the exterior temperature and how well the dwelling is insulatedː
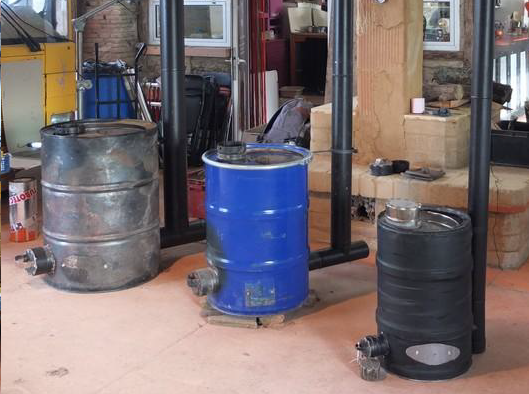
- PITO 60 made from a 60 litre drum (Ø35 cm H 65 cm): suitable for a truck or small caravan. Allow for 80kg
It is low power and low mass and is only suitable for small buildings with, at the very least, good insulation. As an example, in a large caravan (7m long), it is OK for temperatures down to 0°C but when the temperature drops to -5°C you cannot expect any more than 12°C in the morning if you lit a fire in the evening. Heavy use of an under-sized stove makes it less durable.The cooking area is fairly small and only allows use of small pans.
- PITO 120 is made with a 120 litre drum (Ø45 cm H 75 cm) and is suitable for a yurt of up to 5m in diameter if well insulated. It is perfect for a large caravan or a mobile home. Allow for 160 kg
This is the best compromise in the terms of bulk v power and transportability. It also is suitable for a studio. It has a good cooking area with the possibility of a water heating option.
- PITO 200 is made with a 200 litre drum (Ø60 cm H 90 cm) which can be used in a yurt which is larger than 5m in diameter, a small house, a small narrow-boat....allow for 250 kg.
This design is most suitable for lightweight dwellings with a floor-space of more than 20 m² or for a solidly-built, moderately insulated dwelling with a floor-space of more than 35 m² .A device which does not need to be moved very often and requires options such as water heating and heated seating would be suitable for this size of dwelling
Étape 4 - Fundamental Health and Safety Rules
User’s responsibility
The authors of this guide and the organisation which makes it available disclaim all liability resulting from the use of the Poelito. You are solely responsible for the implementation of the proposed device. Take precautions, remain calm and composed when in action. Above all, question any so-called “good ideas” you may have (e.g. “that will be OK like that”...)
Safety during construction
Always use safety equipment required for the task undertaken. Metal can be a dangerous material to work with and cement may be toxic if inhaled. Ensure you have an suitable work plan and only use the right tools to assemble pieces when machining (clamp, vice, locking pliers)
Installing the stove
Like all stoves, it is important to respect safety rules in order to not put yourself or your dwelling at risk.
Weight /foundations:This device is of a substantial weight.In a lightweight dwelling, it is imperative that you put something under the floor to withstand the weight and avoid it collapsing. As a minimum, you will need at least a block which stands on the hard surface to sufficiently support the floor. If needed, insert a transverse beam between existing supports (to form a joist) and a block for maximum effect. In conjunction with this, a ground protection mat is recommended as the floor can be relatively flexible and can become distorted in places due to the weight being concentrated in a given area (at points of bearing heavy loads). This means laying any such material on the floor that is sufficiently rigid and of a size to distribute the weight over a larger area than that on which the device normally stands.
Ground Protection: Where appropriate, it needs to be placed on a thick metal plate which is large enough to distribute the weight. If installing the device on top of combustible material e.g. a plank of wood, the device must be lifted up to allow air flow underneath or placed onto an additional mass or thick insulation.
Spacing between walls:The stove must be placed 15 cm minimum away from all walls. If there is less than 45 cm between the stove and nearest wall, it must be protected with fireproof insulation such as rockwool. It must not under any circumstances be in contact with combustible material.
Conduits:The smoke exhaust pipe must comply with current standards. These are basic standards and prevent fire from breaking out in the dwelling. There must be a safe distance of 30cm between any wall made of combustible material and a single-skin pipe. A double-skin pipe is to be used for going up inside the roofing and for outside (with a safe distance of 10 cm for it to go through the roofing). A build-up of heat must be avoided at all costs: the 10 cm collar which goes around the pipe where it goes through the roof should not be left unfilled. It will need to be filled with fire-retardant insulation. The temperature could rise sufficiently to catch fire in an empty space (especially if it is closed off from the outside).
Chimney Height: The layout will have an effect on air circulation. Obstructions which cause air disturbances should be avoided. The smoke exhaust pipe, in particular, must 40cm higher than the top of the roof. For flat roofs, it must be higher than 120 cm (in this case, it must be properly secured). According to standards, the pipe must also be higher than any obstruction which is less than 8m away (e.g. trees)
Choosing a place to put the stove:Where you put the stove will be often dictated by the possible paths in which the smoke ducts in the roof can take. Clearly, you need to take into consideration the layout of the room. Avoid raising the device up too much as the room should be heated at ground level. If it is placed next to a wall, you should not only pay attention to safe distances but also to the accessibility needed for drawing air in to light the fire and for cleaning out.
Étape 5 - Different types of Concrete: how to make them up and what goes in them.
As part of the process of making the Poelito, you will need to make up concrete. Fire cement is corrosive to the skin and an irritant to the eyes and respiratory tracts: handle using gloves, wear goggles and an anti-dust mask.
You need to make two different mixesː
- An insulating mix used for the bottom of the drum and the heat riser;
- And, for the remainder, a dense mix which used to store in the heat.
You can find details below on how to make it and what materials are needed.
Reference to this will be made at different times during this tutorial.
How to make up the refractory concrete
- 1 part water
- 1 part fire cement
- 1.3 parts vermiculite
- Calculate the volumes needed for casting and increase it by 20 %
- Put the water into the container in which you are going to mix it all up.
- Pour in the cement.
- Mix it up until you have a smooth paste
- Pour all the vermiculite in and mix in until you have an even mixture. The granules should have all turned black and the mix should be sufficiently wet.
- Add more water if necessary.
How to make up the dense refractory concrete
- 1 part water
- 1.3 fire cement
- 3.3 parts refractory chamotte
- Calculate the volumes needed for casting and increase it by 10 %
- Put the chamotte into the container where you are going to make the mix.
- Pour in the cement on top.
- Mix them together dry.
- Add ¾ of the volume of water needed
- Mix
- Gradually add more of the remaining water to adjust consistency
As with all binding agents which set hydraulically, losing moisture or drying out too quickly inhibits chemical reactions needed for it to set.
- Cover whilst it is setting if the weather is hot, do not make mortar in direct sunlight or in freezing weather. It sets fairly quickly: in about ½ hour.
- Only make up amounts that you can work with within this time-frame.
- Avoid contact with rainwater which may be acidic and prevent the binding agent from working properly.
- Avoid using warm water as it speeds up the setting process.
Étape 6 - Préparation du bidon
Décapage
Il est préférable de décaper le bidon avant de se lancer dans la construction. Dans tous les cas il faut le faire avant les premiers feux qui feront cloquer la peinture qui n’est pas prévue pour résister aux hautes températures. Le plus simple pour décaper est d’utiliser des disques à décaper sur une meuleuse. Il est également possible d’utiliser une ponceuse ou de mettre une brosse métallique sur une perceuse.
Découpage
A moins d’avoir un bidon à couvercle amovible avec cerclage, il faut découper le dessus du bidon. Le dessus du bidon sera le couvercle du poêle une foi finie. Il faut donc éviter de l’abimer, et choisir plutôt le fond du bidon (qui est complet) que le dessus (qui comporte des bondes). C'est-à-dire prendre le bidon à l’envers.
Muni d’une disqueuse et des équipements de protection pour les yeux, les oreilles, et les mains, découper juste sous le bourrelet, en prenant soin de ne pas couper la deuxième épaisseur de tôle. Ainsi le couvercle pourra être replacé. La scie à métaux fonctionne aussi très bien. Astuce : entamer le métal à la disqueuse (facile) et finir à la scie (précis). Il faut penser à protéger le sol avec une bâche car les restes de liquide présent dans le bidon risquent de s’échapper par la zone découper.
Nettoyage
Maintenant que le bidon est ouvert, il faut le nettoyer car il contient surement encore un peu d’huile. Utiliser de la sciure ou du sable pour éliminer le plus gros du résidu de contenu. Traiter ce déchet selon sa composition, probablement comme un déchet toxique à placer en déchetterie.
Étape 7 - Réalisation des trous du cendrier et de la sortie fumées
Le bidon doit être percé de deux trous diamétralement opposés permettant d’introduire des tuyaux. À l’avant le tube de diamètre 100/130/150 mm servira d’entrée d’air et d’évacuation des cendres. À l’arrière le tube de 80/100/130 mm servira à connecter le tuyau d’évacuation des fumées (respectivement les diamètres du modèle Pito 60/120/200).
Les deux tubes doivent être à 6 cm du fond du bidon. C’est l’épaisseur de la couche de béton du socle. Il faut faire attention au rebord extérieur pour prendre la côte (c’est 6 cm depuis le fond, auxquels il faut ajouter l’épaisseur du rebord, soit environ 1,5 cm).
- À l’aide d’une ficelle, faire le tour du fut, marquer au feutre sur la ficelle l’endroit où elle se rejoint : cela donne le périmètre du fût.
- Plier la ficelle en deux en deux et faire une nouvelle marque à la moitié : le demi périmètre
- Tracer les trous au marqueur, autour des tubes à insérer
- Utiliser la ficelle pour positionner les 2 centre des ouvertures, en face à face.
- Découper les deux cercles en restant bien à l’intérieur du trait.
- Marteler le bord du trou (vers l’extérieur) pour l’ajuster au tube.
- Conserver les cercles découpés pour pouvoir faire les bouchons du cendrier et de l’alimentation
Étape 8 - Mise en place les tubes cendrier et évacuation des fumées
Côté cendrier
- Enfiler le tube de 100/130/150 dans son trou préparé sur le bidon, côté mâle à l’extérieur, avec le bourrelet contre la paroi extérieure du fût.
- Par l’intérieur, tracer sur le tube la jonction avec la paroi du fût
- Enlever le tube et couper 15 mm plus loin que le trait.
- Découper ensuite les ailettes dans cette bande de 15 mm en arrêtant la coupe sur le trait, à la cisaille, à la scie sauteuse ou à la meuleuse. Elles doivent être larges de 1cm, pour que les ailettes soient faciles à replier.
- Une fois les ailettes découpées remettre le tuyau en place et replier les ailettes.
- Si besoin, placer quelques rivets ou vis auto-foreuses pour le bloquer solidement.
Côté évacuation des fumées
Côté évacuation des fumées il faut fixer de la même manière une manchette courte avec emboitement femelle. L’emboitement femelle donne à l’extérieur.
Étape 9 - Fixation des coffrages perdus
Les coffrages qui seront réalisés prochainement risquent de bouger lors des coulées de béton, il faut donc les arrimer pour maintenir de bonnes épaisseurs.
- Retourner le fut
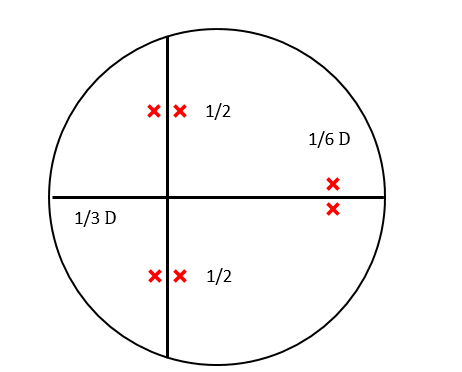
- Percer 3 paires de trous au diamètre du fil de fer selon le schéma ci contre. la précision n'est pas très importante
- Passer des boucles de fil de fer d’environ 1 mètre. Elles viendront maintenir les réservations en cartons pendant le coulage du béton.
Les fils de fer doivent pointer à l'intérieur du bidon
Étape 10 - Fabrication du bouchon du cendrier
Ce bouchon permet de fermer le cendrier et de régler l'entrée d'air primaire.
- Prendre un bout de tube qui s’emboite sur la sortie (mâle) du cendrier.
- Couper en ajoutant 15 mm à la longueur nécessaire.
- Dans cette bande de 15 mm, découper des ailettes tous les centimètres, en essayant d’en avoir un nombre pair, ce sera plus joli.
- Plier une ailette sur deux vers l’intérieur.
- Réutiliser le cercle découpé dans le bidon pour fermer le couvercle.
- Poser le cercle sur les ailettes repliées
- Replier les autres ailettes par-dessus.
- Ajouter une poignée et une petite trappe de réglage de l’entrée d’air.
Le système de réglage de l'air primaire (au cendrier) doit être précis et efficace. Il permet de contrôler la puissance de combustion.
Étape 11 - Coulée du fond de protection
Le fond du poêle est composé de 2 couches différentes : 3 cm de mélange isolant puis 3 cm de mélange dense. Elles ont pour rôle d’isoler le fond du fût de la chaleur pour protéger le sol.
- Marquer à l’intérieur du fût la hauteur à laquelle doivent s’arrêter les deux couches, soit 3 et 6 cm.
- S’assurer que le bidon est sur une surface de niveau quand le béton est coulé.
Mélange isolant
- Calculer le volume nécessaire de mélange isolant https://drive.google.com/file/d/1vtasWBKad9EEFBpeoNq38jT7SOasalra/view
- Préparer le mélange en se référant à la recette et préparation du mélange isolant en étape X
- Couler le mélange isolant jusqu’à atteindre les 3cm
- Compacter le mélange au moyen d’un tasseau lors de la mise en œuvre.
Attention à bien faire ressortir les fils de maintien du moulage. Attendre deux heures que la première couche soit sèche en surface pour couler le mélange dense.
Astuce : une fois que le mélange a commencé à prendre, scarifier la surface du béton pour que la seconde couche accroche bien.
Mélange dense
- Calculer le volume nécessaire de mélange dense https://drive.google.com/file/d/1vtasWBKad9EEFBpeoNq38jT7SOasalra/view
- Préparer le mélange en se référant à la recette et préparation du mélange dense en étape X
- Couler 3cm de mélange dense jusqu’à atteindre les 6cm
- Compacter le mélange au moyen d’un tasseau lors de la mise en œuvre.
Attention à bien faire ressortir les fils de maintien du moulage. Attendre 24h avant de couler le reste
Étape 12 - Réalisation des coffrages perdus
Il va falloir maintenant faire les coffrages perdus pour couler le béton réfractaire. C'est-à-dire créer les conduits pour la circulation du feu et des gaz. Pour cela, à l'aide de cartons il faut réaliser les moules des différents conduits. Une fois le béton coulé, il faudra les retirer. Il faut donc les faire suffisamment solides pour qu’ils résistent à la pression du béton tout en étant le plus simple à retirer une fois l’ensemble sec.
L'épaisseur minimum de béton entre les différentes pièces et entre les pièces et le fût doit être de 3 cm. En dessous, le béton risque de fissurer et de rendre le poêle peu durable. Il y a aussi le risque d’une mauvaise circulation des fumées, donc un poêle qui marche mal. Il faut donc penser à ça lors de la construction des moules et surtout lorsqu’ils sont placés dans le bidon pour couler le mélange.
Découpe
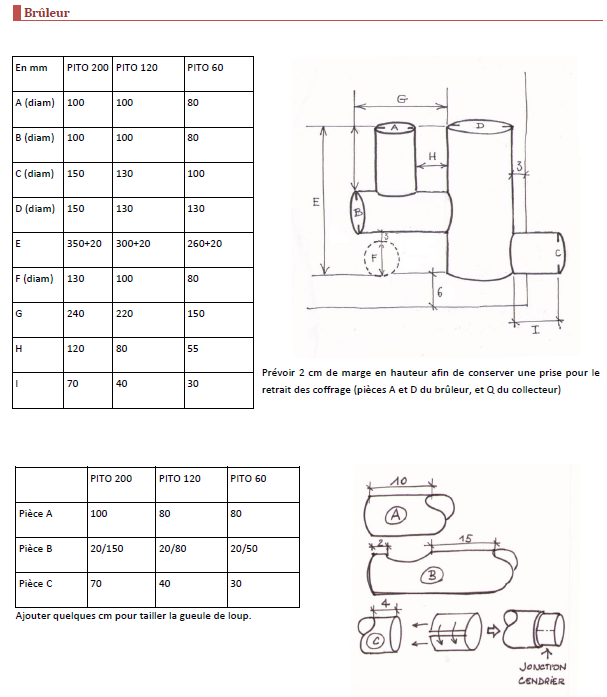
- Pour raccorder deux tuyaux, comme ce sont des cylindres, il faut faire une gueule de loup. Lors des découpes des tubes en carton, ajouter quelques cm aux côtes listées dans les tableaux. Par ex. pour raccorder un tube de 100mm sur du 100mm, la profondeur de la gueule de loup est de 5cm.
La découpe se fait à la scie pour le carton épais (voir à la scie sauteuse, très pratique) et au cutter.
- Prendre les dimensions sur les tableaux en image.
Assemblage
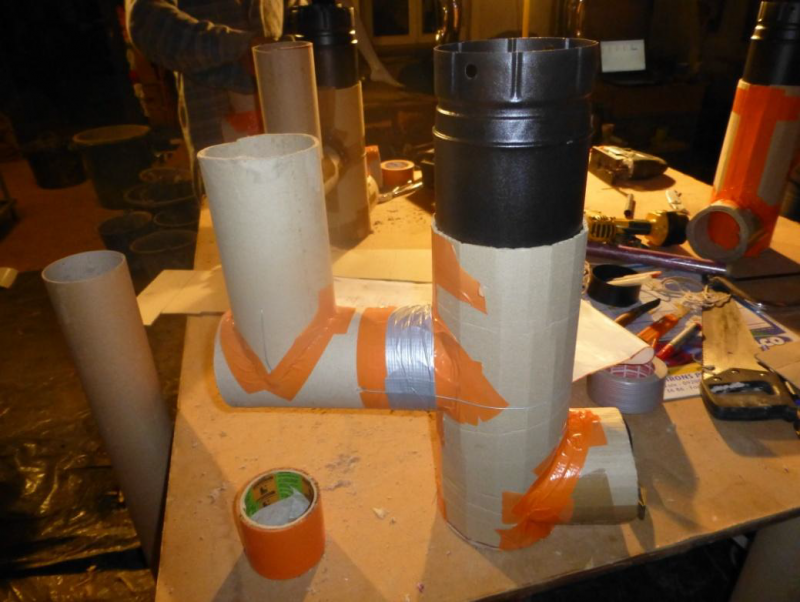
- Emballer chaque tube individuellement dans du plastique de protection.
- Positionner les tubes les uns par rapport aux autres en respectant les mesures données dans les plans.
- Maintenir les tubes entre eu avec du scotch orange.
Attention à bien couvrir les jonctions pour que le béton ne pénètre pas dans les tubes.
ASTUCE : Pour la connexion avec le cendrier ou l’évacuation des fumées, faire une réduction avec un autre morceau de carton assez rigide. Enlever une bande pour le réduire en diamètre pour pouvoir l’enfiler dans le moule en carton.
ASTUCE : Prévoir 2 cm de marge en hauteur afin de conserver une prise pour le retrait des coffrage
ASTUCE : Une fois le collecteur et le tube horizontal de départ de flamme réalisés (les plus durs à retirer) il est possible de les découper dans le sens de la longueur, en 2 ou 3 morceaux puis de les ré-assembler. Ils seront plus faciles à retirer.
Étape 13 - Positionnement des coffrages
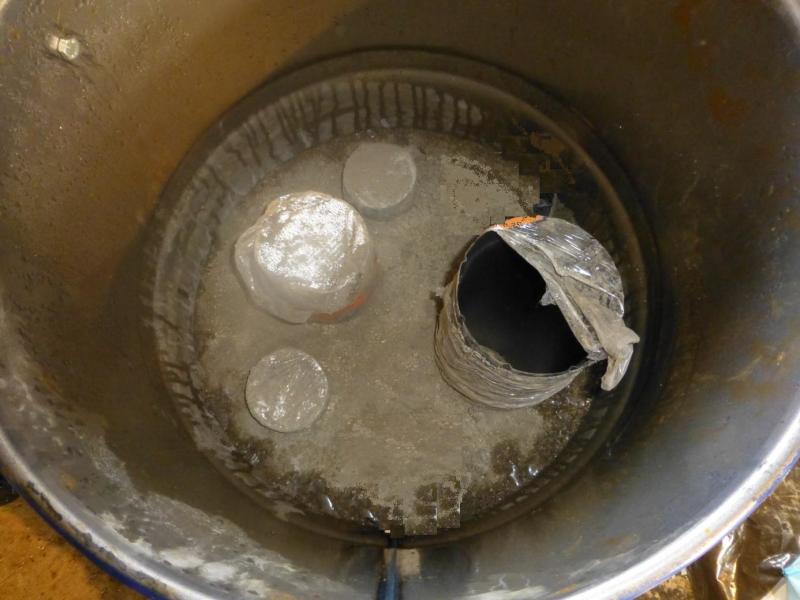
Une fois les coffrages perdus en carton finis et enveloppés, il faut les placer dans le fût et les fixer.Commencer par l’évacuation des fumées :
- Emboiter le tube en carton dans l’ouverture métallique du bidon,
- Le Fixer avec les 2 fils de fer en serrant bien.
- Couper les sur-longueurs de fil de fer inutiles.
Faire de même avec le coffrage du cendrier
- Accrocher les fils de fer en passant par-dessus la branche horizontale de départ de flammes.
- Caler les différents éléments entre eux avec des morceaux de bois, ils permettront de maintenir les écartements entre les éléments pendant la coulée du béton dense.
Étape 14 - Coulée de béton réfractaire
- Indiquer avec un marqueur ou un scotch la hauteur à laquelle doit s’arrêter le béton dense à l’intérieur du bidon à partir du béton du fond (350/300/260).
- Préparer le mélange en se référant à la recette et préparation du mélange dense en étape X
- Couler le béton par passe de 5 cm maximum.
- Tasser le béton après chaque passe de manière homogène. Si le béton est trop tassé d’un côté, le coffrage en carton va être repoussé.
- S’assurer que les épaisseurs sont régulières et symétriques, les coffrages ne doivent pas bouger. Si besoin, replacer les cales au fur et à mesure du remplissage.
- Répéter jusqu’à arriver à la hauteur indiquée.
Étape 15 - Retrait des coffrages perdus
Le retrait des coffrages peut se faire 12h après le coulage. C’est une étape assez fastidieuse.
- Utiliser des gants pour éviter de s’abîmer les mains contre le béton en les glissant dans les trous.
- Arracher à la main ou avec une pince tout ce qui est accessible par les orifices.
- Une fois le maximum enlevé, faire du feu dans les trous pour brûler ce qui reste et pouvoir l’enlever.
Utiliser de l’alcool à bruler facilite la combustion des éléments à retirer, attention cependant à ne jamais mettre d’alcool sur le feu. Une fois le feu démarré, utiliser des petits bouts de bois secs pour continuer la combustion.
Étape 16 - Fabrication du conduit d’alimentation bois
La longueur du conduit d'alimentation bois doit être ajustée pour que son extrémité supérieure traverse le couvercle et puisse recevoir un bouchon. Néanmoins il doit être le plus court possible, car l’effet de tirage qui se produit ici à l’allumage s’oppose à celui de la ligne d’évacuation. Plus il est court, plus c’est facile à allumer.
- Prendre la longueur entre le niveau du béton et le haut du fût, y ajouter 15mm pour les ailettes et la hauteur du bouchon. Le haut du tube doit être un emboitement mâle pour recevoir le bouchon.
- Découper le tube.
- Réaliser des ailettes de 15mm de haut tous les centimètres sur la partie basse.
- Replier une ailette sur deux vers l’extérieur
Étape 17 - Fabrication du bouchon d'alimentation en bois
Pour le conduit d’alimentation il faut procéder de même manière que pour celui du cendrier sans ajouter d’entrée d’air :
- Prendre un bout de tube qui s’emboite sur la sortie (mâle) de l'alimentation.
- Couper en ajoutant 15 mm à la longueur nécessaire.
- Dans cette bande de 15 mm, découper des ailettes tous les centimètres, en essayant d’en avoir un nombre pair, ce sera plus joli.
- Plier une ailette sur deux vers l’intérieur.
- Réutiliser le cercle découpé dans le bidon pour fermer le couvercle.
- Poser le cercle sur les ailettes repliées
- Replier les autres ailettes par-dessus.
- Ajouter une poignée
Pour ajuster l'air secondaire il suffit de poser le couvercle entrouvert. En fonctionnement le couvercle ne sera jamais totalement fermé. A l’arrêt il est fermé, il évite que le poêle chaud continue d’aspirer de l’air dans la pièce, de le chauffer, et de l’évacuer dehors.
Étape 18 - Réalisation de la grille
Le système marche d'autant mieux que le foyer est équipé d'une grille, avec l'air primaire arrivant dessous (sur le cendrier). Cela permet de réduire les braises au fur et à mesure que tu recharges.
- Découper la grille d'égout, selon une forme de langue, pour qu'elle se place au milieu de la hauteur du cendrier, elle doit aller jusqu'au fond du foyer pour empêcher les braises de tomber.
Étape 19 - fabrication de la remontée de flammes
Pour faire ce tube en béton il faut fabriquer un moule à l'aide de 2 tubes de carton placés l’un dans l’autre. Le diamètre du tube intérieur doit correspondre au coulage (100/100/80). Le tube extérieur doit avoir un diamètre d'environ 6cm de plus que celui de l’intérieur pour permettre d'avoir un tube d'épaisseur 3cm. Il devra être plus court que la cloche de 2 à 3 cm afin de laisser un espace sous la vitre pour la circulation des fumées.
- Couper le tube en carton extérieur
- Habiller la surface intérieure de plastique.
- Couper le tube en carton intérieur
- Habiller la surface extérieure de plastique
- Découper deux rondelles de carton qui serviront d’écarteurs entre le tube intérieur et le tube extérieur.
- Les recouvrir de plastique.
- Placer les rondelles dans le fond pour fermer le moule
- Remplir avec du mélange isolant (ciment fondu et vermiculite), par petites quantités.
- Répartir le mélange et tasser le fortement avec un tasseau tout fin.
ASTUCE : Si vous n’avez pas de tube en carton du bon diamètre vous pouvez les réaliser en roulant du carton sur lui-même. Roulez-le en ayant les « veines » du carton dans la hauteur.
ALTERNATIVE : Pour les Pito 60, il est possible de faire un coffrage en mélange isolant ou sinon découper un tube dans du métal épais, par exemple dans un extincteur (pas en aluminium) car l’espace est très étroit.
Étape 20 - Fabrication de la cloche
La cloche doit faire le tour de l'ensemble du tube de remontée des flammes et des deux tubes d'aspiration des fumées. Il faut essayer de faire la cloche la plus petite possible pour pouvoir mettre un maximum de sable autour.
Mise en forme
- Effectuer une pression sur la cloche pour qu’elle se déforme et devienne ovale.
Attention : Éviter de lui donner une forme de haricot car elle risque de se déformer dans le temps. Avec les cycles de chauffe et refroidissement, le sable se compacte et exerce une forte pression sur les éléments métalliques. La cloche peut alors être comprimée et se déformer si sa forme n’est pas simplement ovale.
- Positionner la cloche autour des trous d’évacuations des fumées et de la remontée des flammes.
Si la cloche est trop grande il faut la rétreindre (découper et visser) pour l’ajuster aux éléments.
Ajustement en hauteur
- Prendre la longueur entre le niveau du béton et le haut du fût, y retrancher 2-3 mm de marge et l’épaisseur du verre céramique et ajouter 15mm d’ailettes
- Reporter ces mesures sur la future cloche et poser un scotch sur tout le périmètre, ce sera la marque à suivre lors de la découpe
- Découper la cloche
- Indiquer la hauteur finale de la cloche (distance entre le niveau du béton et le haut du fût, y retrancher 2-3 mm de marge et l’épaisseur)
- Réaliser les ailettes du côté où la découpe est la moins propre.
- Plier toutes les ailettes vers l’extérieur, elles permettront à la cloche de tenir sur le béton.
Étape 21 - Découpe de la vitre
La vitre doit recouvrir toute la cloche. Avant de la faire découper, vérifiez les cotes sur votre poelito, il est important de s’assurer que le patron soit de la bonne taille.
Ce doit être un verre vitrocéramique, qui résiste aux hautes températures. Voir Etape n°1 - Approvisionnement matériel
Si vous l’achetez dans un magasin de bricolage (400 – 700 €/m²) faites la découper sur place.
(PATRONS)
Étape 22 - Découpe du couvercle
Le couvercle ferme le haut du poelito, il n’a pas de rôle particulier dans le système.
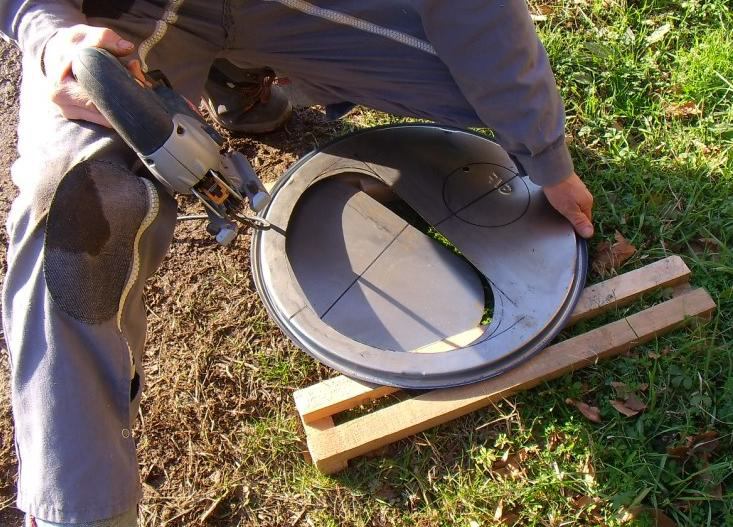
- Tracer sur le dessous du couvercle le conduit d'alimentation ainsi que la cloche.
- Découper à la scie sauteuse
- Positionner sur le poêle
Étape 23 - Peinture
La construction du poêle est terminée, avant de l’installer dans son futur habitat, il mérite un coup de peinture.
- Utiliser des peintures spéciales pour poêles qui résistent aux hautes températures.
Étape 24 - Installation
La construction du Poelito est terminée! il est l'heure de le sortir de l'atelier pour lui trouver une place à long terme pour en profiter durant les longues soirées d'hiver.
Attention à bien respecter les règles de sécurité rappelée dans l'Etape n°4
Étape 25 - Remplissage de sable
Une fois l’appareil installé au bon endroit, sur un socle approprié, avec son tuyau installé, il faut commencer par mettre en place la cloche et le conduit d’alimentation.
- Poser le conduit d’alimentation en bois et la cloche à blanc (sans mortier ni joint) et ajuster les écartements.
- Poser le couvercle par-dessus pour vérifier aussi les alignements.
- Utiliser les ailettes pour ajuster (replie- les pour redresser un conduit un peu penché).
- Lorsque tout est en place, déposer sur la jonction ailettes/maçonnerie des petits paquets de mortier d’argile, en les répartissant progressivement tout autour jusqu’à tout recouvrir. Il s’agit d’éviter que le sable ne fuit par les espaces entre les ailettes.
Mortier d'argile : terre argileuse (qui colle) et du sable en proportions variables. Généralement 1 argile pour 3 à 5 sable, avec ce qu’il faut d’eau pour en faire des boules qui se tienne et qui collent. Si pour un enduit ou de la maçonnerie il vaut mieux s’assurer d’avoir les proportions idéales, ici ça n’a aucune importance.
Étape 26 - Pose de la vitre
Poser la vitre sur la cloche sans joint.
- Faire quelques feux pendant lesquels le sable va se tasser.
- Ajouter du sable quand c’est nécessaire.
- Mettre du sable de niveau jusqu'au haut de la cloche
- Poser par-dessus de la tresse minérale pour porte de poêle (disponible en magasin de matériaux)
- Replacer la vitre.
- Replacer le couvercle, la mise en place est terminée.
- Profiter du poêle jusqu’au printemps !
Étape 27 - Notice d'utilisation
Préparation du combustible
Il faut du bois très sec sans quoi le poêle chauffera mal et s’encrassera. Il faut 2 types de combustibles :
- le bois de préchauffage : très fin et court, de l’ordre de 10 à 20 cm de long pour un diamètre maximum de 4 à 5 cm, idéalement du résineux qui est plus facile à allumer.
- le bois de chauffe : de longueur variable (de 30 cm jusqu’à la hauteur sous plafond) plutôt bien droit et assez fin. *
Si les 10 à 15 cm de section du conduit d’alimentation (selon le modèle) sont remplis avec une seule grosse bûche ça ne brûlera pas bien du tout ! Il faut des diamètres variés et complémentaires afin de bien remplir le conduit. Le bois tordu empêche un bon remplissage, il faut donc s’arranger pour recouper les branches là où elles sont tordues, quitte à avoir des longueurs différentes. Sinon toute essence fera l’affaire, à condition que le bois soit bien sec.
Chargement de la flambée de préchauffage
Placer dans le conduit d’alimentation, depuis l’ouverture supérieure, dans cet ordre-là :
- une poignée d’allume feu bien aéré (carton ou papier déchiqueté, copeaux grossier ...)
- une poignée de cagette bien brisée,
- Une poignée de petit bois de préchauffage fendu très fin (idéalement du résineux),
- une poignée de bois de préchauffage de diamètre plus important (4 à 5 cm maxi)
- Vérifier que le départ horizontal vers la zone de flamme n’est pas obstrué par le bois.
- Vérifier le niveau de cendres et vider s’il y en a trop avant de passer à l’allumage.
Amorçage du tirage et allumage
Placer un peu de cendre ou de sable dans le bouchon du T au pied de la ligne d’évacuation (seulement la 1ère fois)
- verser 5cl d’alcool à brûler dessus.
- Allumer et replacer rapidement le bouchon.
- Allumer le feu au niveau du cendrier
- replacer les 2 couvercles (dessus de l’alimentation et cendrier) en position entrouverte. Le tirage produit par la combustion de l’alcool assure un allumage rapide et idéal à chaque fois.
- Si de la fumée s’échappe par le haut, refermer totalement le couvercle d’alimentation et réduire l’ouverture du cendrier.
==== Chargement ==== Dès que la charge de préchauffage est bien allumée, ajouter par-dessus, sans tasser, suffisamment de bois pour remplir l’intégralité de la section d’alimentation. C’est une condition importante pour que le bois brûle correctement : la combustion est meilleure si tu remplis toute la section. Le feu se développe d'avantage dans la zone de flamme, et moins dans le conduit d'alimentation.
Attention à ne pas trop serrer le bois qui doit pouvoir descendre naturellement au fur et à mesure qu’il brûle.
Gestion du feu et rechargement
Vérifier de temps en temps que le bois brûle seulement en partie inférieure et ne se bloque pas. Secoue ton bois pour l’aider à descendre au besoin. Réglage du tirage : il faut conserver une petite ouverture sur le cendrier pour éviter l’accumulation de braises. Si cette ouverture est trop grande le feu peut s’emballer jusqu’à remonter et fumer par en haut. L’essentiel de l’air doit arriver par le haut du conduit d’alimentation : la réduire de moitié au maximum mais jamais d’avantage !
Si la vitre noircit 3 possibilités : le bois n’est pas sec, le régime de combustion est trop intense (trop d’air au cendrier), l’arrivée d’air par en haut est trop faible.
<u>ATTENTION : </u> Pendant la flambée, l’appareil demande peu de surveillance et d’entretien. Mais avec du bois très long la combustion peut remonter le conduit d’alimentation et s’emballer, surtout avec du résineux (palette). Si c’est le cas, vaporiser un peu d’eau dans le conduit d’alimentation pour le refroidir.
Étape 28 - Entretien
Entretien courant
Le seul entretient à effectuer régulièrement est le vidage des cendres. Si le niveau de cendres est trop important une accumulation de braises va se produire, jusqu’à boucher le départ latéral vers la zone de flammes : c’est l’arrêt d’urgence assuré, après un bon enfumage !
Entretient annuel La loi oblige tout utilisateur de poêle à bois à ramoner le conduit d’évacuation des fumées 2 fois par an dont une fois en période de chauffe. Pour ramoner le conduit glisse un hérisson nylon de diamètre approprié par le tampon de ramonage. Va jusqu’en haut puis redescend. Si tu fais ça dans un poêle encore chaud le tirage va inciter les poussières à sortir par en haut plutôt qu’à sortir vers l’habitat. Il est aussi important de vider le dépôt de cendres qui va se produire en pied de circuit de flamme et surtout au fond du collecteur de fumées. C'est l’endroit préféré des cendres volantes pour se déposer, d'où l'utilité des trappes de ramonage en face du collecteur.
Notes et références
Retrouvez tout et même plus encore sur le site de l'association des2mains :
* https://sites.google.com/site/assodes2mains/poele/le-poelito
* https://drive.google.com/file/d/1SDJ3YHpDVMU-OoX5gND9xs4qdx8HZaNJ/view?usp=sharing
plein d'autres informations sur l'usage du poelito et d'autres solutions sur le site de David :
* http://david.mercereau.info/
et
* https://fr.wikipedia.org/wiki/Po%C3%AAle_de_masse_rocket
* https://fr.wikipedia.org/wiki/Po%C3%AAle_de_masse
Published



 Français
 English
 Deutsch
 Español
 Italiano
 Português