(Page créée avec « Like before, you will see a second menu. This time, choose '''the third line 'Change Keyboard Layout''''. It could take some time before the window is displayed (in genera... ») |
(Page créée avec « It is absolutely necessary that a keyboard be connected to be able to configure the keyboard! ») |
||
| Ligne 122 : | Ligne 122 : | ||
Like before, you will see a second menu. This time, choose '''the third line 'Change Keyboard Layout''''. It could take some time before the window is displayed (in general, all the steps for the keyboard can be a bit long). | Like before, you will see a second menu. This time, choose '''the third line 'Change Keyboard Layout''''. It could take some time before the window is displayed (in general, all the steps for the keyboard can be a bit long). | ||
| − | + | It is absolutely necessary that a keyboard be connected to be able to configure the keyboard! | |
Sur la nouvelle fenêtre, '''validez directement sans changer le type de clavier. Sauf cas particuliers, ce devrait être le bon.''' Une nouvelle autre fenêtre apparaît, choisissez « '''Autre''' ». Sur la nouvelle fenêtre, choisissez le clavier « '''Français''' », puis la disposition '''« Par défaut »,''' « '''Pas de touche''' « '''compose''' » », et enfin « '''Non''' ». | Sur la nouvelle fenêtre, '''validez directement sans changer le type de clavier. Sauf cas particuliers, ce devrait être le bon.''' Une nouvelle autre fenêtre apparaît, choisissez « '''Autre''' ». Sur la nouvelle fenêtre, choisissez le clavier « '''Français''' », puis la disposition '''« Par défaut »,''' « '''Pas de touche''' « '''compose''' » », et enfin « '''Non''' ». | ||
Version du 6 février 2023 à 10:05
Description
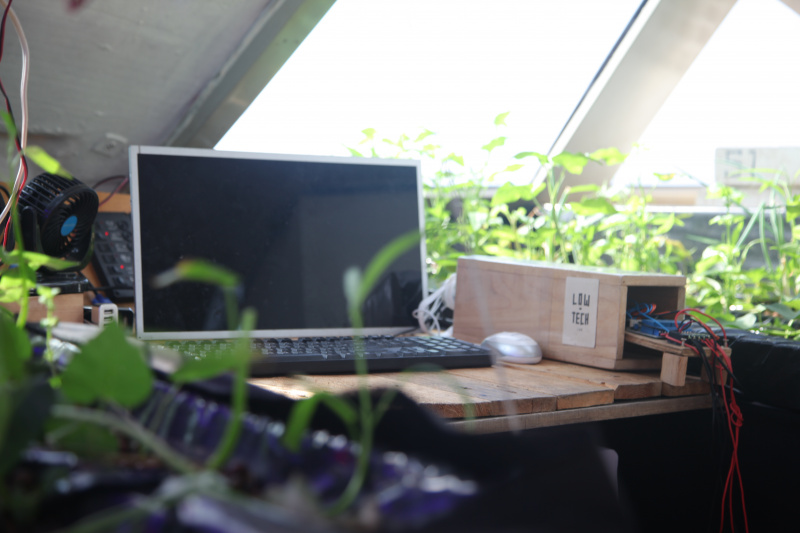
A basic computer model that still meets most of our daily needs. All for a price not exceeding 30 euros!
Sommaire
Sommaire
- 1 Description
- 2 Sommaire
- 3 Introduction
- 4 Étape 1 - Optional: Prepare your SD card (if a Raspbian image is not already burnt on it)
- 5 Étape 2 - First system startup with the prepared SD card - Install Raspbian
- 6 Étape 3 - Raspbian configuration
- 7 Étape 4 - Consulter Wikipedia hors ligne.
- 8 Étape 5 - Option 1 : Utiliser Kiwix comme Lecteur
- 9 Étape 6 - Option 2: Utiliser Kiwix comme Hotspot
- 10 Notes et références
- 11 Commentaires
Introduction
Today we will focus on a subject on the border between high and low tech: the computer! This extremely useful tool, which has become indispensable for most of us, is often too over-equipped for our usage. This obviously has an impact on its price, which excludes a large part of the world. Not to mention the environmental impact, especially because of the extraction of minerals needed for their manufacture, which, in most cases are rarely recycled at the end of their lifespan.
Today, we offer you a very basic computer model that still meets most of our daily needs:
- Classic "desktop processing" (document writing, creating slideshows, etc)
- "Internet browsing" (social media, sending emails, etc)
- A "very basic multimedia use" (no photo editing, video, etc)
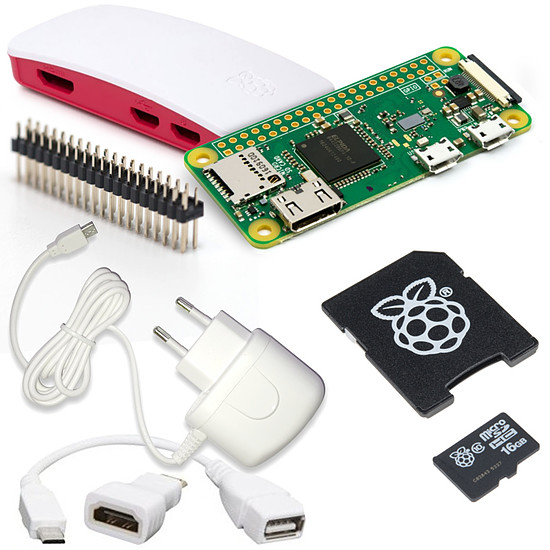
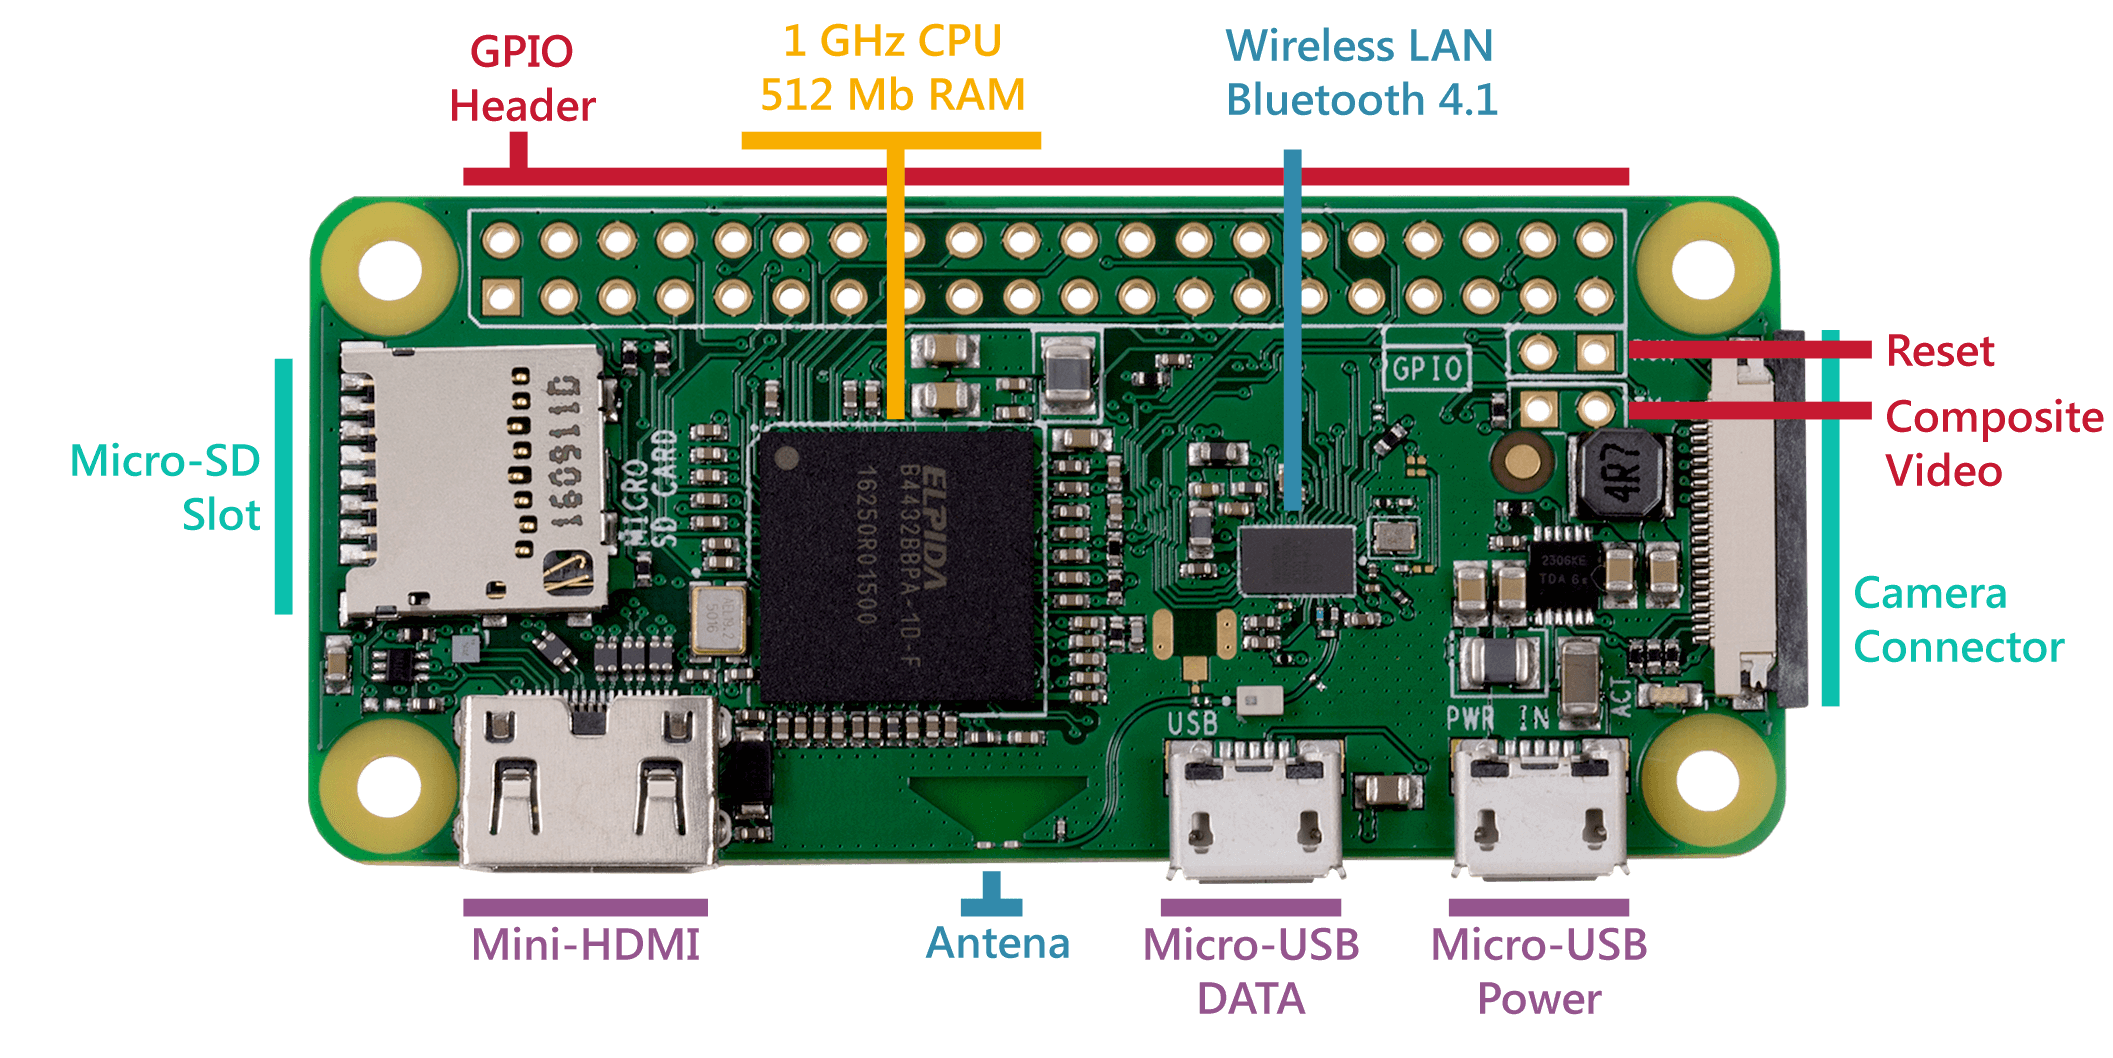
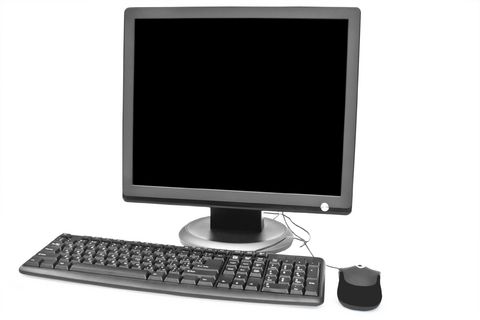
All of this for a price not exceeding 30 euros! To do this, we will use a mini-computer, the "Rasberry Pi", in its simplest version the Rasberry Pi Zero W. For the other computer hardware (screen, keyboard, mouse) we will use those salvaged from old computers.
Be it a school that wants to create a computer lab, an individual who wants a machine for his home, a grandparent who wants to discover IT or an aspiring developer who wants to get into Linux, there are many reasons to build a desktop PC with Raspberry Pi.
Together, let us see how you can assemble your own desktop PC running on Linux built on top of Raspberry Pi.
Matériaux
- Raspberry Pi Zero W
- 64GB MicroSD burnt with a Raspbian image (if you have not already set up your SD card, you could take a look at the tutorial for Windows, and the one for Linux).
- Salvaged USB or wireless keyboard
- Salvaged USB or wireless mouse
- Salvaged monitor with HDMI connection
- HDMI port
- Micro HDMI adapter
- Micro USB adapter
Outils
Étape 1 - Optional: Prepare your SD card (if a Raspbian image is not already burnt on it)
The Raspberry Pi does not have a hard disk. Instead, it uses an SD card as its hard disk. We will have to install an operating system on it, here we will choose Raspbian, a robust distribution adapted for a large majority of uses and optimized for the Raspberry Pi. We recommend that you choose an SD card that is fast and reliable, the performance of the Raspberry Pi being strongly influenced by the quality of the chosen SD card.
- For this step, you will need to download the latest distribution of Raspbian, this is what we will install on the SD card of your Raspberry Pi.
- You will also need the Win32DiskManager software, download it here, and install it.
- Note at as far as hardware is concerned, you will have to be able to write to the SD card, which requires either a computer with an adapted port or getting an external card reader.
You should now have a Raspbian 'zip' file, decompress it and you should get an 'img' file.
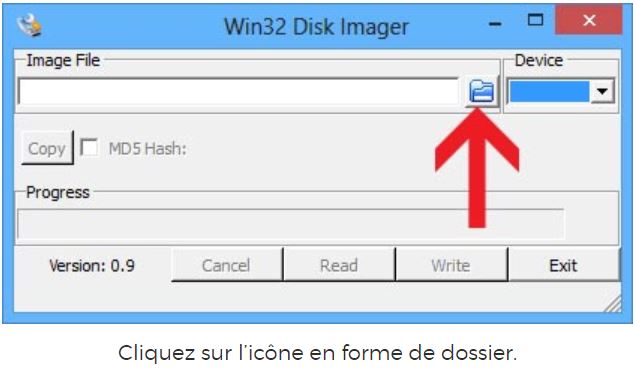
Insert your SD card into the card reader of your computer, and once it is recognized, launch Win32DiskImager and click on the icon representing a folder on the left of the 'Image File' field. (image 1) This will open a file explorer, go to the 'img' file generated previously by decompressing the Raspbian ZIP file.
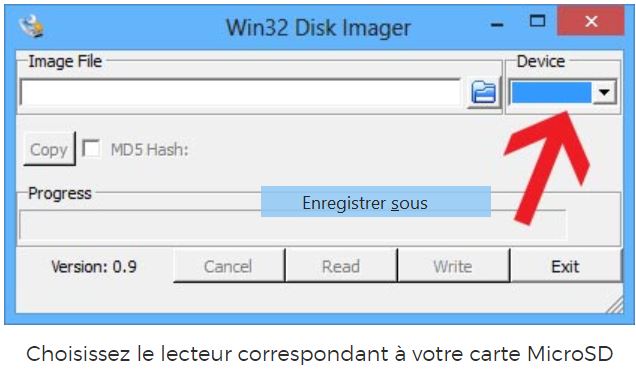
On the right of the folder icon, in the 'Device' field, choose the drive corresponding to your MicroSD card, do not choose the wrong drive! (image 2)
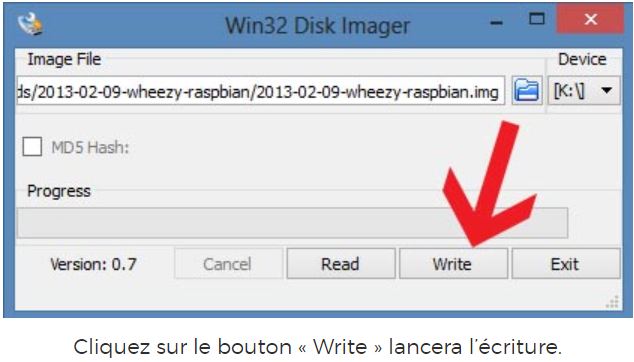
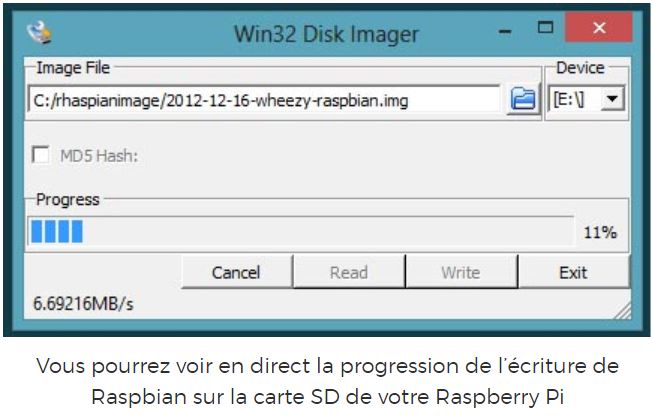
Once this is done, click on the 'Write' button, you will then see the progress of the write operation of your image on your SD card.
The Raspbian card is ready, all you have to do is insert it in your Raspberry Pi and power on your computer.
Étape 2 - First system startup with the prepared SD card - Install Raspbian
Armed with your Raspberry Pi ZW kit and the hardware specified above, you should be able to proceed with the first system startup and install Raspbian (in fact you will see that the installation is done all by itself) .
First, connect your Raspberry to the monitor and keyboard, without connecting it to the power supply, and insert the SD card.
Once this is done, connect the power cable of the Raspberry. The first system startup can be a little long, because during this, the Raspberry is going to install the Raspbian system.
During this system boot (and subsequent ones), you will see multiple lines of commands scrolling by. These are commands executed by the system in order to boot. Ignore them, just wait for the system to finish booting.
In addition, during boot, the red led should stay fixed and the green one should flash for a few seconds before turning off. If this is not the case, and if the Raspberry does not appear to startup on the screen, even after about thirty seconds, this means that it is unable to startup from the card. In fact, it is unable to find the code which allows it to 'boot' and install Raspbian.
This problem can be caused by many factors, but the source is almost always the SD card.
If the problem does not arise from there, it can come from a bad partitioning of the card, or a bad copy of the Raspbian system. In this case, you should re-partition your card, and reinstall your Raspbian system.
Once the system is started up, it is (probably) going to ask you to identify yourself. During the first system startup the default login is 'pi' and the password is 'raspberry'.
-On Linux systems, the passwords are not displayed while typing. So, do not be surprised if you do not see the the usual little asterisks when you type your password and type it normally, then validate by pressing 'Enter'.
If the password is incorrect, it could be because the keyboard is in the 'QWERTY' configuration and not 'AZERTY' by default. You should then type 'rqspberry' as the password.
There you go! You have access to the system, you just installed Raspbian! I All that remains now is to configure Raspbian!
This entire step is taken from the site: https://raspbian-france.fr/installer-raspbian-premier-demarrage-configuration/
Étape 3 - Raspbian configuration
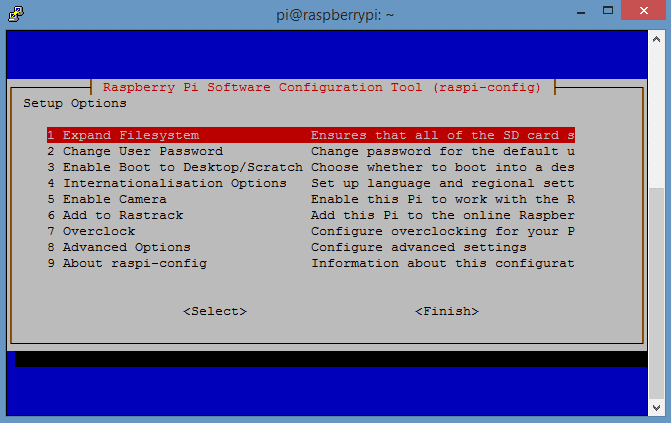
If this is your first system startup, you should get an interface allowing to to choose configuration options. This interface is in the form of a keyboard-navigable menu.
If you do not see this interface on startup, you can get get it by launching the terminal and typing the command sudo raspi-config Once on this configuration interface, we will configure Raspbian such that you have optimal conditions during your subsequent usages and you could get the most out of your Raspberry.
- A Raspbian system on the entire card
First, we will confirm that the Raspbian system utilizes the entire card (careful, this step should only be done if you use one Raspbian distribution on your SD card. If multiple versions coexist, like with NOOBS) for example, then do not perform this step.
To do this, you should place your cursor on the first choice 'Expand Filesystem' and press 'Enter'. The menu will disappear and lines of commands will be executed. Once the system is done, it will again display a window similar to the previous menu informing you about the success of the operation.
Confirm, and you are returned to the menu.
- Switch the keyboard to AZERTY
If you tried to type in text, you probably realized that the keyboard behaves a bit strangely.
In fact, your keyboard is still configured in 'QWERTY' mode and not in 'AZERTY', as is the norm for French keyboards. We will thus fix this problem.
To do this, again choose the forth line 'Internationalisation options'.
Like before, you will see a second menu. This time, choose the third line 'Change Keyboard Layout'. It could take some time before the window is displayed (in general, all the steps for the keyboard can be a bit long).
It is absolutely necessary that a keyboard be connected to be able to configure the keyboard!
Sur la nouvelle fenêtre, validez directement sans changer le type de clavier. Sauf cas particuliers, ce devrait être le bon. Une nouvelle autre fenêtre apparaît, choisissez « Autre ». Sur la nouvelle fenêtre, choisissez le clavier « Français », puis la disposition « Par défaut », « Pas de touche « compose » », et enfin « Non ».
- Passer Raspbian et la Raspberry en français
Pour continuer dans l’internationalisation, nous allons passer tout le système en français.
Pour cela, nous allons modifier ce que l’on nomme les « locales ». Il s’agit d’un réglages définissant un ensemble de textes en plusieurs langues. Vous allez donc vous rendre sur le quatrième choix, « Internationalisation Options », et appuyer sur « Entrée ».
Vous allez cette fois choisir la première ligne, « Change Locale ».
Une fenêtre apparaît (elle peut mettre un petit peu de temps), et vous explique ce que sont les locales.
Vous allez descendre jusqu’à la ligne « en_GB.UTF-8 UTF-8 », et la sélectionner en appuyant sur la touche « Espace ». Un astérisque va alors apparaître entre les crochets précédent le choix (il est possible que la ligne soit déjà sélectionnée dès le départ. Dans ce cas, gardez là sélectionnée, c’est à dire avec un astérisque affiché entre les crochets).
Vous allez de nouveau descendre, cette fois jusqu’à la ligne « fr_FR.UTF-8 UTF-8 », et répéter la même opération que précédemment.
Vous allez maintenant vous déplacer sur le champ « Ok » en bas à gauche de la fenêtre. Pour cela, appuyez sur la touche tabulation (la touche avec les deux flèches). Puis validez.
Une nouvelle fenêtre va apparaître vous demandant de choisir les locales par défaut. Déplacez-vous sur fr_FR.UTF-8, puis utilisez de nouveau la touche tabulation pour aller sur « Ok », et validez.
Le système va de nouveau exécuter des commandes. Ces dernières risquent de prendre un peu de temps. Une fois ces commandes terminées, vous serez de nouveau devant le menu de configuration basique (ce dernier restera probablement en anglais, c’est normal).
La vidéo suivante reprend l'ensemble des étapes décrites ci-dessus: https://www.youtube.com/watch?time_continue=24&v=9QHIS36LxE4
L'ensemble de cette étape est disponible sur le site: https://raspbian-france.fr/installer-raspbian-premier-demarrage-configuration/
Étape 4 - Consulter Wikipedia hors ligne.
Nous proposons d'utiliser l'ordinateur Low-tech afin de pouvoir consulter Wikipédia hors ligne.
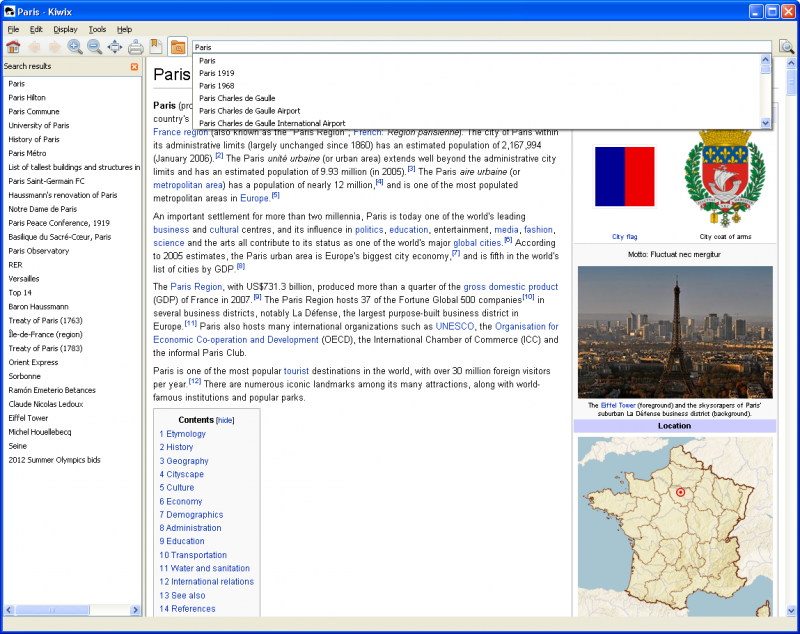
Pour cela, nous utiliserons le logiciel Kiwix. Ce logiciel libre permet d'avoir toute l'encyclopédie Wikipédia (et bien d'autres contenus!) sous la main, où que vous soyez ! Sur un bateau, au milieu de nulle part ou encore en prison, il permet un accès à l'ensemble de la connaissance humaine. Vous n'avez pas besoin d'accès à Internet, tout est stocké sur votre ordinateur, votre clef USB ou DVD !
Pour cela vous aurez besoin de:
- Kiwix (le logiciel)
- Le fichier ZIM avec le contenu de la Wikipédia linguistique spécifique que l'utilisateur souhaite (par ex. français).
Nous présenterons deux options d'installation un peu différentes:
- Option 1 : Utiliser Kiwix comme Lecteur
Le KIWIX Reader vous permet de consulter hors ligne, sans connexion Internet, des packs de contenu (Wikipédia, TEDx, ....) au format ZIM. Il est disponible pour tous les principaux systèmes d'exploitation (Windows, Mac, GNU/Linux, Android) . Il se présente sous la forme d'une application autonome ou d'un plug-in de navigateur. Installer-le et consulter le contenu de Wikipédia directement sur votre ordinateur Low-tech.
- Option 2: Utiliser Kiwix comme Hotspot
KIWIX Hotspot vous permet de transformer un mini-ordinateur bon marché comme le Raspberry Pi en un relais pour distribuer du contenu gratuit, sans connexion internet, via un réseau local. Cette solution est particulièrement utile pour les écoles, les bibliothèques, les communautés, les organisations humanitaires, etc. Les utilisateurs finaux n'ont besoin que d'un appareil pouvant détecter le réseau avec un navigateur, ils n'ont pas besoin de télécharger et d'installer quoi que ce soit sur leurs appareils. KIWIX Hotspot fonctionne sous Windows, macOS et Linux.
Étape 5 - Option 1 : Utiliser Kiwix comme Lecteur
Nous détaillerons ici l'installons sous le système d'exploitation Windows PC mais toutes les versions sont disponibles [[1]].
- Télécharger le logiciel et et double-cliquez sur le fichier pour l'ouvrir.
- La première fois que vous ouvrez Kiwix, une fenêtre devrait apparaître pour vous inviter à visiter la bibliothèque. Si ce n'est pas le cas (ou si vous voulez voir ce qui est disponible à tout moment), allez dans Fichier > Parcourir la bibliothèque. Choisissez la langue de votre choix, puis téléchargez le fichier ZIM correspondant.
- Une fois le fichier ZIM téléchargé, Kiwix devrait vous proposer de l'ouvrir. Si ce n'est pas le cas (ou si vous voulez ouvrir un ancien fichier), cliquez sur "Ma bibliothèque" dans le coin supérieur gauche de la fenêtre de l'application.
Étape 6 - Option 2: Utiliser Kiwix comme Hotspot
Pour réaliser cette installation vous aurez besoin de :
- un ordinateur (fonctionnant sous Windows, macOS ou GNU/Linux) avec un lecteur de carte SD.
- une carte microSD (ou SD en fonction du modèle de Raspberry Pi que vous utilisez). Choisissez une de bonne qualité et avec une mémoire adaptée à la taille du contenu que vous souhaitez diffuser. 32GB est un bon début. Pour la version lourde de Wikipédia English, vous aurez besoin de 128GB ou plus.
- Aller sur https://download.kiwix.org/release/kiwix-hotspot/ et ouvrir le sous-dossier contenant la version la plus récente. Télécharger l'installeur correspondant au système d'exploitation de l'ordinateur que vous utilisez pour préparer la carte SD (Windows 32 ou 64 BIT, macOS ou Linux).
- Préparer votre carte SD : Pour éviter tout problème veillez à ce que votre carte SD soit bien vide et formatée.
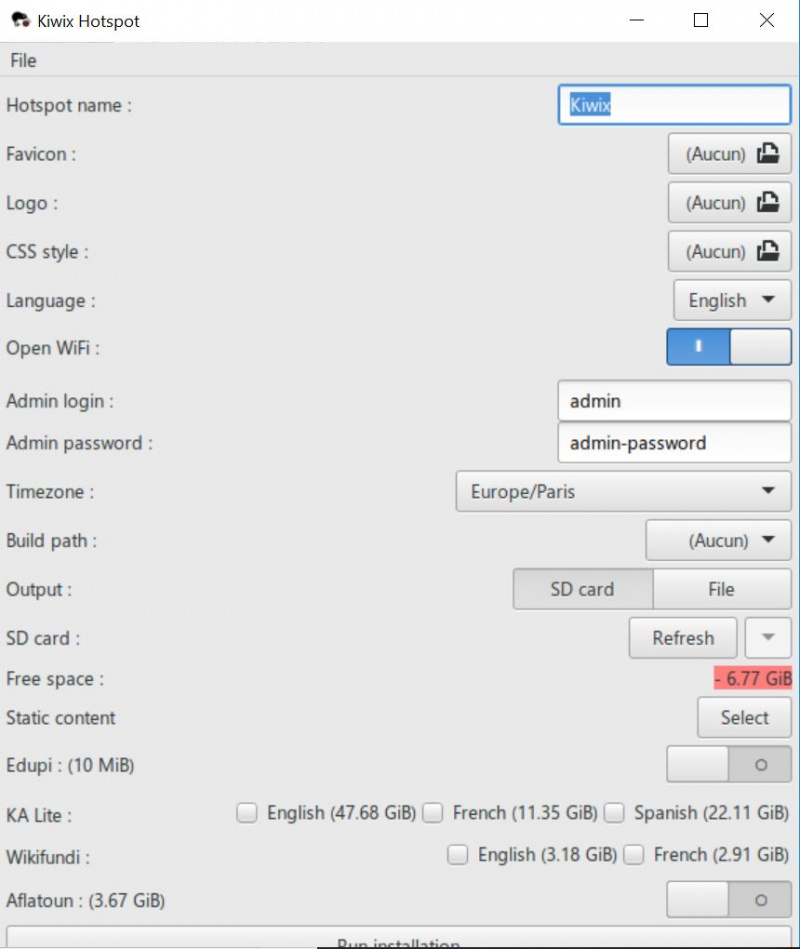
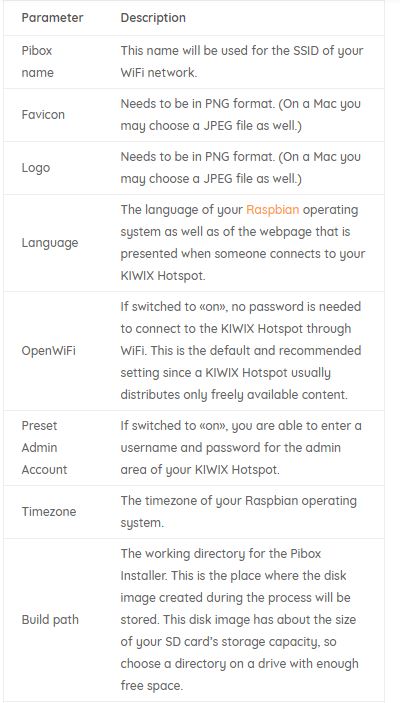
- Ecran Principal : Après avoir lancer le programme Kiwix Hotspot, vous verrez apparaître l'écran principal (image 1). Les différents paramètres de configuration sont détaillés dans les images 2 et 3.
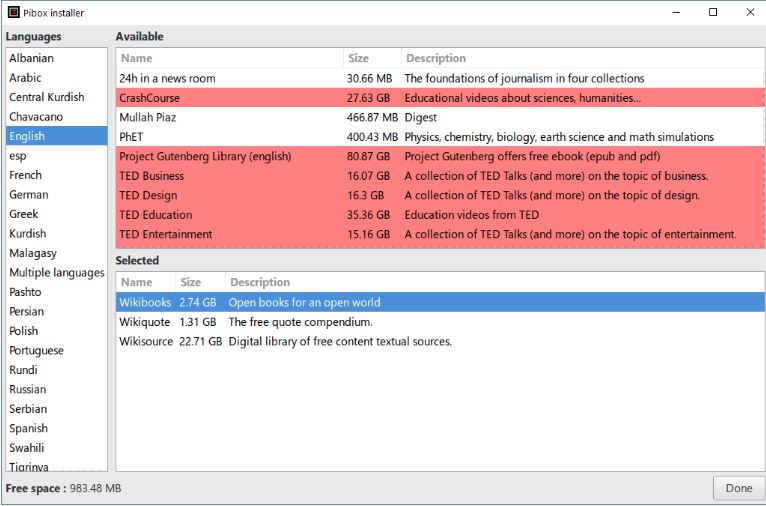
- Sélectionner du contenu : Le "content selector" vous permet de choisir les pack de contenu qui seront installer sur votre réseau. Il est possible de choisir sa langue préférer pour afficher seulement les contenus dans la langue sélectionnée (voir image 4)
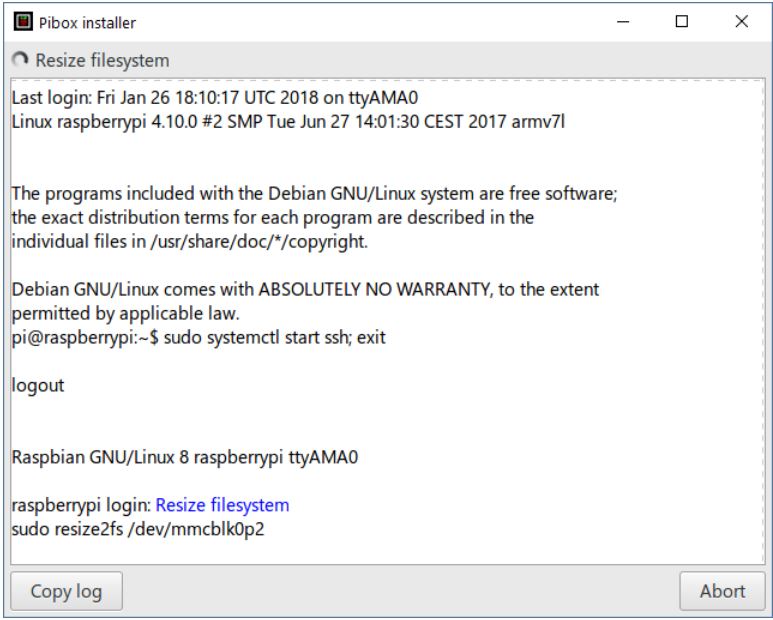
- Installation : Une fois vos choix effectués, cliquez sur "Run Installation" sur l'écran principal. La fenêtre "Installer Status" va apparaître (image 5) .
L'installation peut prendre plusieurs heures. Ne pas l'interrompre même si vous avez l'impression que rien ne se passe. Attendez qu'une boite de dialogue vous indique que l'installation est terminée. Faites attention à ce que votre ordinateur ne se mette pas en mode Veille.
- Une fois l'installation terminée, retirez la carte SD de votre ordinateur.
- Insérer la carte SD dans votre Raspberry Pi, connecter le à son alimentation et laisser démarrer (cela peut prendre une ou deux minutes)
- Connecter votre ordinateur, tablette ou smartphone au réseau Wifi local avec le nom que vous avez choisi pendant l'installation.
- Ouvrez votre navigateur internet et entrer l'adresse suivante dans la barre d'adresse: http://<name>.hotspot où <name> est le "Project Name" que vous avez utilisé pendant l'installation (le même que le réseau Wifi)
- Vous devriez maintenant voir la page d’accueil de Kiwix Hotspot (voir image 6).
Notes et références
- Installation et configuration de Raspbian : https://raspbian-france.fr/installer-raspbian-premier-demarrage-configuration/
- Créez votre ordinateur de bureau sous Linux pour moins de 200€ avec la Raspberry Pi : https://raspbian-france.fr/ordinateur-bureau-linux-raspberry-pi/
- Installer et utiliser KIWIX sous Windows ou macOS : https://www.kiwix.org/en/documentation/installing-and-using-kiwix-on-windows-or-macos/
- Comment configurer KIWIX Hotspot : https://www.kiwix.org/en/documentation/how-to-set-up-kiwix-hotspot/
Published




 Français
 English
 Deutsch
 Español
 Italiano
 Português