(Page créée avec « Here, the idea is to produce a fermented drink similar to lemonade, fresh and not very sweet. Depending on what you use to flavour your mead, you can make a medicinal mead... ») |
(Page créée avec « *Brew the herbs hot before adding the honey (the honey is added when the liquid is lukewarm or cold so as not to kill the micro-organisms). *Cold macerate by adding the el... ») |
||
| Ligne 69 : | Ligne 69 : | ||
Here, the idea is to produce a fermented drink similar to lemonade, fresh and not very sweet. Depending on what you use to flavour your mead, you can make a medicinal mead (with aromatic and medicinal plants of your choice). There are several ways of flavouring mead. | Here, the idea is to produce a fermented drink similar to lemonade, fresh and not very sweet. Depending on what you use to flavour your mead, you can make a medicinal mead (with aromatic and medicinal plants of your choice). There are several ways of flavouring mead. | ||
| − | * | + | *Brew the herbs hot before adding the honey (the honey is added when the liquid is lukewarm or cold so as not to kill the micro-organisms). |
| − | * | + | *Cold macerate by adding the elements directly to the jar after diluting the honey in the water. |
Les deux possibilités peuvent être utilisées pour une même boisson suivant la facilité de la plante à diffuser son gout et ses principes actifs dans l'eau. Par exemple on peut faire infuser à chaud du gingembre et de la sauge et faire macérer ensuite du basilic. | Les deux possibilités peuvent être utilisées pour une même boisson suivant la facilité de la plante à diffuser son gout et ses principes actifs dans l'eau. Par exemple on peut faire infuser à chaud du gingembre et de la sauge et faire macérer ensuite du basilic. | ||
Version du 28 juin 2024 à 15:41

Dernière modification le 28/06/2024
Difficulté
Très facile
Durée
15 minute(s)
Coût
3 EUR (€)
Description
A range of recipes for simple, healthy, no-waste fermented drinks made with honey and spontaneous fermentation (naturally occurring yeast).
Introduction
Fermented foods are foods that have been transformed by micro-organisms: bacteria, yeasts, fungi. This process often takes place without oxygen, in an anaerobic environment. Microbes normally multiply in the presence of oxygen. But when they are deprived of it, they fight back by producing molecules to gain an advantage over competing microbes: alcohol, lactic acid, acetic acid. This gives rise to various types of fermentation: lactic, alcoholic, acetic, etc. Although we sometimes tend to forget it, many everyday foods are in fact fermented: bread, cheese, yoghurt, sauerkraut, saucisson, wine, beer... The list goes on. And that's just as well, because their effects are beneficial to health ! They aid digestion, help the intestines to function properly, are sources of vitamins and minerals, and boost the immune system...
As Virginie Geres reminds us with her website HappyBiote, without micro-organisms we'd be dead! Quite simply! We couldn't function without the billions of bacteria, yeasts and other (non-pathogenic) microbes that line our bodies. They carry out important tasks such as protecting us from aggression from other (pathogenic) microbes, allowing us to eat, to have a distinct smell from other people (and therefore making it easier to fall in love when we're not too dirty), they participate in our immune system... And in each of our cells is a microorganism that we have incorporated over the millennia: the mitochondrion, which enables cellular respiration! Watch this super video to find out more.
So, not only are microorganisms necessary for our survival, but by providing a wide diversity of them through a healthy and varied diet (in particular with foods rich in fibre -prebiotics- and microorganisms -probiotics-) we improve our immune and mental health. This is the antithesis of modern Western standards, which literally make people ill, not least because of a weak microbiota. For more information I recommend this report from Arte, or this one a little older on the same theme.
Many good reasons to eat or drink them regularly (careful not to make it your whole meal though !)
Here are several recipes for no-waste fermented drinks, made from natural honey, to try your hand at making these homemade sodas!
To find out more about fermentations, I invite you to look at, download and distribute the collection from the 2020 French summit on fermentations, which includes contributions from scientists, chefs and various recipes. You'll find it just below in the "Files" section of the tutorial.
Matériaux
- Honey (liquid or solid)
- Non-chlorinated water (aerated for a few hours)
- Aromatics of your choice (flowers, leaves, spices, syrups, etc.)
Outils
- Large glass jar
- Glass bottle with mechanical closure (lemonade type)
- Scales (optional)
- Soup spoon
- Cloth
- Strainer or fine sieve
Étape 1 - Hygiene rules
You don't have to work in a sterile field when it comes to fermentation, but it is crucial to be as clean as possible.
Work on a clean work surface (if necessary/possible sanitised with white vinegar or alcohol). Use clean utensils and containers, washed in hot water (or put in the dishwasher), handle with clean hands and wipe with a CLEAN cloth... of course.
Étape 2 - Fermentation stages
1st fermentation phase (F1): This fermentation phase is called breathing because it works aerobically (with oxygen), this is when the yeasts and bacteria multiply and develop flavours. Mix all the ingredients in a wide-mouth glass jar. Close the lid loosely or place a cloth over the top with a rubber band. Leave to ferment for 3-5 days in a warm place (around 20°C), stirring regularly. You'll know that the first phase is complete when you see the liquid simmer generously when you stir it.
2nd fermentation phase (F2): This phase is called carbonation because the aim is for the CO2 produced by the microorganisms to be forced back into the liquid (by pressure) and therefore make the liquid fizz. It is during this phase that the micro-organisms are anaerobic (without oxygen) and therefore produce acetic (vinegar-type acid) and/or alcoholic fermentation. When they consume the sugar in the drink, the micro-organisms produce this acid or alcohol and release CO2. If you like the taste at the end of F1, you can drink it now. Filter the liquid and pour it into a lemonade-type bottle, but it also works with plastic soda bottles. At the start of this second phase, the liquid should still be a little sweet. Fermentation will continue for a few more days, and the yeasts need food. If this is not the case, add more sugar. Open the bottle every day to degas and taste to see if the taste suits you.
This phase can last between 2 and 5 days, depending on the taste and the level of bubbles you want. You can taste it from time to time.
- Too sweet: wait another two or three days.
- Not sparkling enough: add sugar and wait another day or two.
- Too vinegary: add more sugar and wait another day.
Lorsque le goût vous convient, vous pouvez déguster votre boisson pétillante fermentée à partir de fleurs! Vous pourrez la conserver quelques jours à température ambiante, avant qu’elle ne tourne au vinaigre (ce qui est délicieux aussi). Vous pouvez aussi la conserver plus longtemps au frigo, car cela ralentit le processus de fermentation.
Étape 3 - Recipe for light mead (low alcohol content)
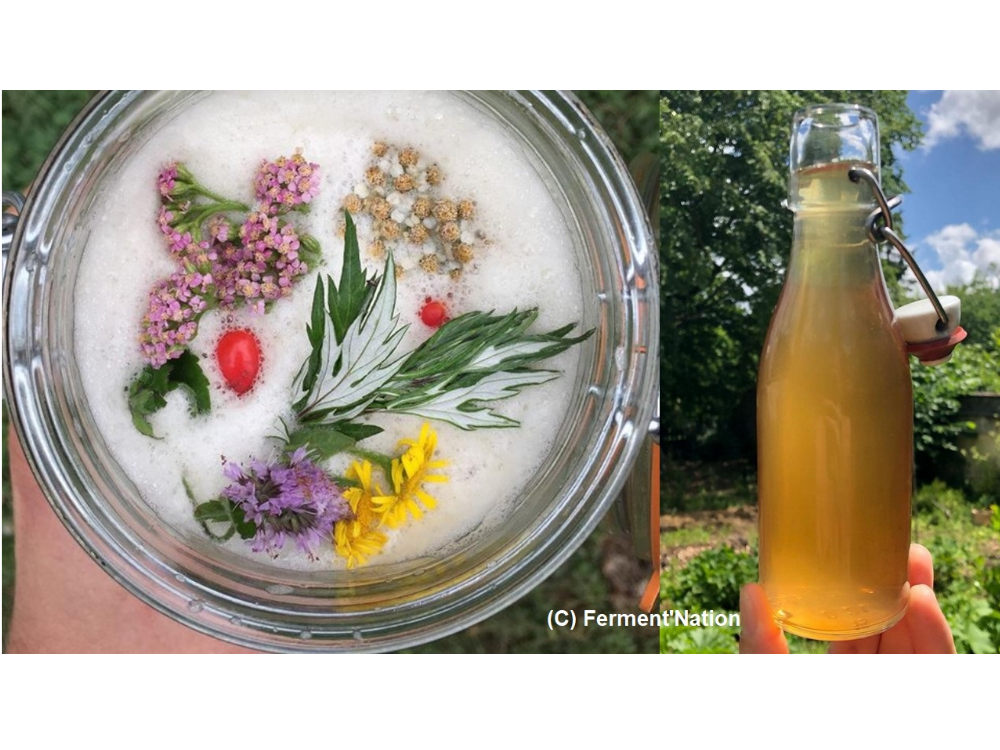
Recipe adapted from Ferment'Nation and Atelier Cultures Paris (whose Instagram live video recipe is here)
Normally, the traditional proportions for producing mead are 300g of honey to 1L of water. The result is a fairly highly alcoholic and very sweet drink.
Here, the idea is to produce a fermented drink similar to lemonade, fresh and not very sweet. Depending on what you use to flavour your mead, you can make a medicinal mead (with aromatic and medicinal plants of your choice). There are several ways of flavouring mead.
- Brew the herbs hot before adding the honey (the honey is added when the liquid is lukewarm or cold so as not to kill the micro-organisms).
- Cold macerate by adding the elements directly to the jar after diluting the honey in the water.
Les deux possibilités peuvent être utilisées pour une même boisson suivant la facilité de la plante à diffuser son gout et ses principes actifs dans l'eau. Par exemple on peut faire infuser à chaud du gingembre et de la sauge et faire macérer ensuite du basilic.
Recette :
- 100g de miel (environ 3-4 cuillères à soupe) ou jusqu'à 300g pour la version traditionnelle
- 1L d'eau déchlorée
- Aromates de votre choix
Pour libérer le chlore de l'eau du robinet laissez-la s'aérer quelques heures. Ensuite dissoudre le miel dans l'eau dans le bocal en mélangeant avec une cuillère. Ajoutez les aromates de votre choix.
Fermentation F1, respiration : suivant votre préférence par rapport à la force du gout de l'hydromel final vous pouvez faire une respiration très courte (en laissant juste un peu d'air dans le haut d'un bocal fermé) ou longue (en laissant 24h le bocal juste couvert d'un linge). La F1 est lancée en quelques heures lorsque vous pouvez voir des petites bulles se former sur les aromates et les paroies du bocal.
Fermentation F2, carbonatation : Une fois les bulles formées vous pouvez transférer le liquide (en laissant ou non les aromates dedans) dans une bouteille ou un bocal avec fermeture mécanique type limonade. Laissez fermenter encore 3-5 jours suivant la température pour former la quantité de bulle que vous aimez. Il est important de dégazer doucement tous les jours pour éviter une trop forte pression qui pourrait faire éclater la bouteille, vous pouvez en profiter pour gouter un petit peu et ainsi décider si vous laissez fermenter encore un peu (pour plus d'acidité et de bulles) ou si votre hydromel est prêt.
Conservation : Une fois l'hydromel à votre gout vous pouvez le boire et le stocker au frigo quelques jours. Le frigo permet de ralentir très fortement la fermentation sans toute-fois l'arrêter. Si vous mettez du temps à le consommer il se peut que le gout acide devienne très fort, pas de panique cela donne un excellent vinaigre!
Notes et références
Pour plus d'inspirations de recettes et des cours de fermentations n'hésitez pas à suivre ShiraBio, Ferment'Nation et à explorer l'incroyable site (et livres) de Marie-Claire Frédéric, anthropologue et cheffe de cuisine fascinée par les fermentations du monde : Ni cru ni cuit
Il existe d'ailleurs plusieurs groupes facebook de passionnés de fermentations, je vous recommande ceux-ci
- Fermentation maison fondé par Ferment'Nation
- Lactofermentation et conserves naturelles, spécifiquement axé sur les lactofermentations
Si vous êtes à la recherche de livres de références pour apprendre les arts de la fermentation, Sébastien alias Ferment'Nation propose dans ce post du groupe Fermentation Maison une compilation expliquée des meilleurs livres qu'il a testé. Il y en a des spécifiques (sur les lactofermentations, les fromages) et d'autres généralistes. De quoi vous inspirer!
Pour retrouver de nombreuses recettes, ferments et outils pour fermenter à la maison voici le site de l'entreprise Fairment, organisatrice du Sommet sur les fermentations : https://fairment.com
D'autres références incontournables sont dans les premières pages du fichier joint à ce tutoriel.
Si vous souhaitez voir plus de tutoriels sur les fermentations n'hésitez pas à regarder :
- Conserves lactofermentées
- Aliments fermentés - fermentations de fruits
- Boissons fermentées - Sodas maison
- Boissons fermentées - Kéfir, kombucha et vinaigres
- Boissons fermentées - Sodas à base de fleurs
- Aliments fermentés - produits laitiers animaux maison
- Aliments fermentés - kéfir de laits végétaux et fromages vegan
- Aliments fermentés - levains et pains
- Aliments fermentés - fermentations asiatiques de céréales, légumineuses et variations
- Aliments fermentés - festival de sauces
- Aliments fermentés - alternatives aux protéines animales
Published
 Français
 English
 Deutsch
 Español
 Italiano
 Português