(Page créée avec « Plastic bottles, which are widely used, are ubiquitous waste products that have a damaging impact on the environment and human health. Their decomposition, spread over sev... ») |
(Page créée avec « - The pot is very stable thanks to its even weight distribution. ») |
||
| (14 révisions intermédiaires par le même utilisateur non affichées) | |||
| Ligne 19 : | Ligne 19 : | ||
|Step_Picture_00=Pot_de_fleur_WhatsApp_Image_2023-12-20_at_10.12.20_5_.jpeg | |Step_Picture_00=Pot_de_fleur_WhatsApp_Image_2023-12-20_at_10.12.20_5_.jpeg | ||
|Step_Picture_01=Pot_de_fleur_WhatsApp_Image_2023-12-20_at_11.17.03.jpeg | |Step_Picture_01=Pot_de_fleur_WhatsApp_Image_2023-12-20_at_11.17.03.jpeg | ||
| − | |Material= | + | |Material=Bottle |
| − | |Tools=1 | + | |Tools=1 pair of scissors and 1 knife |
}} | }} | ||
{{Tuto Step | {{Tuto Step | ||
| − | |Step_Title= | + | |Step_Title=Washing the bottle |
|Step_Content= | |Step_Content= | ||
|Step_Picture_00=Pot_de_fleur_WhatsApp_Image_2023-12-20_at_10.12.20_5_.jpeg | |Step_Picture_00=Pot_de_fleur_WhatsApp_Image_2023-12-20_at_10.12.20_5_.jpeg | ||
}} | }} | ||
{{Tuto Step | {{Tuto Step | ||
| − | |Step_Title= | + | |Step_Title=Cutting the bottle |
| − | |Step_Content= | + | |Step_Content=Using a cutter or scissors, cut the plastic bottle to the desired height for the pot. You can adjust the height according to the size of the plant you wish to place in it. |
|Step_Picture_00=Pot_de_fleur_WhatsApp_Image_2023-12-20_at_10.12.20_1_.jpeg | |Step_Picture_00=Pot_de_fleur_WhatsApp_Image_2023-12-20_at_10.12.20_1_.jpeg | ||
|Step_Picture_01=Pot_de_fleur_WhatsApp_Image_2023-12-20_at_10.12.19.jpeg | |Step_Picture_01=Pot_de_fleur_WhatsApp_Image_2023-12-20_at_10.12.19.jpeg | ||
}} | }} | ||
{{Tuto Step | {{Tuto Step | ||
| − | |Step_Title= | + | |Step_Title=Decoration (additional) |
| − | |Step_Content= | + | |Step_Content=If you like, you can decorate the plastic pot with paint, stickers or other decorative materials. Let your creativity run wild. |
| − | + | It's best not to paint it, so that you can see the roots and prevent the plant from suffocating. | |
|Step_Picture_00=Pot_de_fleur_WhatsApp_Image_2023-12-20_at_10.12.20.jpeg | |Step_Picture_00=Pot_de_fleur_WhatsApp_Image_2023-12-20_at_10.12.20.jpeg | ||
|Step_Picture_01=Pot_de_fleur_WhatsApp_Image_2023-12-20_at_10.12.19_4_.jpeg | |Step_Picture_01=Pot_de_fleur_WhatsApp_Image_2023-12-20_at_10.12.19_4_.jpeg | ||
}} | }} | ||
{{Tuto Step | {{Tuto Step | ||
| − | |Step_Title= | + | |Step_Title=Drilling the cap |
|Step_Content= | |Step_Content= | ||
|Step_Picture_00=Pot_de_fleur_WhatsApp_Image_2023-12-20_at_10.12.19_3_.jpeg | |Step_Picture_00=Pot_de_fleur_WhatsApp_Image_2023-12-20_at_10.12.19_3_.jpeg | ||
| Ligne 48 : | Ligne 48 : | ||
}} | }} | ||
{{Tuto Step | {{Tuto Step | ||
| − | |Step_Title= | + | |Step_Title=Assembly |
| − | |Step_Content= | + | |Step_Content=Assemble the two parts and tighten with the plug |
|Step_Picture_00=Pot_de_fleur_WhatsApp_Image_2023-12-20_at_10.12.18_4_.jpeg | |Step_Picture_00=Pot_de_fleur_WhatsApp_Image_2023-12-20_at_10.12.18_4_.jpeg | ||
}} | }} | ||
{{Tuto Step | {{Tuto Step | ||
| − | |Step_Title= | + | |Step_Title=Filling with soil and potting the plant |
| − | |Step_Content= | + | |Step_Content=Put in a little soil, then place the plant and add more soil so that the roots are completely buried in the soil. |
|Step_Picture_00=Pot_de_fleur_WhatsApp_Image_2023-12-20_at_10.12.18_1_.jpeg | |Step_Picture_00=Pot_de_fleur_WhatsApp_Image_2023-12-20_at_10.12.18_1_.jpeg | ||
|Step_Picture_01=Pot_de_fleur_WhatsApp_Image_2023-12-20_at_10.12.18_2_.jpeg | |Step_Picture_01=Pot_de_fleur_WhatsApp_Image_2023-12-20_at_10.12.18_2_.jpeg | ||
| Ligne 60 : | Ligne 60 : | ||
}} | }} | ||
{{Notes | {{Notes | ||
| − | |Notes=- | + | |Notes=-We can see the roots, which means we can prevent the plant from suffocating and consider using a larger bottle to ensure the plant grows smoothly. |
| − | - | + | - The pot is very stable thanks to its even weight distribution. |
}} | }} | ||
{{PageLang | {{PageLang | ||
Version actuelle datée du 26 juillet 2024 à 14:30

Difficulté
Très facile
Durée
1 heure(s)
Coût
0 EUR (€)
Description
This tutorial shows you how to make a flower pot from a plastic bottle. The idea came from a broken flower pot, whose plant needs a suitable environment in which to grow.
Introduction
Plastic bottles, which are widely used, are ubiquitous waste products that have a damaging impact on the environment and human health. Their decomposition, spread over several centuries, leads to the pollution of soil, waterways and oceans. Faced with these harmful consequences, recycling plastic containers is emerging as a crucial solution. This approach facilitates the transformation of this waste into new products, such as articles of clothing, furniture, brooms, carpets, bags, containers, clotheslines, rafts and plant receptacles.) With this in mind, we've opted for up-cycling as a more environmentally-friendly approach. In fact, making flower pots from plastic bottles is a project that is both simple and accessible to everyone. All you need to do is use basic tools such as scissors (especially with children) or a cutter, as well as a dose of imagination, to help reduce the environmental footprint associated with this widespread plastic waste.


Matériaux
Bottle
Outils
1 pair of scissors and 1 knife
Étape 1 - Washing the bottle
Étape 2 - Cutting the bottle
Using a cutter or scissors, cut the plastic bottle to the desired height for the pot. You can adjust the height according to the size of the plant you wish to place in it.


Étape 3 - Decoration (additional)
If you like, you can decorate the plastic pot with paint, stickers or other decorative materials. Let your creativity run wild.
It's best not to paint it, so that you can see the roots and prevent the plant from suffocating.


Étape 4 - Drilling the cap


Étape 5 - Assembly
Assemble the two parts and tighten with the plug

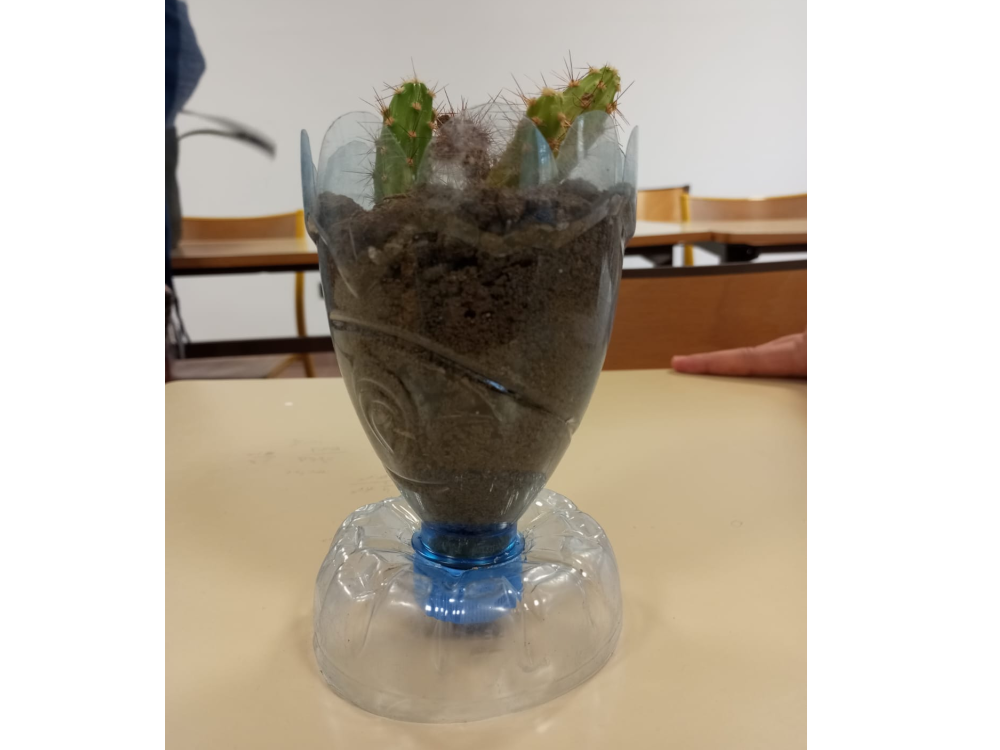
Étape 6 - Filling with soil and potting the plant
Put in a little soil, then place the plant and add more soil so that the roots are completely buried in the soil.


Notes et références
-We can see the roots, which means we can prevent the plant from suffocating and consider using a larger bottle to ensure the plant grows smoothly.
- The pot is very stable thanks to its even weight distribution.
Draft
 Français
 English
 Deutsch
 Español
 Italiano
 Português