
Dernière modification le 06/09/2024
Difficulté
Moyen
Durée
3 heure(s)
Coût
165 EUR (€)
Description
Tutorial to setup a nextcloud server (equivalent to google drive but free and adapted to collective organisations) on a single board computer (photovoltaics powered)
This tutorial is not really "lowtech" at first look because we talk about computers and photovoltaics
However it is as didactic as possible and follows a lowtech philosophy to share knowledge, avoid unreachable tech by information rentention, complexification by design, or proprietary
dependance by design.
We also give sizign tools for photovoltaics with a few explanation.
It's up to to you to size your computer working hours on a sun schedule, ie respecting human temporalities.
Nextcloud (framasoft offers a service here: https://www.frama.space/abc/fr ) is a cool service to organise collectively and allows to share files, have a directory, a chat, work cooperatively on libreoffice files, and even do visios. We can also imagine mobile infokisosks on this principle.
The tutorial puts into question the vpn market, the phtovoltaics with brand new and expensive batteries (in reality photovoltaics has become too competitive compared to petrleum and even more compared to nuclear power!), and the gafam market and their surveillance design is damaging trust and social links.
The commands are those for a debian system
Finally, the tutorial is made iwth 4G modem (and a wired connection to orange pi which has no wifi card by default), and is updated on this 10th of april for a raspberry pi connected
to a "shared wifi" of your telephone (see stage 6 for a wifi in wpa3 and stage 16 for a wifi in wpa2)
Sommaire
Sommaire
- 1 Description
- 2 Sommaire
- 3 Introduction
- 4 Étape 1 - Tools
- 5 Étape 2 - Nextcloud installation 1/4
- 6 Étape 3 - Install nextcloud 2/4
- 7 Étape 4 - Install nextcloud 3/4
- 8 Étape 5 - Install nextcloud 4/4
- 9 Étape 6 - Configure local ethernet or wifi network
- 10 Étape 7 - configuring a wireguard vpn to make your server more accessible from a 4g box or a 4g modem
- 11 Étape 8 - vpn openvpn configuration to make your server accessible from a 4g box or a 4g modem
- 12 Étape 9 - Redirect all requests of the vpn server to the orangepi-raspberrypi
- 13 Étape 10 - domain name and fixed adress
- 14 Étape 11 - Https Configuration on the vpn proxy gandi server
- 15 Étape 12 - configuration https on dietpi if you are on a box
- 16 Étape 13 - Make your nomad server offgrid with photovoltaics
- 17 Étape 14 - Montage et test
- 18 Étape 15 - Securisation du serveur
- 19 Étape 16 - Activer le wifi lors de l'installation (par exemple avec un raspberry)
- 20 Notes et références
- 21 Commentaires
Introduction
Tutorial to setup a nextcloud server (equivalent to google drive but free and adapted to collective organisations) on a single board computer (photovoltaics powered)
This tutorial is not really "lowtech" at first look because we talk about computers and photovoltaics
However it is as didactic as possible and follows a lowtech philosophy to share knowledge, avoid unreachable tech by information rentention, complexification by design, or proprietary dependance by design.
We also give sizign tools for photovoltaics with a few explanation. It's up to to you to size your computer working hours on a sun schedule, ie respecting human temporalities.
Nextcloud (framasoft offers a service here: https://www.frama.space/abc/fr ) is a cool service to organise collectively and allows to share files, have a directory, a chat, work cooperatively on libreoffice files, and even do visios.
We can also imagine mobile infokisosks on this principle.
The tutorial puts into question the vpn market, the phtovoltaics with brand new and expensive batteries (in reality photovoltaics has become too competitive compared to petrleum and even more compared to nuclear power!), and the gafam market and their surveillance design which is damaging trust and social links.
The commands are those for a debian system
Finally, the tutorial is made iwth 4G modem (and a wired connection to orange pi which has no wifi card by default), and is updated on this 10th of april for a raspberry pi connected to a "shared wifi" of your telephone (see stage 6 for a wifi in wpa3 and stage 16 for a wifi in wpa2)
See https://solar.lowtechmagazine.com/ to go further with the low tech internet insights (in particular "how to create a lowtech internet"?)
Matériaux
Outils
autonomie.ods
Étape 1 - Tools
The links to the photovoltaics material are in the autonomie.ods file (readable with libreoffice) attached to this tutorial.
- raspberry pi :
42€ on leboncoin
-Orange pi :
single board computer: Orange pi 5
single board computer with 4,8,16 or 32 Go of ram
2,4Ghz ARM Cortex-A55 CPU
This card is compatible with nvme pcie 2.0 hard drives (2242 or 2230, pcie is retrocompatible ie 3.0, 4.0 and 5.0 work with lower speed on orange pi 5)
Same principle as here but a bit more powerful and we can plug a hard drive (useful for nextcloud which is made to host files) and it starts automatically on a usb stick
Price: 143€ brand new on aliexpress in version 16 Go on the 2nd of august 2023
Second hand on leboncoin: we find more easily raspberry pi at around 100€.
It is necessary to buy a small box at 10€ (or make one) to avoid a naked single board computer
-hard drive
Here we use a kingston usb stick of 32Go and a nvme samsung 512Go card
We can plug a hard drive of higher capacity in usb, or a nvme card (nvme pcie 2.0 ssd 2242 or 2230) compatible with pcie 3.0 4.0 and above but the speed is reduced
A nvme samsung 2242 card of 500Go is about 50€ on the 2nd of august 2023.
-usb stick : 10€
- rj45 cable: 5€
-Internet box or 4G modem according to your internet connection
-solar pannel: here we use a flexible 120W pannel bougth 115€ brand new but we can find second hand ones at 30€ on leboncoin for an equivalente peak power.
Note: for the theoretical need. See file autonomy.ods
-second hand battery: use the previous lead acid battery of your car when it crashes when it's too hot in summer!
-12V/24V-usb 5V battery converter: 20€ avoid amazon if you can
- pwm regulator 30A: 30€ brand new if you dont buy corporate brand
- DRL (day/night switch 13V): 1,5€ brand new
(key word "Kit de feux de jour à LED pour voiture, contrôleur marche/arrêt automatique DRL" in french)
-electric mc4 cable: 20€
Total second hand price for orangepi: 256,50€
Total brand new price for orangepi: 431,50€
Total second hand price for raspberry: 165€
See autonomie.ods
-


Étape 2 - Nextcloud installation 1/4
1. Download dietpi and prepare your usb stick
For installation, i recommend using diepti. It is interesting in particular for it is lightweight for single board computers, but also because the automatic installation of free software
with a relatively "user friendly" menu. We can mention among all the installable software at boot (https://dietpi.com/dietpi-software.html)
domotic apps, interesting to save energy based on weather, but also tor relay to contribute to the relatively anonymous tor network, interesting for any "eco-terrorist" we are.
We must also mention "younohost"(https://yunohost.org/fr) which is french and who does the same job as dietpi for raspberry and which is also "user friendly" or even more. I have not yet tested yunohost because i had put aside raspberry pi after too many weird mouse bugs. My research to avoid these weird mouse bugs have not concluded positively to any solution (purism, odroid, raspberry, orangpi, macbook, windows, see security section), i can only send a feedback on what i have really tried.
( for younohost : https://yunohost.org/fr/install/hardware:arm)
Select the single board computer (orange pi in the present case) and then download
Unzip the obtained archive
Use balena etcher to create a bootable usb stick to install dietpi on your single board computer (orange pi 5 in the present case but it works the same on other single board computers)
https://etcher.balena.io/#download-etcher
Double click on the downloaded file
Select the dietpi downloaded image, select your usb stick, click on flash.
You only need to plug the usb stick on the orangepi and it will boot automatically on the usb stick.
For a raspberry pi, we use a sd card but we can configure the usb boot as well (see here:https://makerhelp.fr/booter-un-raspberry-pi-4-sur-un-disque-dur-ou-un-ssd-en-usb )
Install nextcloud
Power your orangepi/raspberrypi with the usb stick plugged.
The default login at boot is root and the password is dietpi.
Follow the menus at first boot to install the nextcloud service. It is very easy, it is in english and everything is automated. I have put the images of the menus you have to select. to install nextcloud: see in this stage and on stages 3 to 6
You can move the menus with the keyboard and the arrows and the tab key
Select with space and validate with enter
See images at stages 3 to 6 for the installation process and select the entries


Étape 3 - Install nextcloud 2/4
see images


Étape 4 - Install nextcloud 3/4
see images


Étape 5 - Install nextcloud 4/4
see images


Étape 6 - Configure local ethernet or wifi network
If you don't have a box and you have a orange pi or raspberry pi and you want connext to a wifi (for example wifi of a shared connection smartphone)
Dietpi gives a utility to configure automatically the wifi which works on raspberry. At my place it works only if the network is wpa2. If you want to activate wpa3 or if you want to configure your wifi manually, here are the steps to follow.
Linux is a bit complicated for network management. A lot of programs exist allowing to manage networks (networking, network interfaces, ifup, wpa_supplicant, network_manager, ifconfig, ip...) network_manager, ifconfig, ip...).
If you know well, do what you think is best suited for you.
Otherwise, we will use the default programs installed with dietpi for managing wifi interfaces: wpa_supplicant and dhclient.
Begin with plugging a wifi usb adapter to your orangepi or verify your wifi adapter on your raspberry pi is well detected.
On a orangepi: verify the adapter is well detected entering:lsusbThis command will list the usb devices and you should see your wifi usb stick in the list. Then verify that the drivers of your usb stick have been loaded entering:
dmesg

Étape 7 - configuring a wireguard vpn to make your server more accessible from a 4g box or a 4g modem
[Watch out, this section puts into question the vpn market!!]
This section is useful for 4G connections or in wifi on a smartphone (4G or 5G)
The 4g has the advantage to be mobile with a very low power consumption of the modem, around 5W, and you can find 4g modems without wifi to limit the attack surface of your server (example netgear lm1200 around 150€)
what is a vpn?
The vpn are mainly known to be vpn "clients". Ie you use it on your computer to become "anonymous".
The vpn is in fact a tunnel between your computer and another distant computer, from which your requests go on to the internet. Your traffic in direction of the internet goes through this tunnel.
Internet then thinks your requests come from this distant computer. That is to say your public ip becomes distant computer one.
Your internet provided doesnt see the traffic between your computer and this distant computer, which makes you "anonymous"
In reality, you are anonymous for your internet provider, but you only move the trust you had in your internet provider to your vpn provider who can see your traffic.
The vpn has also other uses like giving you access to websites being filtered on a geographic basis (information that can be deducted from your public ip)
You can very well create your own vpn server, and in our case, this vpn server will redirect the internet requests made on this server to your orangepi/raspberry pi going through the tunnel (in the other direction than when you use it as a client to access the internet)
An wee will see how.
Create a server on gandi.net
Create an account on gandi.net, then create a server on gandicloud vps. See images for the 3clicks server creation that costs 5€/month.
To create a ssh key and log in see:
https://docs.gandi.net/fr/cloud/operations_courantes/connexion_serveur.html
https://docs.gandi.net/fr/cloud/operations_courantes/connexion_serveur.html
Once logged onto the server
launch the command to install wireguard and the necessary dependencies
sudo apt update && sudo apt install wireguard resolvconf iptables nano -y
Launch the same command on your orangepi/raspberry pi
then launch the commands on your orangepi/raspberry pi server to create the private and public wireguard keysAfficher la clé publique sur votre orange pi/raspberry pi en tapantsudo mkdir -p /etc/wireguard
sudo sh -c 'wg genkey | (umask 0077 && tee /etc/wireguard/private_key) | wg pubkey > /etc/wireguard/public_key'
Afficher egalement la clé publique sur votre serveur en tapantsudo cat /etc/wireguard/public_key
Display the public key on your orangepi/raspberry pi typingsudo cat /etc/wireguard/public_key
Afficher egalement la clé publique sur votre serveur en tapantsudo cat /etc/wireguard/public_key
sudo cat /etc/wireguard/public_key
Then enter the following commands to create a configuration file /etc/wireguard/wg0.conf on your server:
Type the following lines (replace cle_publique_du_orange_pi_ou_raspberry_pi) by the one previously displayed
Then enter the following command on the server to launch and activate the vpn serviceecho "[Interface]" | sudo tee /etc/wireguard/wg0.conf
echo "Address=10.10.0.1/24" | sudo tee -a /etc/wireguard/wg0.conf
echo "PrivateKey=$(sudo cat /etc/wireguard/private_key)" | sudo tee -a /etc/wireguard/wg0.conf
echo "ListenPort=12345" | sudo tee -a /etc/wireguard/wg0.conf
echo "[Peer]" | sudo tee -a /etc/wireguard/wg0.conf
echo "PublicKey=cle_publique_du_orange_pi_ou_raspberry_pi" | sudo tee -a /etc/wireguard/wg0.conf
echo "AllowedIPs=10.10.0.2/32" | sudo tee -a /etc/wireguard/wg0.conf
then entersudo systemctl start wg-quick@wg0
sudo systemctl enable wg-quick@wg0
to obtain the public ip of your servercurl ifconfig.me
Type the following lines (replace cle_publique_du_serveur by the one previously displayed and ip_publique_du_serveur by the one previously displayed) :
echo "[Interface]" | sudo tee /etc/wireguard/wg0.conf
echo "Address=10.10.0.2/24" | sudo tee -a /etc/wireguard/wg0.conf
echo "PrivateKey=$(sudo cat /etc/wireguard/private_key)" | sudo tee -a /etc/wireguard/wg0.conf
echo "[Peer]" | sudo tee -a /etc/wireguard/wg0.conf
echo "PublicKey=cle_publique_du_serveur" | sudo tee -a /etc/wireguard/wg0.conf
echo "AllowedIPs=10.10.0.1/32" | sudo tee -a /etc/wireguard/wg0.conf
echo "Endpoint=ip_publique_du_serveur:12345" | sudo tee -a /etc/wireguard/wg0.conf
The line AllowedIPS defines the destination ips (outgoing) that will go through the tunnel and will be encrypted but also the ips authorized to enter. If you want to configure your "client" (orange pi or raspberry pi) to use the vpn to access the internet, replace AllowedIPs=10.10.0.1/32 with AllowedIPs=0.0.0.0/0 Defining 0.0.0.0/0 we indicate that all the traffic of the orangepi/raspberry pi will go through the wireguard tunnel and that all the entering ips will be allowed. It is then important to configure well a firewall for the server!
To verify wireguard works, launch the following command on the vpn server:The ping must workping 10.10.10.2 -c 4
This doesnt work systematically on my computer, but i am sure that if you try, your digitla weather forecast being better than mine, it will work on your computer ;)


Étape 8 - vpn openvpn configuration to make your server accessible from a 4g box or a 4g modem
In the case where it would not work with wireguard, you could user openvpn, (which is configurable with the mouse!)
Gandi.net proxy server configuration:
For that, follow the stages on https://openvpn.net/vpn-server-resources/installing-openvpn-access-server-on-a-linux-system :
27/11/23 update: there is no bookworm version of openvpn-as available for debian. Think about installing bullseye debian version
apt update && apt -y install ca-certificates wget net-tools gnupg
wget https://as-repository.openvpn.net/as-repo-public.asc -qO /etc/apt/trusted.gpg.d/as-repository.asc
echo "deb [arch=amd64 signed-by=/etc/apt/trusted.gpg.d/as-repository.asc] http://as-repository.openvpn.net/as/debian bullseye main" | sudo tee /etc/apt/sources.list.d/openvpn-as-repo.list
apt update && apt -y install openvpn-as
If the commands above dont owrk, it is possible openvpn has updated elements. Thanks to see https://openvpn.net/access-server/, sign up and follow the installation instructions
Then go on the server configuration adress: https://<adresse_ip_du_serveur>
login openvpn
password: indiqué dans le log de l'installation
screen 1: go to admin panel enter your login/password
screen2: Network settings: Activate UDP only and port 1194 then save settings
screen3: VPN Settings: enter the fields as in the screenshot and then save settings
screen 4 et 5: User Management/User permission : change the password in local password and enter the fixed ip adress on the screenshot and then save. Then update running server..
To reconnect to the configuration interface : https://adresse_ip_du_serveur:943
Rename the downloaded configuration file as openvpn.conf Open the configuration file and find the line auth-user-pass and replace it with the following line:
Configuration of orangepi/raspberrypiauth-user-pass auth.txt
Then launch on the orange pi and raspberry pi :
sudo apt update && sudo apt install openvpn
Copy the downloaded configuration file to /etc/openvpn/client/openvpn.conf on your orangepi/raspberry pi
create a file auth.txt in /etc/openvpn/client/ in which you copy the two following lines replacing password with your password
openvpn
password
Lancer ensuite le client vpn:
If you want the client to connect automatically at the start of your machine typesudo systemctl start openvpn-client@openvpn
sudo systemctl enable openvpn-client@openvpn


Étape 9 - Redirect all requests of the vpn server to the orangepi-raspberrypi
To redirect the requests on the server to the orangepi/raspberry pi, we put in place a http nginx server
sudo apt install nginx -y
We then open the configuration file of this http server:
sudo nano /etc/nginx/sites-enabled/default
Replace the content of this file with what follows
server {
listen 80;
server_name localhost;
server_tokens off;
add_header Permissions-Policy "accelerometer=(),autoplay=(),camera=(),display-capture=(),document-domain=(),encrypted-media=(),fullscreen=(),geolocation=(),gyroscope=(),magnetometer=(),microphone=(),midi=(),payment=(),picture-in-picture=(),publickey-credentials-get=(),screen-wake-lock=(),sync-xhr=(self),usb=(),web-share=(),xr-spatial-tracking=()";
add_header Strict-Transport-Security "max-age=31536000 ; includeSubDomains";
add_header X-Frame-Options "SAMEORIGIN";
add_header X-Content-Type-Options nosniff;
add_header Content-Security-Policy "script-src 'self';";
add_header X-Permitted-Cross-Domain-Policies none;
add_header Referrer-Policy no-referrer;
add_header Clear-Site-Data "cache,cookies,storage";
location / {
proxy_pass http://10.10.0.2;
proxy_set_header Host $host;
proxy_set_header X-Forwarded-For $proxy_add_x_forwarded_for;
proxy_set_header X-Real-IP $remote_addr;
proxy_set_header X-Forwarded-Proto $scheme;
client_max_body_size 20M;
limit_except GET HEAD POST {deny all;}
}
}
Nginx will redirect all requests made on the public ip of your server to your orangepi/raspberry pi nextcloud (line proxy_pass http://10.10.0.2;)
you can test if this works when going on the page:
http://ip_publique_de_votre_serveur_gandi/nextcloud
(note it's http and not https)
Watch out, many navigators dont accept very well the http redirections, see https section to configure https (it will need a domain name)
Étape 10 - domain name and fixed adress
the domain name is the adress in your navigator: for example lowtechlab.org
It will allow you to have your server reachable more easily with an adress you can remember. It only associates the domain name and the ip adress of your vpn server or the ip adress of your box.
Wether you register a domain name to redirect to your ip adress or not (it's necessary to get the https however), we must note that by default, the internet providers give you a different ip adress on each connection.
If you want a fixed ip adress, you will have to ask your internet provider. It is unfortunately not very well spread in the mainstream internet packages. Orange offers instead a "Dyndns" that allows to have a correspondance in letters to your ip but with which you can not attach easily a domain name. A few domain name registrar like infomaniak, offer however to register a domain name for the dyndns which is easily reachable without extra cost on most operators.
If you have a 4G internet connection, it is not possible to get a fixed ip and your public ip is usually a"pool" ip. That is to say that the operator gives you a public ip adress which is shared among several clients, and doesnt allow you to use the NAT/Port Forwarding technique to have your dietpi available on the internet.
You will then have to take a domain for your vpn server that redirects the requests to your dietpi.
See image attached for the recording of a domain: it is the line "@" type A you have to fill with the public ip adress of your box or your vpn proxy server.

Étape 11 - Https Configuration on the vpn proxy gandi server
If you have a proxy server
On your gandi server, do the following :
Create a file /etc/nginx/conf.d/dietpi.conf and paste the following lines:
server {
listen 80;
server_name localhost;
server_tokens off;
add_header Permissions-Policy "accelerometer=(),autoplay=(),camera=(),display-capture=(),document-domain=(),encrypted-media=(),fullscreen=(),geolocation=(),gyroscope=(),magnetometer=(),microphone=(),midi=(),payment=(),picture-in-picture=(),publickey-credentials-get=(),screen-wake-lock=(),sync-xhr=(self),usb=(),web-share=(),xr-spatial-tracking=()";
add_header Strict-Transport-Security "max-age=31536000 ; includeSubDomains";
add_header X-Frame-Options "SAMEORIGIN";
add_header X-Content-Type-Options nosniff;
add_header Content-Security-Policy "script-src 'self';";
add_header X-Permitted-Cross-Domain-Policies none;
add_header Referrer-Policy no-referrer;
#add_header Clear-Site-Data "cache,cookies,storage";
return 301 https://$host$request_uri;
location / {
return 301 https://$host$request_uri;
}
}
Then launch the following commands:
sudo apt install letsencrypt
wget https://raw.githubusercontent.com/certbot/certbot/master/certbot-nginx/certbot_nginx/_internal/tls_configs/options-ssl-nginx.conf
sudo cp options-ssl-nginx.conf /etc/letsencrypt/options-ssl-nginx.conf
wget https://raw.githubusercontent.com/certbot/certbot/master/certbot/certbot/ssl-dhparams.pem
sudo cp ssl-dhparams.pem /etc/letsencrypt/ssl-dhparams.pem
sudo rm /etc/nginx/sites-enabled/default
sudo apt remove certbot
sudo apt install python3-certbot-nginx
obtain the certificates (replace __domain__ with your domain)
sudo certbot certonly --nginx -d __domain__
then copy the following lines in your file /etc/nginx/conf.d/dietpi.conf
replacing __domain__ by your domain
server {
listen 80;
server_name localhost;
server_tokens off;
add_header Permissions-Policy "accelerometer=(),autoplay=(),camera=(),display-capture=(),document-domain=(),encrypted-media=(),fullscreen=(),geolocation=(),gyroscope=(),magnetometer=(),microphone=(),midi=(),payment=(),picture-in-picture=(),publickey-credentials-get=(),screen-wake-lock=(),sync-xhr=(self),usb=(),web-share=(),xr-spatial-tracking=()";
add_header Strict-Transport-Security "max-age=31536000 ; includeSubDomains";
add_header X-Frame-Options "SAMEORIGIN";
add_header X-Content-Type-Options nosniff;
add_header Content-Security-Policy "script-src 'self';";
add_header X-Permitted-Cross-Domain-Policies none;
add_header Referrer-Policy no-referrer;
#add_header Clear-Site-Data "cache,cookies,storage";
return 301 https://$host$request_uri;
location / {
return 301 https://$host$request_uri;
}
}
server {
listen 443 ssl http2;
server_name localhost;
server_tokens off;
ssl_certificate /etc/letsencrypt/live/__domain__/fullchain.pem;
ssl_certificate_key /etc/letsencrypt/live/__domain__/privkey.pem;
include /etc/letsencrypt/options-ssl-nginx.conf;
ssl_dhparam /etc/letsencrypt/ssl-dhparams.pem;
add_header Permissions-Policy "accelerometer=(),autoplay=(),camera=(),display-capture=(),document-domain=(),encrypted-media=(),fullscreen=(),geolocation=(),gyroscope=(),magnetometer=(),microphone=(),midi=(),payment=(),picture-in-picture=(),publickey-credentials-get=(),screen-wake-lock=(),sync-xhr=(self),usb=(),web-share=(),xr-spatial-tracking=()";
add_header Strict-Transport-Security "max-age=31536000 ; includeSubDomains";
add_header X-Frame-Options "SAMEORIGIN";
add_header X-Content-Type-Options nosniff;
add_header Content-Security-Policy "script-src 'self';";
add_header X-Permitted-Cross-Domain-Policies none;
add_header Referrer-Policy no-referrer;
#add_header Clear-Site-Data "cache,cookies,storage";
location / {
proxy_pass http://10.10.10.2;
proxy_set_header Host $host;
proxy_set_header X-Forwarded-For $proxy_add_x_forwarded_for;
proxy_set_header X-Real-IP $remote_addr;
proxy_set_header X-Forwarded-Proto $scheme;
client_max_body_size 20M;
limit_except GET HEAD POST {deny all;}
}
}
restart nginx
sudo systemctl restart nginx
Once you have completed these steps, your server is reachable online in https typing in your browser https://votre_domaine/nextcloud
Vous pouvez alors configurer nextcloud en ligne par le compte administrateur login par défaut sur dietpi: admin mot de passe par défaut sur dietpi: mot de passe entrée à l'installation de dietpi

Étape 12 - configuration https on dietpi if you are on a box
I dont have a box, i will update when it will be the case and prooftested! :)
Étape 13 - Make your nomad server offgrid with photovoltaics
Wether it be for ecology reasons, or any other reasons, it is interesting to have a energy offgrid server,
that will not rely on the grid hazards
NB: for a slightly modified version of the photovoltaics sizing (mean production/range based with jrc model in december instead of minimum sunlight hours) see my other tutorial here:
Dimensionner une installation photovoltaïque autonome
videos:
beginner basis (pannels, regulator, inverter, consumption/production): https://www.youtube.com/watch?v=8Ft4XQj9lQ4
simple myshop solaire kit assembly for 230V: https://www.youtube.com/watch?v=SvmPEhPq_S8
ready for use kits (if you have subsidies and colleagues who cooperate well):
integrated energy storage (expensive and not very lowtech)
Portable energy station : 230V BLUETTI AC200MAX
EcoFlow River 2 pro
semi lowtech kits (the one used in this guide):
120W photovoltaics pannels and lead acid car battery.
really lowtech kit:
build lithium battery from waste: see barnabé chaillot on youtube
https://www.youtube.com/watch?v=_hwj7Ds50lU
basis recall: plugging in serie (+ on + and - on -) we add voltage and we keep same amperage, plugging in paralell (+ on +, - on -) we add amperage and we keep same
same for batteries: keep in paralell to keep the same voltage
the first problematic in lowtech photovoltaics offgrid is sizing (see other tutorial
Dimensionner une installation photovoltaïque autonome)
To do so you will find a lot of information on the web.
You can use the libreoffice calc sheet attached to this tutorial for a diy sizing
Sizing-daily need:
Orangepi consumes approx. 20W
An additional usb hard drive consumes approx. 5W
A 4G modem consumes approx. 5W
So a constant need of approx 35W taking 16% of error margin
The daily need for a 24h powered server is approx: 35W*24=840Wh
The daily need for a server working by day only is :
in summer: 35W*14h=490Wh
in winter: 35W*8h=280Wh
Note this is a mean daily need and if you want to size
for varying needs, it is recommeded to proceed more precisely
calculating real time needs
Battery sizing based on autonomy time:
Estimate loss to 20% and increase the needs in consequence:
need 24h=840/0,8=1050Wh
Estimate wanted autonomy time:
example 24h
We will size batteries to hold 24h
For 12V batteries: 1050Wh/12V=87,5Ah
Considered we want to limit battery discharge to 50% we will get:
87,5Ah/05=175Ah
So 2100Wh in 12V
Based on the pannel characteristics (see calc sheet), we can estimate battery charging when the sunlight is minimal (in december)
Sizing with "full charge in x day" method:
If we want to be able to charge the batteries in one day in winter, we must consider the power produced by your pannels a day in winter with the less sunlight
If we take 3,5h for the minimum, the number of necessary pannels of X Watt will be:
C_battery: battery capacity in Wh
In our example 2100Wh
T_winter: minimum daily need in winter (in h)
In our example 3,5h
B_winter: daily need outside of sunlight time in winter (Wh)
in our example: (24h-3,5h)*35W=897Wh
n_wanted: number of wanted days to fully charge the batteries
in our example 1
I: output amperage of a pannel
in our example 7A
U: output voltage of a pannel
in our example 12V
Nb_pannels=C_battery+B_winter*n_wanted/T_wanted*I*U*n_wanted
In the example:
nb_pannel=(2100+897*1)/(3,5*12*7*1)
We will therefore need 10 pannels of 84W 7A in 12V
Notice the cardinal value here is at line 42 of the attached file, it is
daily minimal sunlight in december at nominal production. Reference values can be found at
https://re.jrc.ec.europa.eu/api/v5_2/seriescalc?lat=44.203142&lon=0.616363&loss=14&angle=45&aspect=0&startyear=2005&endyear=2005&pvcalculation=1&peakpower=1&pvtechchoice=crystSi&browser=0&outputformat=csv
But nothing compares to an empirical measurement to verify all that.
The graph in illustrationg comes from monitoring two 400km away installations from an entreprise who install and monitors photovoltaics since 2018. I'm waiting to measure all that with a reliable voltmeter on different second hand pannels to update this tutorial in december! :)
Any comment and feedback is welcome on this matter at the bottom of this page!
Sizing with try and errors method
The calc sheet offers at lines 41 and 42 to adjust the number of pannels and the mean sunlight time in december and gives the daily need outside of sunlight time in winter (Wh) and the maximum battery charge in winter (Ah and Wh). Doing try and errors on these two parameters, we can get the minimum number of pannels so the battery get charged positively in winter.
The main problematic of lowtech photovoltaics offgrid is how to store the energy.
You can read the pannel characteristics :
-peak power: they add up to obtain the necessary power found when sizing
-voltage: 12V,24V or 48V. see serie/paralell rules to add up
-amperage: varying among the models but often below 10A. see serie/paralell rules to add up
To charge batteries, in principle, if you connect the pannels directly on a battery, you only need the output pannel voltage is the same as the battery so it gets charged
There is one important component you have to think about to charge correctly your batteries:
the regulator or charging controler
Three types exist: the tor (everything or nothing), the mppt (maximum power point tracking) and the pwm (pulse width modulation)
They are built with a DC/DC adapter (direct current to dirrect current) and a circuit breaker. The mppt also has an impedance adapter (it has a resistance to adapt amperag injected in the battery). the mppt accept higher nominal power, ie higher tensions and intensity
The regulator or charging controler mainly allows to break the circuit when the battery is fully charged surveilling voltage and amperage charge levels. It breas the circuit if their values get higher than the reference range (so the charging regulator stops the charge temporarily and measures the voltage at the battery)
The mppt has an integrated "electronic algorithm" that seeks the optimal power point thanks to its impedance adapter.
If you connect several pannels and several batteries, it is recommended to have a regulator to break the charging circuit correctly when the battery is fully charged.
The charging reference voltage is 12V,24V and 48V.
However, the model prices get higher with the nominal power (that will depend on amperage) they accept
To limit amperage and photovoltaics production, it is better to use higher power pannels which generally have higher voltage output
recall: P=U*I
recall E=P*t and is kept equal in a closed system).
note: si le systeme de stockage par batterie ou l'appareil connecté à vos panneaux n'absorbe pas toute la puissance produite, et si le régulateur de charge ne coupe pas le circuit, le reste sera dégagé en chaleur.
L'amperage va aussi dependre de la capacité de stockage de vos batteries, dimensionnées pour couvrir vos besoins pendant une periode définie au dimensionnement.
Le courant de charge est calculé en divisant par 4 ou 5 la capacité nominale de la batterie exprimée en Ah qui devrait alors se recharger en 4 ou 5h. Cependant une batterie se rechargera aussi avec un courant de charge de la capacité nominale de la batterie divisée par 20 mais plus lentement (en 20h).
Dimensionnez et/ou agencez vos panneaux en conséquence.
Des montages de panneaux serie+paralelle peuvent permettrent d'ajuster tension et amperage.
Il y a enfin un dernier point sur lequel être attentif: le déclenchement de la recharge de la batterie par le regulateur/controleur de charge (qui déclenche quand la tension de la batterie diminue en dessous d'un certain seuil).
En effet, si la puissance soutirée à la batterie est trop faible, il est possible que le temps nécessaire à la décharger avec votre consommation journalière pour déclencher la recharge dans le régulateur dépasse le temps d'ensoleillement journalier. La batterie ne se recharge alors pas du tout pendant la journée.
Dans ce cas, votre batterie ne se rechargera qu'un jour sur deux ou sur trois (selon le seuil de déclenchement de la recharge du regulateur).
C'est un paramètre à prendre en compte dans le dimensionnement (non inclus dans la feuille de calcul).
Le régulateur a 3 phases:
1.bulk: le regulateur laisse passer le courant
2.floating: le regulateur alterne interupteur fermée et ouvert à une fréquence donnée pour maintenir la batterie chargée
En outre il faut prendre des précautions car la charge des batteries présente certains risques.
3.absorption (pour les mppt): la tension de charge augmente un peu pour créer une difference de potentiel suffisante pour continuer à charger la batterie presque pleine.
En théorie le courant de charge diminue lorsque la batterie est presque rechargée (courant de queue etc.)
La charge de batteries en paralelle ou en série sur des batteries usagées qui n'ont pas les mêmes tensions ou intensité présente en théorie des risques. En effet vous lirez un peu partout que la résistance des fils pour relier ces batteries
créee des différences de potentiels entre les batteries qui produisent des décharges d'une batterie envers une autre etc.
créant des risques d'explosion, de degazage pour les batteries plomb etc.
Il faut bien se rapeller que les batteries sont des assemblages de composants unitaires de faible tension mis en séries et en paralelle pour obtenir un générateur de l'intensité et la tension voulue et qu'à priori faire de même avec des batterie entiere ne présente pas vraiment de risques..
On parle souvent de "battery management system" (bms) "intégré" pour les batteries lithium ion.
En réalité le régulateur de charge est déjà un "bms". En théorie, le bms intégré s'assure que les tensions et les intensités de chaque unité composant la batterie est la même et la rééquilibre au besoin.
On peut bien sûr s'interroger si tout ceci n'est pas une façon de rendre le stockage de l'énergie plus cher avec des composants BMS artificiellement chers et si ce n'est pas une façon d'éviter de réutiliser des unités de batteries usagées.
Il est par exemple étonnant qu'il n'existe pas de BMS pour rééquilibrer automatiquement des batteries plomb acide, ce qui rendrait utilisable toutes les batteries mises au rebut de l'industrie automobile pour stocker l'énergie photovoltaïque sans risque!
Dans tous les cas, si vous réutilisez des batteries au plomb, utilisez un régulateur pour éviter de continuer à charger vos batteries rechargées (risques de production d'hydrogene) -ou si vous n'en utilisez pas dimensionnez avec beaucoup de soin-, évitez les décharges profondes, et maintenez les batteries à une temperature constante autant que possible.


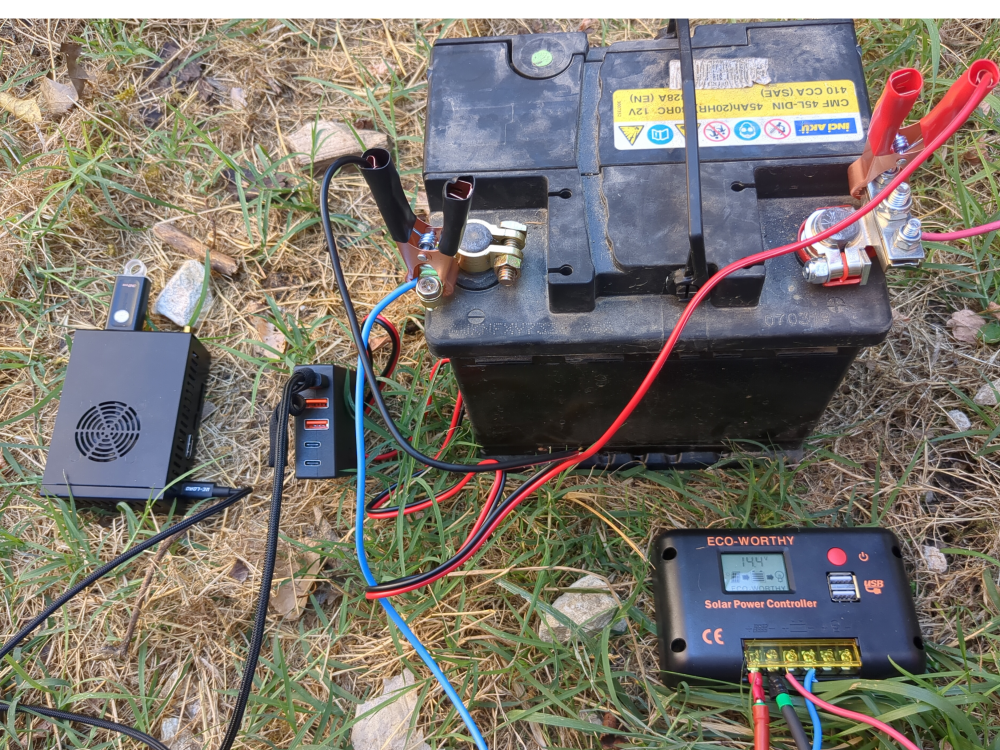
Étape 14 - Montage et test
On dimensionne sur un dixieme de la puissance de panneaux et un quart de la capacité de batterie de ce que la théorie nous a indiqué pour être autonome 24h/24h et en capacité de recharger en un seul jour en hiver, soit un panneau de 120W et une vieille batterie de voiture de 45Ah en 12V.
C'est raccord avec une approche lowtech de ne faire tourner le serveur que lorsqu'il fait jour, pour une informatique qui respecte la temporalité humaine.
Pour être bien en hiver (à hypothèse 3,5h d'ensoleillement moyen), il faudrait une batterie de plus de 58Ah, mais pour raisons budgétaire, on fait pour l'instant avec ce qu'on a! :).
Le regulateur utilisé n'accepte pas les panneaux 40V donc on n'a pas utilisé le panneau photovoltaïque d'occasion de 180W à 20€ trouvé sur leboncoin, mais je ne manquerai pas d'updater ce tuto avec des raccordement de panneaux et de batteries dès que j'aurai le materiel et avec les valeurs de production hivernale si j'y arrive!
Etapes de montage:
- Raccorder un cable electrique de la borne + de la batterie à la borne + du regulateur pwm (sortie batterie). Raccorder un cable electrique de la borne - de la batterie à la borne - du regulateur pwm (sortie batterie)
- Raccorder les panneaux aux cables mc4. Brancher le côté dénudé du cable + au + du régulateur pwm (entree panneaux). Brancher le côté dénudé du cable - au - du régulateur pwm (entree panneaux).
- Brancher les pinces du convertisseur 12V batterie/5V USB avec le + sur le + et le - sur le -
- Brancher le cable rj45 de votre box ou modem 4g au orange pi ou raspberry pi
- Brancher le cable usb du orange pi ou raspberry pi au convertisseur 12V batterie/5V USB
- Pour automatiser le fonctionnement quand il fait jour et éteindre quand il fait nuit, on utiliser un module DRL (Daytime Running Light) de voiture. Le module est un interupteur qui laisse passer le courant quand la tension est supérieure à 13V (quand le panneau solaire charge la batterie). L'interrupteur est à brancher borne + du IN sur le + de la batterie, borne - du IN sur le - de la batterie, borne + du out sur la pince rouge et borne - du out sur la pince rouge (entre la batterie et le convertisseur 12V batterie/5V USB).
Attendre quelques minutes que ca boot. Et voilà , votre serveur nextcloud est accessible en ligne ! :)
Notez que si vous voulez alimenter quelque chose en courant alternatif 220V, la seule chose qu'il manque au montage est un convertisseur DC/AC (courant continu alternatif) qu'on trouve facilement en magasin de camping car ou sur leboncoin.


Étape 15 - Securisation du serveur
Au niveau sécurité, les failles connues des cpus peuvent être trouvées sous linux en faisant:
grep -r . /sys/devices/system/cpu/vulnerabilities
Cette commande sur le orange pi (cpu CortexA55) avec dietpi installé donne:
/sys/devices/system/cpu/vulnerabilities/spectre_v2:Mitigation: Unprivileged eBPF enabled
/sys/devices/system/cpu/vulnerabilities/itlb_multihit:Not affected
/sys/devices/system/cpu/vulnerabilities/mmio_stale_data:Not affected
/sys/devices/system/cpu/vulnerabilities/mds:Not affected
/sys/devices/system/cpu/vulnerabilities/l1tf:Not affected
/sys/devices/system/cpu/vulnerabilities/spec_store_bypass:Mitigation: Speculative Store Bypass disabled via prctl
/sys/devices/system/cpu/vulnerabilities/tsx_async_abort:Not affected
/sys/devices/system/cpu/vulnerabilities/spectre_v1:Mitigation: __user pointer sanitization
/sys/devices/system/cpu/vulnerabilities/retbleed:Not affected
/sys/devices/system/cpu/vulnerabilities/srbds:Not affected
/sys/devices/system/cpu/vulnerabilities/meltdown:Not affected
Ayant testé un orange pi un raspberry pi et un odroid, le probleme reste le même.
basiques:
on peut passer sa vie à augmenter la sécurité d'un systeme informatique...
trouver le bon compromis et évaluer les risques ou appats en termes financiers.
Le hack est toujours possible, et vu le nombre de failles 0day non encore publié, quel que soit le systeme d'exploitation, la question est moins d'avoir un système infaillible, que de savoir de qui on cherche à se protéger quand on cherche à "sécuriser" ou réduire sa surface d'attaque.
Je pense que la philosophie libre reste supérieure en termes de sécurité car auditable et réparable plus vite par la "commu", mais il faut bien avouer que les reglages par défaut ne sont pas tip top car linux a été pensé pour être stable au départ (rappelez vous des écrans bleux windows il y a 30 ans), et pas "sécurisé".
Ayant subi des hacks que je considère très avancés et pas à la portée du premier venu(et ce quel que soit le système d'exploitation, quelle que soit la machine, et quel que soit le niveau de sécurisation -hors compilation de kernel-), j'ai cherché à sécuriser mes dispositifs numériques et j'en arrive aujourd'hui à penser que la "souveraineté" numérique n'existe pas ou plus, les failles créent un marché de la sécurité, ca fait travailler des gens... Voir l'article intéressant de w0nderfall au sujet de la sécurité sous linux: https://wonderfall.space/linux-securite/
Cependant quelques éléments car c'est un sujet sur lequel on trouve peu d'informations didactiques rassemblées.
-principe de limiter surface d'attaque : principe général, la sécurisation ne fait que diminuer la surface d'attaque potentielle
-acces physique sécurisé et config logicielle liée:
- acces physique: à vous de voir
-mot de passe grub
Lancer dans un terminal:
grub-mkpasswd-pbkdf2
Copier le texte qui commence par grub.pbkdf2.sha512.10000.xy
où xy est une longue suite de lettres et de chiffres
Ajouter les lignes suivantes à un fichier /etc/grub.d/42_pw
en remplacant user par votre nom d'utilisateur linux et pw par le
texte précemment copié
cat << EOF
set superusers=user
password_pbkdf2 pw
EOF
lancer ensuite la commande
update-grub
-bons mots de passes en general
pour changer le mot de passer de l'utilisateur courant taper
passwd
pour changer le mot de passe de l'utilisateur root taper
sudo passwd root
-éventuellement vérification d'intégrité du boot (voir ordinateurs de purism par exemple)
-chiffrer (crypter) ses supports de stockage:
https://doc.ubuntu-fr.org/tutoriel/chiffrer_ses_donnees
https://www.dwarmstrong.org/remote-unlock-dropbear/
sécurité d'un serveur:
-apt update automatisé : https://www.linuxtricks.fr/wiki/debian-activer-les-mises-a-jour-automatique-avec-unattended-upgrades
-ssh renforcé :
lignes à inclure dans votre configuration ssh (/etc/ssh/sshd_config):
Port 22 #changer sur un autre port si vous le souhaitez
Protocol 2
PermitRootLogin no
StrictModes yes
PermitEmptyPasswords no
X11Forwarding no
Ciphers chacha20-poly1305@openssh.com,aes256-gcm@openssh.com,aes128-gcm@openssh.com,aes256-ctr,aes192-ctr,aes128-ctr
MACs hmac-sha2-512-etm@openssh.com,hmac-sha2-256-etm@openssh.com,umac-128-etm@openssh.com,hmac-sha2-512,hmac-sha2-256,umac-128@openssh.com
KexAlgorithms curve25519-sha256,curve25519-sha256@libssh.org,diffie-hellman-group14-sha256,diffie-hellman-group16-sha512,diffie-hellman-group18-sha512,ecdh-sha2-nistp521,ecdh-sha2-nistp384,ecdh-sha2-nistp256,diffie-hellman-group-exchange-sha256
AllowTcpForwarding no
MaxSessions 1
UsePAM yes
AllowUsers user #remplacer par les utilisateurs autorisées
AllowGroups group #remplacer par les groupes autorisés
PasswordAuthentication no
AuthorizedKeysFile .ssh/authorized_keys
-firewall logiciel:
ufw: https://doc.ubuntu-fr.org/ufw
ou fichier de configuration iptables:
https://gitlab.com/aurelpere/bp028-hardening/-/blob/main/rhel_iptables_ipv4/files/server_firewall.sh
-backup: regle du 321 : 3 copies, 2 supports de stockages differents, 1 copie sur un autre lieux que les autres. borgbackup reste un standard pour sa fiabilité dans la communauté du libre (je confirme apres avoir testé plusieurs trucs) et offre un cloud pas cher pour stocker des sauvegardes "remote" qui finance le developpement de son logiciel libre.
fail2ban: https://doc.ubuntu-fr.org/fail2ban
fail2ban pour nextcloud: https://tuxicoman.jesuislibre.net/2015/01/fail2ban-pour-owncloud-7-sur-debian-jessie.html
-desactiver ipv6 (ou configurer le firewall aussi pour ipv6)
3 méthodes pour désactiver ipv6:
1.dans grub
2.avec sysctl
ajouter les lignes suivantes à /etc/systcl.conf
net.ipv6.conf.all.disable_ipv6 = 1
net.ipv6.conf.default.disable_ipv6 = 1
net.ipv6.conf.all.router_solicitations = 0
net.ipv6.conf.default.router_solicitations = 0
net.ipv6.conf.all.accept_ra_rtr_pref = 0
net.ipv6.conf.default.accept_ra_rtr_pref = 0
net.ipv6.conf.all.accept_ra_pinfo = 0
net.ipv6.conf.default.accept_ra_pinfo = 0
net.ipv6.conf.all.accept_ra_defrtr = 0
net.ipv6.conf.default.accept_ra_defrtr = 0
net.ipv6.conf.all.autoconf = 0
net.ipv6.conf.default.autoconf = 0
net.ipv6.conf.all.accept_redirects = 0
net.ipv6.conf.default.accept_redirects = 0
net.ipv6.conf.all.accept_source_route = 0
net.ipv6.conf.default.accept_source_route = 0
net.ipv6.conf.all.max_addresses = 1
net.ipv6.conf.default.max_addresses = 1
3.avec le network manager nmcli
-sécuriser le serveur en cas de multi utilisateur ou autres utilisateurs ayant obtenu un accès:
listes de fichiers à sécuriser (permissions etc.): https://linuxfr.org/forums/linux-general/posts/liste-des-fichiers-linux-a-securiser-owner-group-permissions-setuid-setgid-sticky-bit
guides de durcissement anssi : https://www.ssi.gouv.fr/guide/recommandations-de-securite-relatives-a-un-systeme-gnulinux/
Pour aller plus loin en termes de sécurité:
firewall physique libre: pcengines/ logiciel libre OPNSense
fail2ban avec listes géographiques: https://thecustomizewindows.com/2016/11/fail2ban-geoip-action-script-block-ssh-country/
Créer un sas de connection à votre service en ligne (MySafeip): https://linuxfr.org/news/mysafeip-un-tiers-de-confiance-pour-votre-pare-feu
sécuriser les services systemd linux: https://github.com/juju4/ansible-harden-systemd
compiler un kernel :
https://doc.ubuntu-fr.org/tutoriel/comment_compiler_un_kernel_de_kernel.org
Étape 16 - Activer le wifi lors de l'installation (par exemple avec un raspberry)
wpa2:
Lorsque vous démarrez pour la premiere fois votre raspberry avec dietpi sur la clé usb ou la carte sd, le programme d'installation va vous afficher un menu suite à une erreur ("Checking ipv4 network connectivity") [...] ping: connect: Network is unreachabel")
Aller alors dans "network-settings" puis suivez les menus indiqués dans les images jointes
wpa3: voir etape 6


Notes et références
Pas de remerciements, c'est galère et on m'a pas aidé ;)
Le tuto et son contenu ne sont pas issus d'expertise ou de formation spécifique mais de bidouillages et d'informations glanées ça et là donc soyez indulgents ;)
Tout retour d'experience est bienvenu dans les commentaires
Published
 Français
 English
 Deutsch
 Español
 Italiano
 Português