

Difficulté
Facile
Durée
1 heure(s)
Coût
10-15 EUR (€)
Description
Système de micro-irrigation semi-enterré.
Sommaire
Sommaire
- 1 Description
- 2 Sommaire
- 3 Introduction
- 4 Étape 1 - Matching (and adjusting) the two pots
- 5 Étape 2 - Enlarge the hole at the bottom of the pot
- 6 Étape 3 - Smoothing the edges of the hole
- 7 Étape 4 - Wet the surfaces to be bonded
- 8 Étape 5 - Plug the bottom of the large pot
- 9 Étape 6 - Join the two pots
- 10 Étape 7 - Assembling the float
- 11 Étape 8 - Attach the float to the cover
- 12 Étape 9 - Peindre le couvercle
- 13 Étape 10 - Installer l'oya
- 14 Commentaires
Introduction
Les oyas (ou ollas) sont des récipients en terre cuite et en forme de poire. Ils sont poreux et disposent d’une ouverture vers le haut. Elles sont utilisées depuis l’antiquité pour irriguer le sol en douceur. Pour cela, il suffit de les enterrer en laissant seulement la partie haute dépasser, pour permettre leur remplissage.
Ce tutoriel va vous accompagner dans la fabrication d'une oya de ~7L, capable de maintenir un sol humide dans un rayon de ~ 60 cm (entre 1 et 1,5 m2) sur une durée d’environ ~10 jours.
Nota: différentes tailles d'oyas peuvent être fabriquées en suivant les même étapes. Les dimensions indiquées ici ne sont qu'indicatives.
Les avantages de ce mode d'irrigation sont nombreux:
- l'eau consommée ne subit aucune évaporation, elle n'entraîne aucun lessivage du sol, et évite l'apparition des maladies fongiques causées par l'humidité du feuillage (ex. mildiou)
- la diffusion de l'eau dans le sol se fait lentement, elle laisse aux racines avoisinantes le temps d'en profiter
- les racines des plantes (ou des arbres) plongent dans le sol, au lieu de rester en surface
- lorsque le sol est déjà humide (ex. après une grosse pluie) l'eau reste dans l'oya
- l'arrosage est plus rapide (il suffit de remplir l'oya) et plus simple (on peut le confier à un voisin qui ne jardine pas)
- l'eau dans l'oya se met à température, elle ne crée pas de choc thermique pour la plante
Matériaux
- 2 pots en terre cuite (non peints)
- 1 grand : diamètre = 23 cm (mesuré sur l'extérieur du bord haut)
- 1 petit: diamètre = 21 cm
- soucoupe adaptée au petit pot : diamètre = 16 cm
- tesson de carrelage (environ 5 cm x 5 cm)
- colle à carrelage (compter ~50 g par oya)
- peinture blanche
- 1 pic à brochette (ou 1 clou + 2 pailles en plastique )
- ~30 cm de fil de fer
- 1 bouchon de liège
Outils
- crayon de maçon (ou marqueur)
- râpe à bois demi-ronde "grosse piqûre" (pour râper les bords)
- ALTERNATIVE : ponceuse + abrasif gros grain (<60)
- ALTERNATIVE : disqueuse + disque "diamant"
- scie-sauteuse + lame "diamant" (pour les découpes)
- ALTERNATIVE : perceuse + trépans de maçonnerie (diamètre ~70mm)
- ALTERNATIVE : disqueuse + disque diamant + pince perroquet
- deep bucket or tub for soaking
- small masonry equipment
- fine shovel ("cat's tongue" type)
- mason's bucket or dipper
- heavy duty sponge
- brush
- hand towel (or old towel)
- drill
- 1 fine drill bit (~2.5mm): wire diameter
- 1 thick drill (~4.5mm): > the diameter of the skewer (or straws)
- cutting pliers (for the wire)
Étape 1 - Matching (and adjusting) the two pots
Goal: that the upper parts of the pots fit together well enough two by two to then allow a solid, watertight seal.
Even when manufactured industrially, clay pots are not always perfectly round, and their dimensions can vary.
If the 2 pots do not fit together sufficiently:
- look for a better fit by turning the top one on its axis
- plane the rim of the pot using a wood file, a sander or an angle grinder
Once fitted, mark the chosen position.

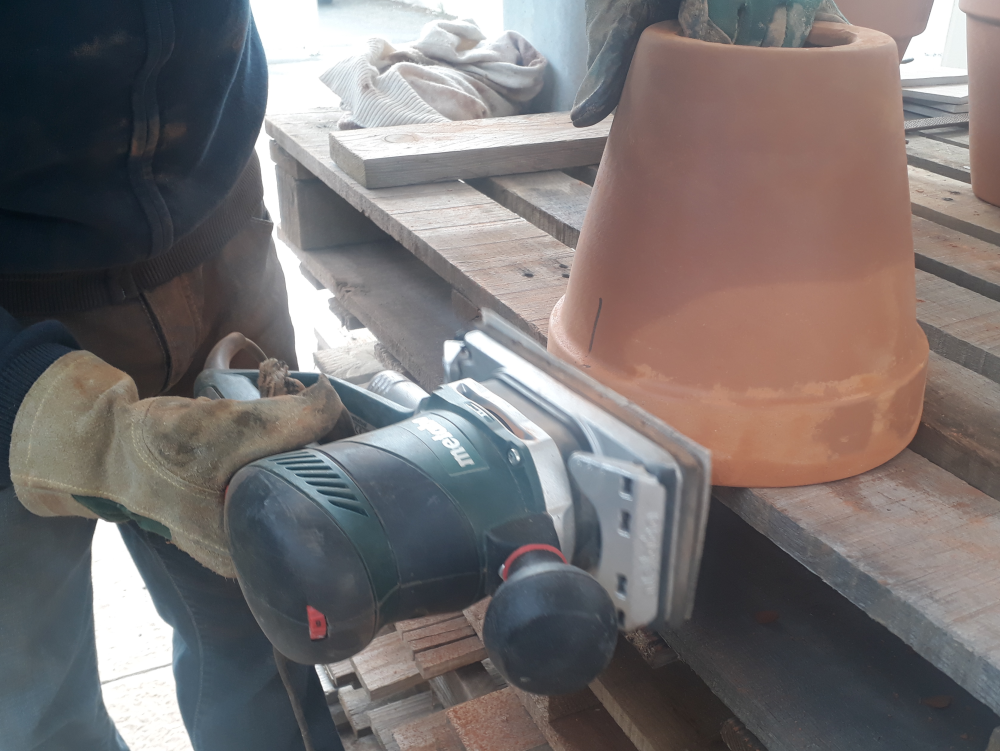

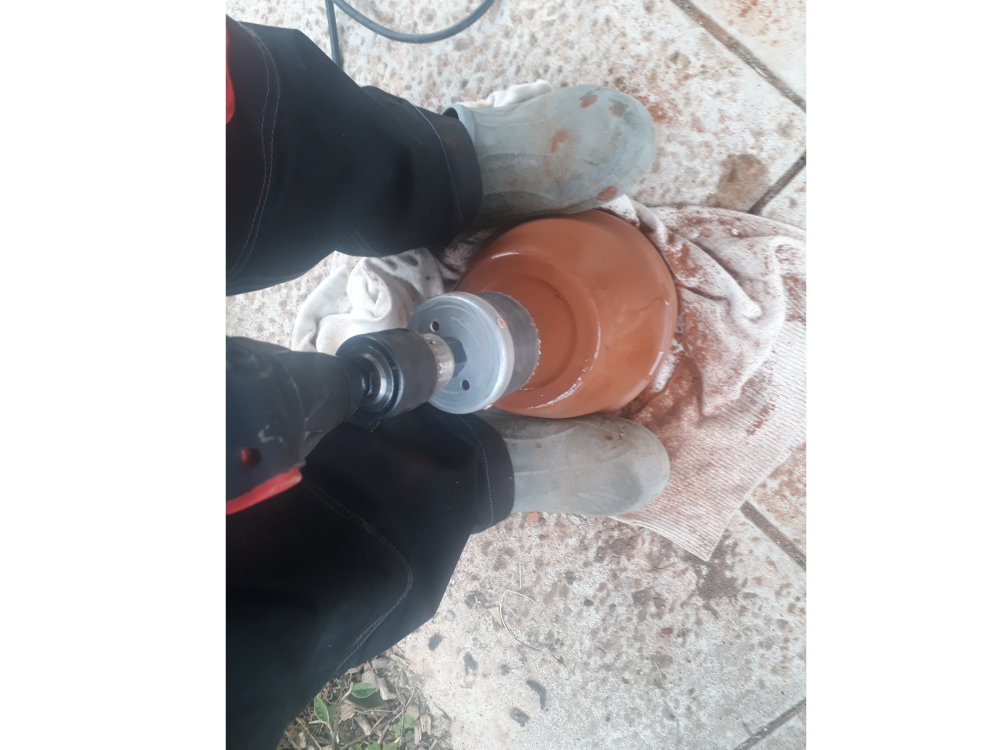
Étape 2 - Enlarge the hole at the bottom of the pot
Goal: make it easier to fill and clean the oya
Place the pot on the tea towel (or towel), open side down.
Using the jigsaw, cut a spiral shape until you reach a disc that you can pass your hand through.
During cutting, be sure to press the pot firmly downwards to limit vibration.
No jigsaw? You can achieve the same result with
- a drill + drill bit
- or an angle grinder + parrot beak pliers

Étape 3 - Smoothing the edges of the hole
Once you've removed the base of the pot, smooth the edges with a wood rasp to avoid injuring yourself when you reach in.

Étape 4 - Wet the surfaces to be bonded
Goal: that the glue doesn't set too quickly
Ideally, the pots should be completely immersed for 2~3 minutes.
If you don't have a large enough container, try to wet the parts that will receive the glue.

Étape 5 - Plug the bottom of the large pot
Goal: promote slow, lateral water diffusion in the future oya
Prepare ~0.5L of tile adhesive (refer to the instructions on the bag).
Use around a third to "butter" the shard of tiles, place it over the hole and fill the bottom of the large pot.
Drying time: refer to the instructions for the tile adhesive used
The rest is for storage (in the shade) and will be used later to assemble the two pots.

Étape 6 - Join the two pots
Goal: create an assembly that is watertight (so that water doesn't come out between the two pots), and solid (so that the oya can be easily transported and reused)
Match the two pots by referring to the mark made in step 1.
Use the remaining glue to fill the gap in the groove between the pots (pressing the glue down firmly).
When you have finished, wipe the joint with a slightly damp sponge to remove any excess glue and smooth the joint.
Drying time: refer to the instructions for the tile adhesive used

Étape 7 - Assembling the float
Goal: make a float that will indicate the level of water remaining in the oya
- Option " skewer pick "
Stick the spike into the cork deep enough so that the two pieces are joined together.
- Straw and nail option
Drive the nail completely into the cork. On the point protruding from the cork, attach the first straw and assemble as many straws as you need to cover the height of the cork.
Étape 8 - Attach the float to the cover
Goal: allow the float to protrude from the oya and keep it in a vertical position
Avec la perceuse équipée de la mèche épaisse, percer au centre de la soucoupe le trou qui permettra de faire passer le flotteur.
Avec la mèche mince, percer trois trous autour du trou principal pour disposer le fil de fer.
Avec le fil de fer (et la pince coupante), réaliser une forme permettant:
- de fixer le fil via les trois trous fins
- de maintenir le flotteur vertical
Étape 9 - Peindre le couvercle
Objectif: faciliter le repérage de l'oya lorsqu'il sera installé et réverbérer les rayons solaires
Une fois votre oya installée, la soucoupe sera son chapeau et sera la seule partie visible au sol.
Appliquer la peinture blanche sur la partie visible de la soucoupe. (donc le dessous)

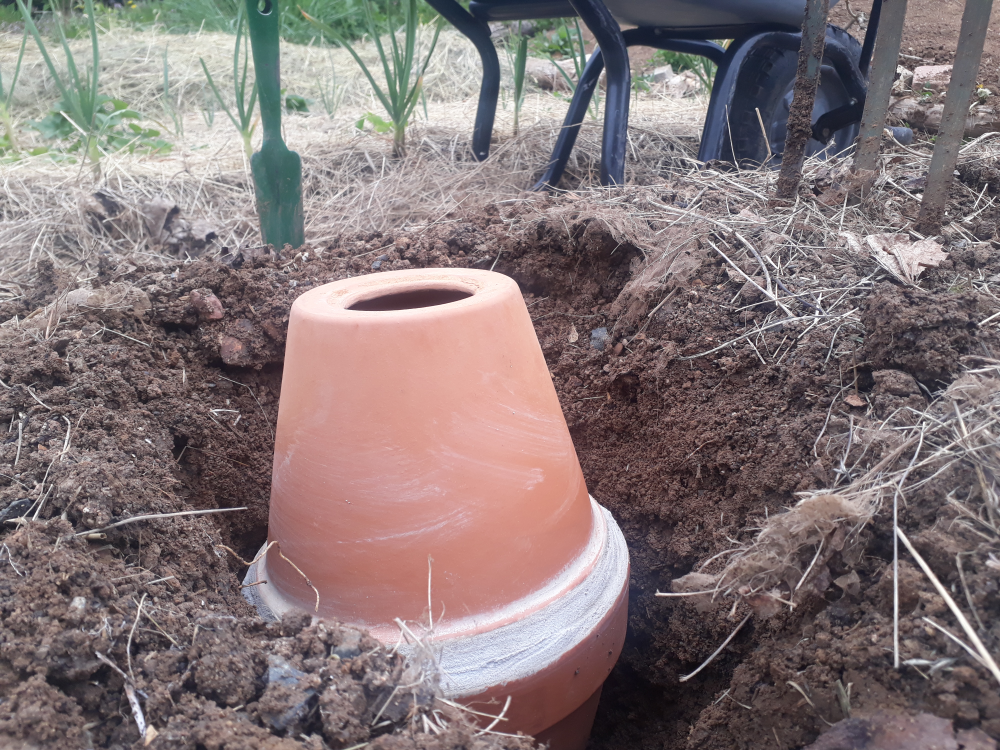
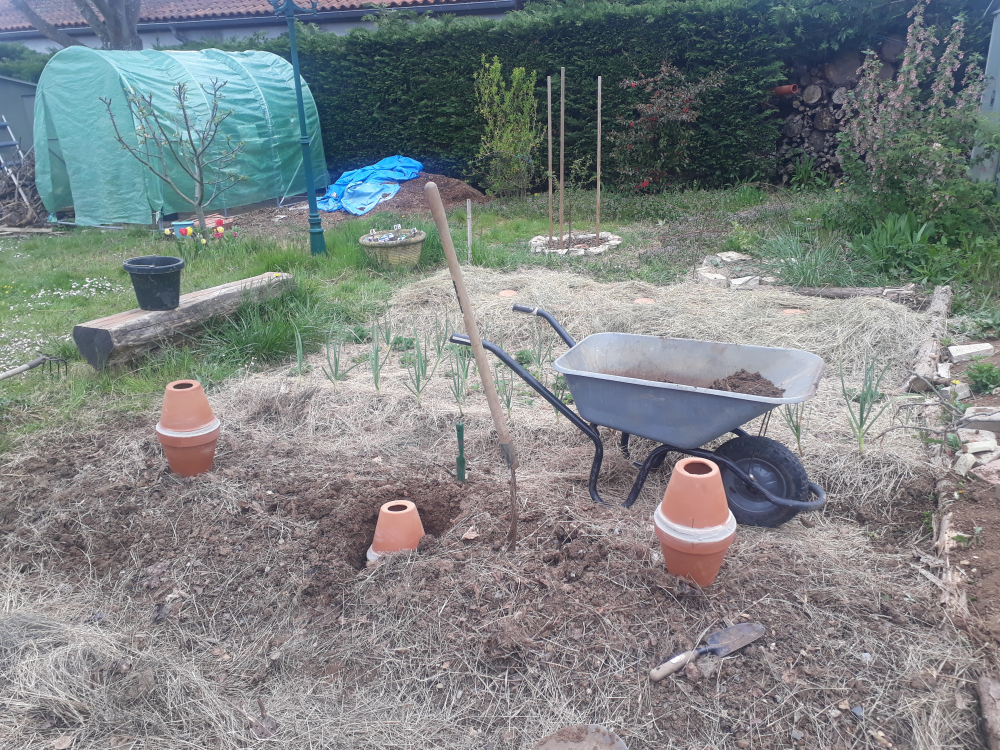
Étape 10 - Installer l'oya
Objectif: enterrer l'oya dans votre espace cultivé (ou au pied d'un arbre)
Creuser 1 trou d'environ 40cm de profondeur et 30cm de diamètre.
Installer l'oya en veillant à sa bonne verticalité.
Caler l'oya avec un mélange de terre et terreau adapté aux cultures prévues. Dans le cas d'une installation au pied d'un arbre:
- choisir une distance au tronc qui ne va pas endommager le système racinaire de l'arbre (l'idéal étant d'installer en même temps l'arbre et l'oya)
- anticiper la croissance du diamètre du tronc de l'arbre


Published
 Français
 English
 Deutsch
 Español
 Italiano
 Português
#/media/Fichier:Raspel_Baiter.jpg)