| Ligne 42 : | Ligne 42 : | ||
{{ {{tntn|Tuto Step}} | {{ {{tntn|Tuto Step}} | ||
|Step_Title=Create the weaving loom | |Step_Title=Create the weaving loom | ||
| − | |Step_Content= | + | |Step_Content=Use your pencil and ruler to draw a square 12cmx12cm. |
| − | Put 20 nails every 2 cm. | + | Put 20 nails every 2 cm. With your hammer, firmly plant the nails into the board onto each of the 20 dots. |
| + | }} | ||
| + | {{ {{tntn|Tuto Step}} | ||
| + | |Step_Title=Prepare the cloth | ||
| + | |Step_Content=Choose a sock that can stretch over 12 cm. | ||
| + | |||
| + | Use your scissors to cut 10 rings of 4 cm width on your socks. | ||
| + | }} | ||
| + | {{ {{tntn|Tuto Step}} | ||
| + | |Step_Title=Attach the rings | ||
| + | |Step_Content=Attach the rings to the nails vertically, only in one side. | ||
| + | |||
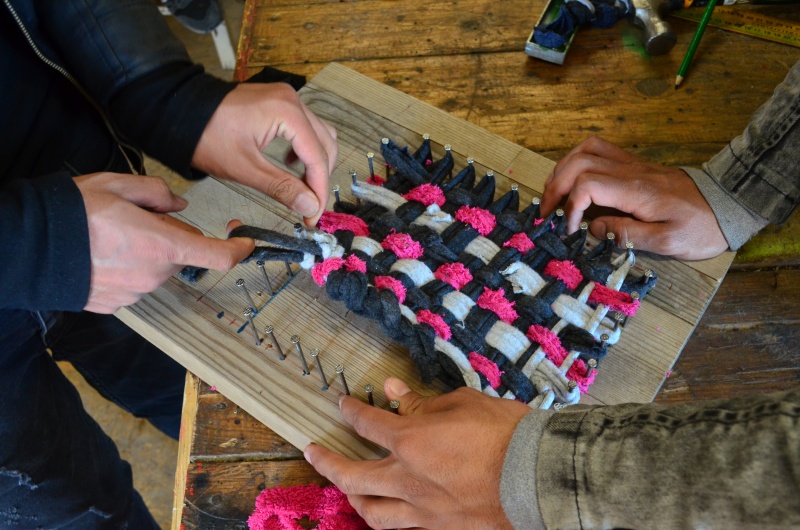
| + | Attach 5 rings vertically (see image). | ||
}} | }} | ||
{{ {{tntn|Notes}} | {{ {{tntn|Notes}} | ||
Version du 12 mars 2019 à 10:29
Difficulté
Très facile
Durée
15 minute(s)
Coût
0 EUR (€)
Description
This tutorial aims to provide another life to your old cloth or pieces of cloth by doing an eco-friendly sponge.
Étape 1 - Create the weaving loom
Use your pencil and ruler to draw a square 12cmx12cm.
Put 20 nails every 2 cm. With your hammer, firmly plant the nails into the board onto each of the 20 dots.
Étape 2 - Prepare the cloth
Choose a sock that can stretch over 12 cm.
Use your scissors to cut 10 rings of 4 cm width on your socks.
Étape 3 - Attach the rings
Attach the rings to the nails vertically, only in one side.
Attach 5 rings vertically (see image).
Draft


 Français
 English
 Deutsch
 Español
 Italiano
 Português