(Page créée avec « *Giant mustard ») |
(Page créée avec « '''Document written by Emma Bousquet-Pasturel as part of [https://www.biosphere-experience.org/ Biosphère Expérience's] participatory science program.''' ») |
||
| (31 révisions intermédiaires par le même utilisateur non affichées) | |||
| Ligne 349 : | Ligne 349 : | ||
*Giant mustard | *Giant mustard | ||
| − | + | *Red mustard | |
| − | + | *Wasabina mustard | |
| − | + | *Bok choy | |
| − | + | *Parsley | |
| − | + | *Summer purslane | |
| − | + | *Round radish | |
| − | + | *Chard | |
| − | + | *Large thyme | |
| − | + | *HierbaBuena | |
| − | + | *Lemon balm | |
| − | + | *Morning Glory | |
| − | + | *Oregano | |
| − | + | *Rauram | |
| − | + | *Tatsoï | |
| − | + | *Sweet potato | |
| − | + | *Cherry tomato | |
}} | }} | ||
{{Tuto Step | {{Tuto Step | ||
| − | |Step_Title= | + | |Step_Title=Positioning the plants in the gutter |
| − | |Step_Content=''' | + | |Step_Content='''Assembly A''' |
| − | * | + | *Collect seedlings, micro-shoots or make your own seedlings. Wash your plants to remove all soil from the roots (see photo 1) |
| − | {{Idea| | + | {{Idea| This is a crucial step, so be careful not to break any roots, especially when removing the soil.}}<br /> |
| − | * | + | *Place the plants in your hydroponic pots, then cover the roots with clay balls up to the top of the pot (see photo 2). |
| − | * | + | *Place your hydroponic pots in the holes in the waterproof fabric (see photo 3). |
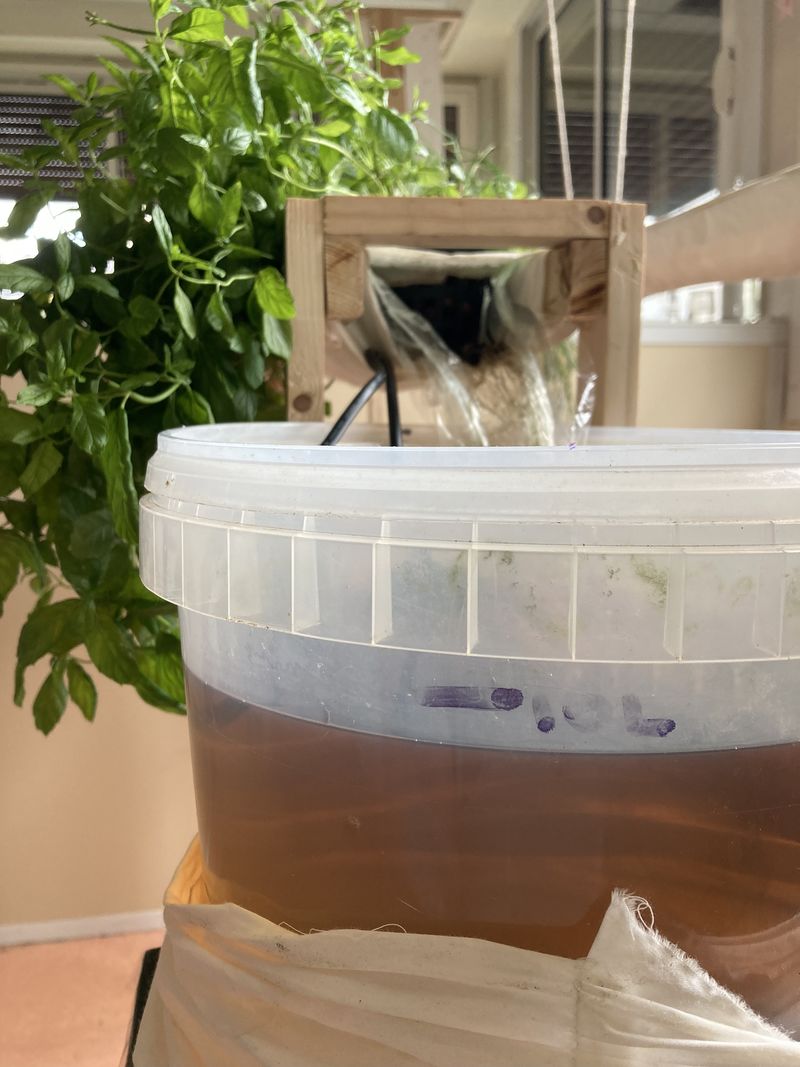
| − | * | + | *Fill the bucket with 10 L of water. Mark this height with an indelible marker (see photo 5). |
| − | * | + | *Add 2 mL of organic fertilizer to 1 L of water in the bucket. Here, we have a 10 L bucket, so add 20 mL of organic fertilizer. |
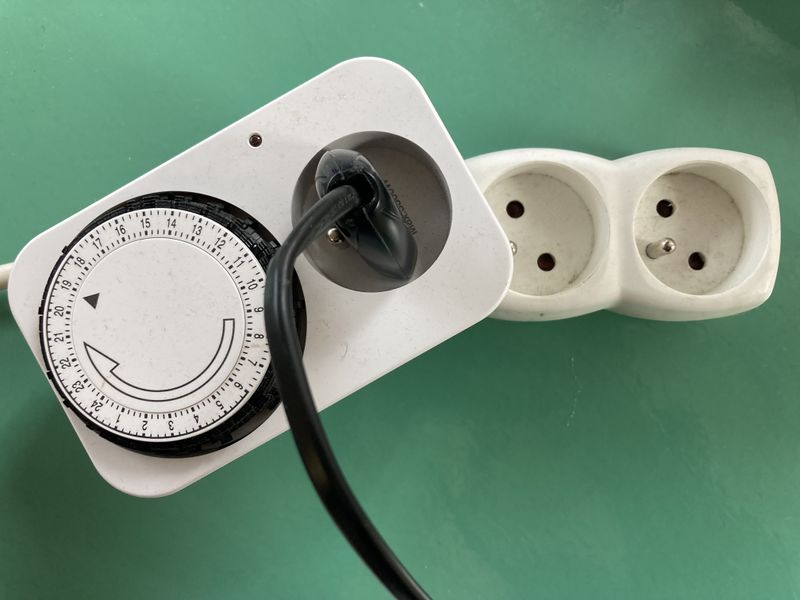
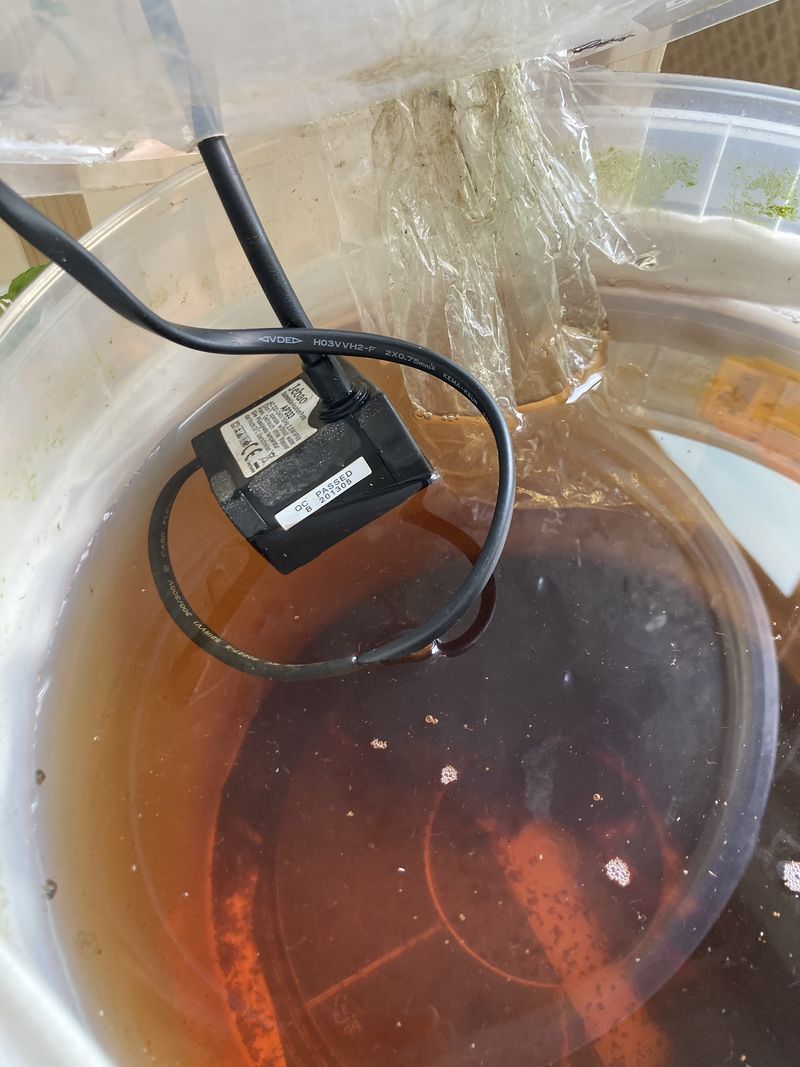
| − | * | + | *Connect the program plug to your home's power supply. Make sure the water pump is always immersed in the water in the bucket. Set your program plug to 15 min every hour (see photo 6). |
| − | ''' | + | '''Assembly B''' |
| − | * | + | *Collect seedlings, micro-sprouts or make your own seedlings. Wash your plant to remove all soil from the roots (see photo 1). |
| − | {{Idea| | + | {{Idea|This is a crucial step, so be careful not to break any roots, especially when removing the soil.}}<br /> |
| − | * | + | *Fill the gutter with clay balls, about 50 mm high. Place your plants directly in the clay balls (see photo 4). |
| − | * | + | *Fill the bucket with 10 L of water. Mark this height with an indelible marker (see photo 5). |
| − | * | + | *Add 2 mL of organic fertilizer to 1 L of water in the bucket. Here, we have a 10 L bucket, so add 20 mL of organic fertilizer. |
| − | * | + | *Connect the program plug to your home's power supply. Make sure the water pump is always immersed in the water in the bucket. Set your programmable plug to 15 min every hour (see photo 6). |
|Step_Picture_00=Mission_2_-_Le_jardin_d_int_rieur_Sans_titre_-_1-16.png | |Step_Picture_00=Mission_2_-_Le_jardin_d_int_rieur_Sans_titre_-_1-16.png | ||
|Step_Picture_00_annotation={"version":"3.5.0","objects":[{"type":"image","version":"3.5.0","originX":"left","originY":"top","left":0,"top":0.25,"width":2480,"height":3317,"fill":"rgb(0,0,0)","stroke":null,"strokeWidth":0,"strokeDashArray":null,"strokeLineCap":"butt","strokeDashOffset":0,"strokeLineJoin":"miter","strokeMiterLimit":4,"scaleX":0.24,"scaleY":0.24,"angle":0,"flipX":false,"flipY":false,"opacity":1,"shadow":null,"visible":true,"clipTo":null,"backgroundColor":"","fillRule":"nonzero","paintFirst":"fill","globalCompositeOperation":"source-over","transformMatrix":null,"skewX":0,"skewY":0,"crossOrigin":"","cropX":0,"cropY":0,"src":"https://wiki.lowtechlab.org/images/f/fa/Mission_2_-_Le_jardin_d_int_rieur_Sans_titre_-_1-16.png","filters":[]},{"type":"textbox","version":"3.5.0","originX":"center","originY":"center","left":463.55,"top":31,"width":156.92,"height":22.6,"fill":"#000000","stroke":"#000000","strokeWidth":1,"strokeDashArray":null,"strokeLineCap":"butt","strokeDashOffset":0,"strokeLineJoin":"miter","strokeMiterLimit":4,"scaleX":1,"scaleY":1,"angle":0,"flipX":false,"flipY":false,"opacity":1,"shadow":null,"visible":true,"clipTo":null,"backgroundColor":"","fillRule":"nonzero","paintFirst":"fill","globalCompositeOperation":"source-over","transformMatrix":null,"skewX":0,"skewY":0,"text":"Montages A et B","fontSize":20,"fontWeight":"normal","fontFamily":"sans-serif","fontStyle":"normal","lineHeight":1.16,"underline":false,"overline":false,"linethrough":false,"textAlign":"left","textBackgroundColor":"","charSpacing":0,"minWidth":20,"splitByGrapheme":false,"styles":{} }],"height":803,"width":600} | |Step_Picture_00_annotation={"version":"3.5.0","objects":[{"type":"image","version":"3.5.0","originX":"left","originY":"top","left":0,"top":0.25,"width":2480,"height":3317,"fill":"rgb(0,0,0)","stroke":null,"strokeWidth":0,"strokeDashArray":null,"strokeLineCap":"butt","strokeDashOffset":0,"strokeLineJoin":"miter","strokeMiterLimit":4,"scaleX":0.24,"scaleY":0.24,"angle":0,"flipX":false,"flipY":false,"opacity":1,"shadow":null,"visible":true,"clipTo":null,"backgroundColor":"","fillRule":"nonzero","paintFirst":"fill","globalCompositeOperation":"source-over","transformMatrix":null,"skewX":0,"skewY":0,"crossOrigin":"","cropX":0,"cropY":0,"src":"https://wiki.lowtechlab.org/images/f/fa/Mission_2_-_Le_jardin_d_int_rieur_Sans_titre_-_1-16.png","filters":[]},{"type":"textbox","version":"3.5.0","originX":"center","originY":"center","left":463.55,"top":31,"width":156.92,"height":22.6,"fill":"#000000","stroke":"#000000","strokeWidth":1,"strokeDashArray":null,"strokeLineCap":"butt","strokeDashOffset":0,"strokeLineJoin":"miter","strokeMiterLimit":4,"scaleX":1,"scaleY":1,"angle":0,"flipX":false,"flipY":false,"opacity":1,"shadow":null,"visible":true,"clipTo":null,"backgroundColor":"","fillRule":"nonzero","paintFirst":"fill","globalCompositeOperation":"source-over","transformMatrix":null,"skewX":0,"skewY":0,"text":"Montages A et B","fontSize":20,"fontWeight":"normal","fontFamily":"sans-serif","fontStyle":"normal","lineHeight":1.16,"underline":false,"overline":false,"linethrough":false,"textAlign":"left","textBackgroundColor":"","charSpacing":0,"minWidth":20,"splitByGrapheme":false,"styles":{} }],"height":803,"width":600} | ||
| Ligne 415 : | Ligne 415 : | ||
}} | }} | ||
{{Tuto Step | {{Tuto Step | ||
| − | |Step_Title=Maintenance | + | |Step_Title=Maintenance and follow-up |
| − | |Step_Content=''' | + | |Step_Content='''Daily maintenance involves ensuring that the water level in the bucket is stable, that the pump is always submerged and that the plants are healthy.''' |
| − | ''' | + | '''Maintenance time''' : 2 minutes per day |
<br /> | <br /> | ||
| − | * | + | *At the start ofthe experiment, dose at approximately 0.6 g/L of water, i.e. 6 g for a 10 L bucket. Mix the solution thoroughly |
| − | * | + | *Throughout the experiment, make sure your water level is stable and that the water pump is always immersed in the bucket. Add water when necessary |
| − | * | + | *Every 15 days, add 0.4 g/L of water, i.e. 4 g for a 10 L bucket. Mix the solution well |
| − | {{Idea| | + | {{Idea|When your plants are feeling well, they'll start to grow and form new roots. The whiter the roots, the healthier your plants will be.}} |
| − | ''' | + | '''Monitoring growth''' |
| − | * | + | *We encourage you to record your observations as your plants grow, and to share your questions and tips on the WhatsApp group to which you've been added. |
'''Questionnaires''' | '''Questionnaires''' | ||
| − | * | + | *Don't forget to fill in the questionnaire every Sunday! |
<br /> | <br /> | ||
| Ligne 442 : | Ligne 442 : | ||
}} | }} | ||
{{Notes | {{Notes | ||
| − | |Notes='''Document | + | |Notes='''Document written by Emma Bousquet-Pasturel as part of [https://www.biosphere-experience.org/ Biosphère Expérience's] participatory science program.''' |
}} | }} | ||
{{PageLang | {{PageLang | ||
Version actuelle datée du 17 décembre 2024 à 09:33
Description
This tutorial was created as part of mission #2 "Indoor garden" of the participatory science program run by the Biosphère Expérience association. It presents the steps involved in building the bioponic device, as well as the protocol to be followed during the 2-month experiment from September 1 to October 31, 2024.
Sommaire
Sommaire
- 1 Description
- 2 Sommaire
- 3 Introduction
- 4 Video d'introduction
- 5 Étape 1 - Planning
- 6 Étape 2 - Purchasing equipment
- 7 Étape 3 - Tips and precautions
- 8 Étape 4 - Cutting the cleats
- 9 Étape 5 - Gutter structure
- 10 Étape 6 - Making the sock
- 11 Étape 7 - Fitting the sock to the gutter
- 12 Étape 8 - Sealing the gutter
- 13 Étape 9 - The following steps are for assembly A
- 14 Étape 10 - Making the upper fabric
- 15 Étape 11 - Sealing the upper fabric
- 16 Étape 12 - Fixing the waterproof fabric to the cleats
- 17 Étape 13 - Gutter assembly
- 18 Étape 14 - Finishing assembly B
- 19 Étape 15 - The following steps are common to both assemblies
- 20 Étape 16 - Installing the gutter
- 21 Étape 17 - Irrigation system
- 22 Étape 18 - Experimentation phase
- 23 Étape 19 - Choice of plants
- 24 Étape 20 - Positioning the plants in the gutter
- 25 Étape 21 - Maintenance and follow-up
- 26 Notes et références
- 27 Commentaires
Introduction
Project
Biosphère Expérience's participatory science program aims to study the implementation and use of low-tech in everyday life from a technical, sociological, ergonomic and psychological point of view. These citizen experiments will make it possible to collect a wide range of data, which will then be analyzed from November 1, 2024, and will be the subject of an experimental report and scientific publications.
Mission #2 : The indoor garden
The aim of this mission is to promote the cultivation of edible seedlings in biopony, an above-ground growing system adapted to urban areas. Using a closed-circuit water basin and organic fertilizers, this system produces plants rich in vitamins and minerals, while requiring up to 10 times less water than traditional soil-based cultivation. We propose to build a system that can accommodate 9 plants.
Objectives
Everyone is capable of experimenting with growing edible sprouts in biopony! The aim of this mission is to study the effectiveness and acceptability of such a crop, and to explore ways of changing our eating habits.
Youtube
Matériaux
This is an exhaustive list of materials. If you already have some items, we recommend favoring second-hand options and adapting the diameters and dimensions indicated in the tutorial.
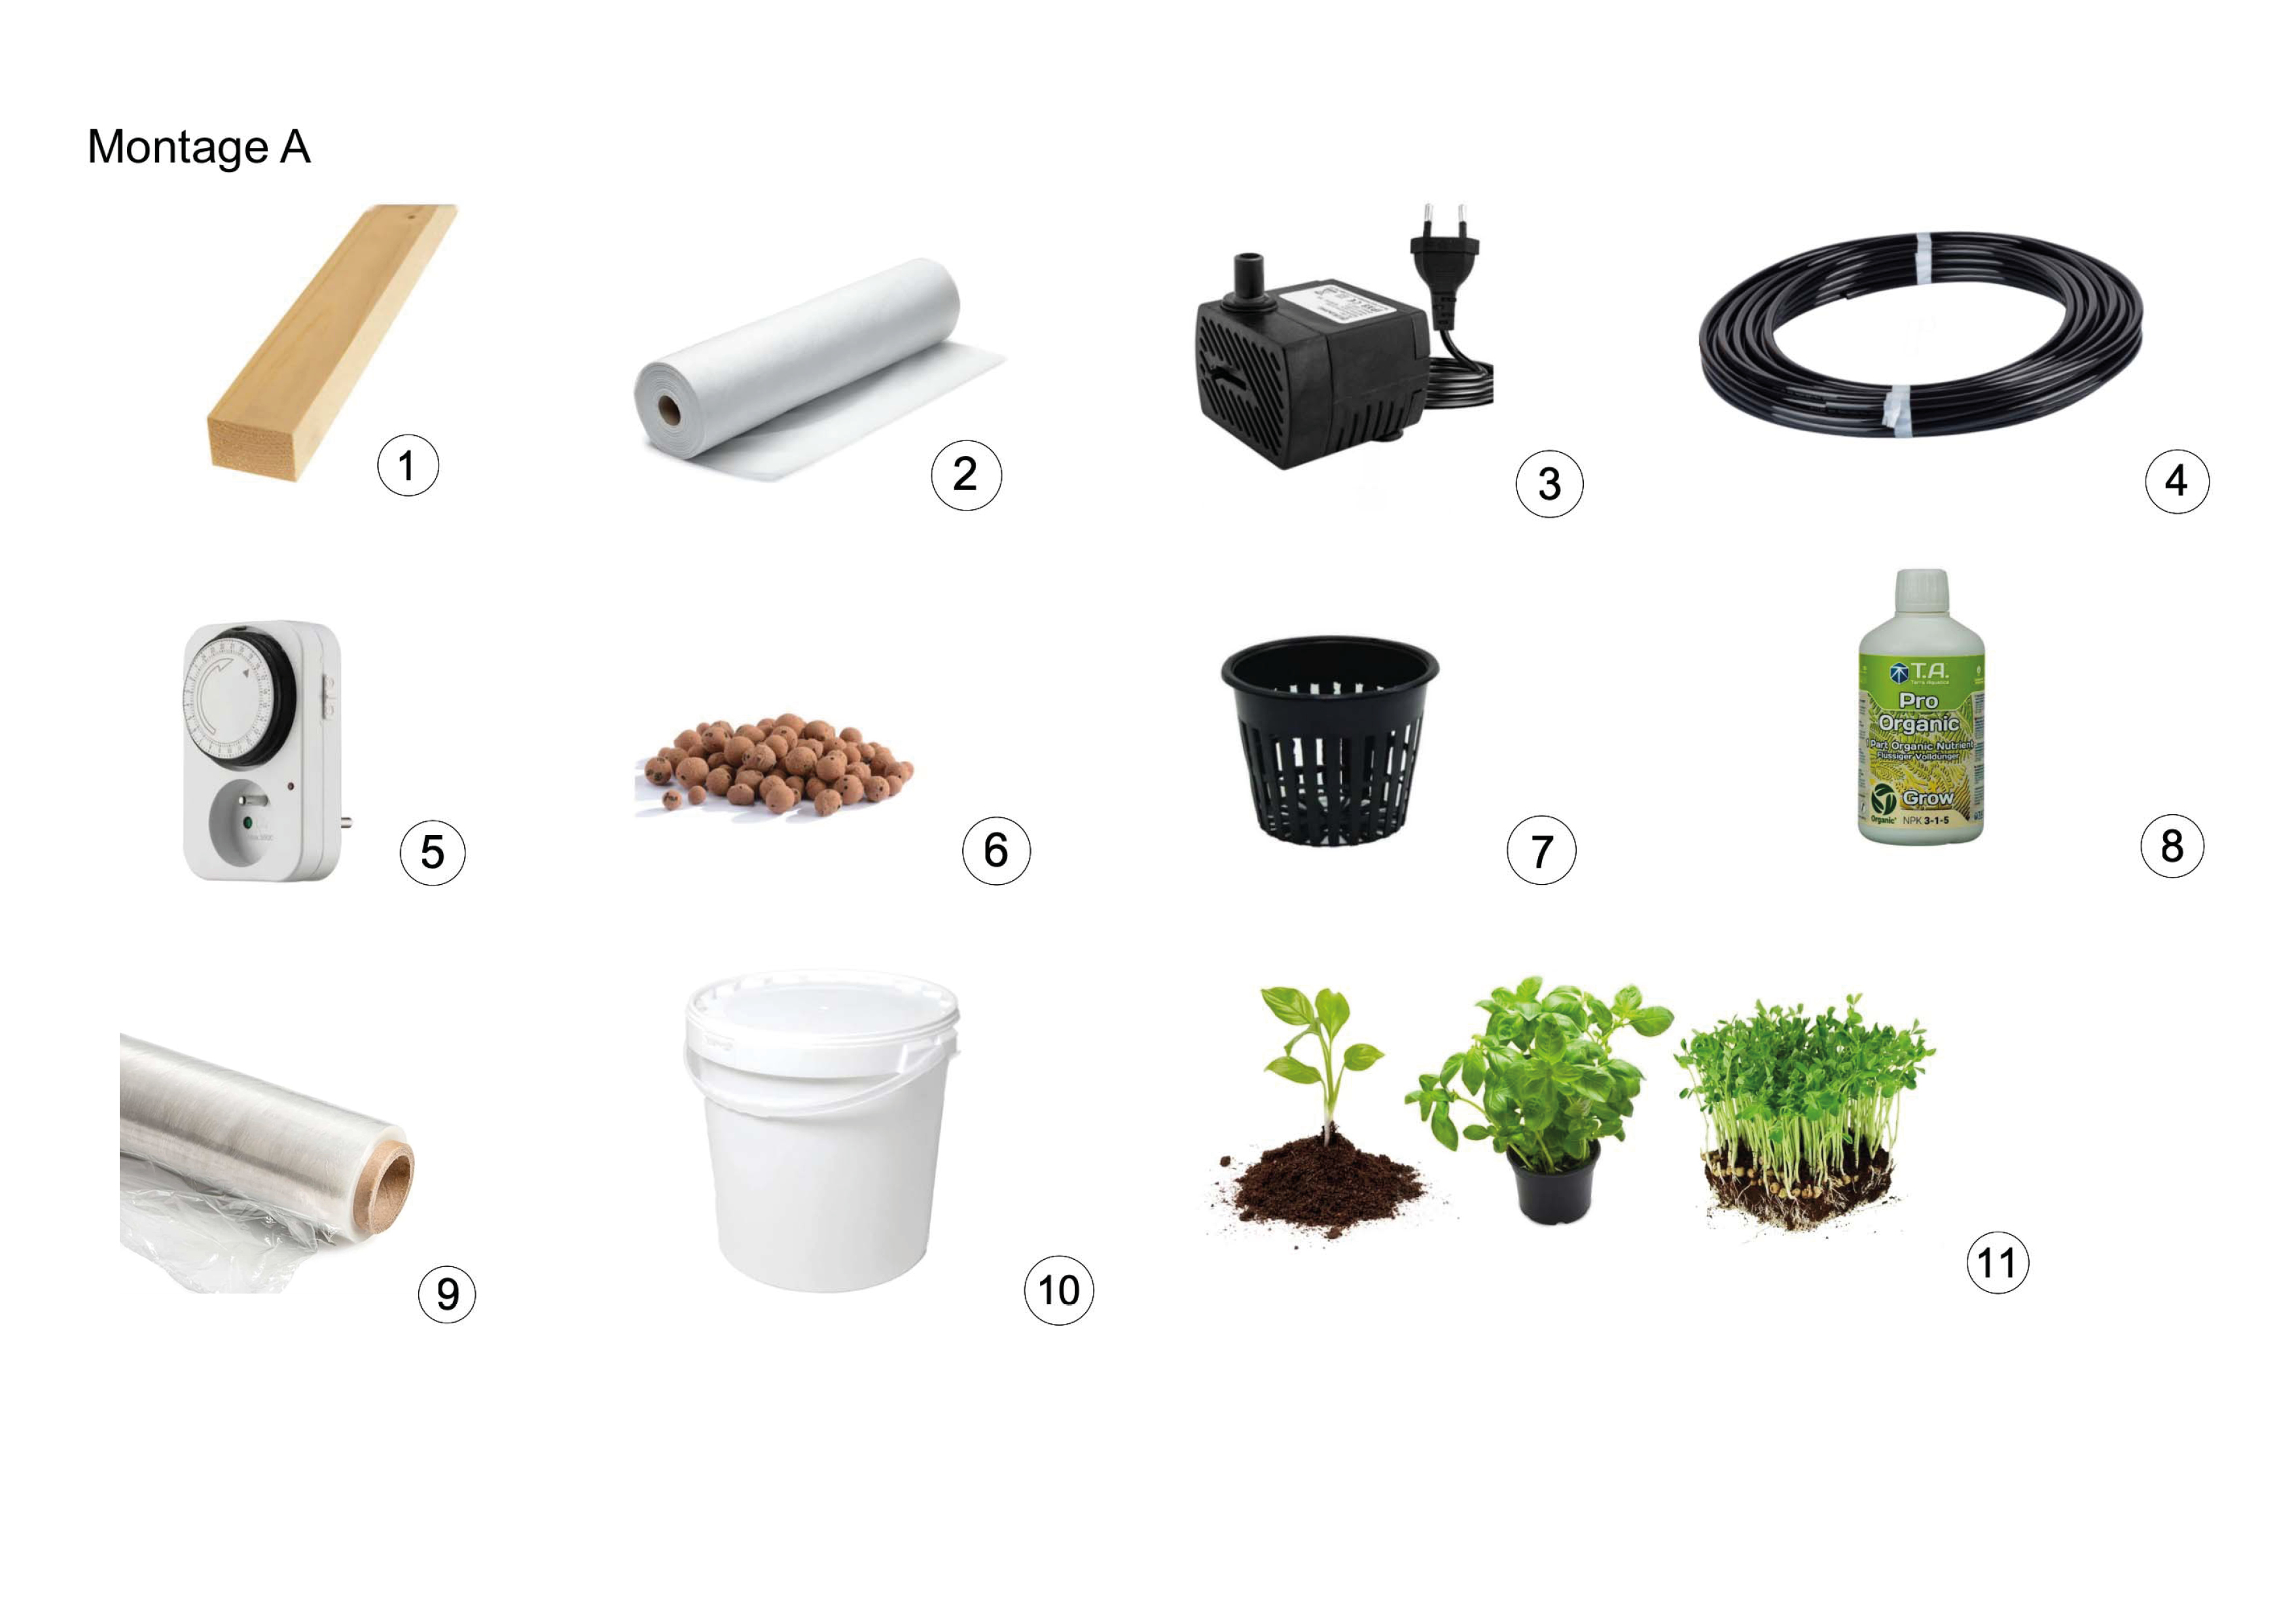
Assembly A (gutter with hydroponic pots)
- 2 wooden battens: 2400 x 18 x 44 mm (standard batten in a DIY store) (No. 1 in the image)
- 2 pieces of fabric, with the following dimensions: 1000 x 500 mm; 1000 x 150 mm (No. 2 in the image)
- Water pump with a flow rate of 250 L/h, about 3W (No. 3 in the image)
- Hose, 1600 mm in length and 6 mm in diameter (the diameter should match your pump, usually 6 mm) (No. 4 in the image)
- Programmable plug (No. 5 in the image)
- 1 L of clay pebbles (No. 6 in the image)
- 8 hydroponic pots (No. 7 in the image). We recommend buying your pots in groups to avoid waste and reduce costs. Feel free to use the WhatsApp conversation to organize with other participants.
- 1 bottle of organic fertilizer (to be ordered from the supplier communicated via email and through the WhatsApp conversation) (No. 8 in the image)
- A roll of plastic wrap (No. 9 in the image)
- A 10 L bucket, ideally opaque. If you have a transparent bucket, plan to use more fabric to make a cover for the bucket (No. 10 in the image)
- Parchment paper
- A sachet of beeswax
- 8 young shoots, microgreens, seedlings, or plants (No. 11 in the image)
- 8 screws, 4 mm in diameter
- Staples
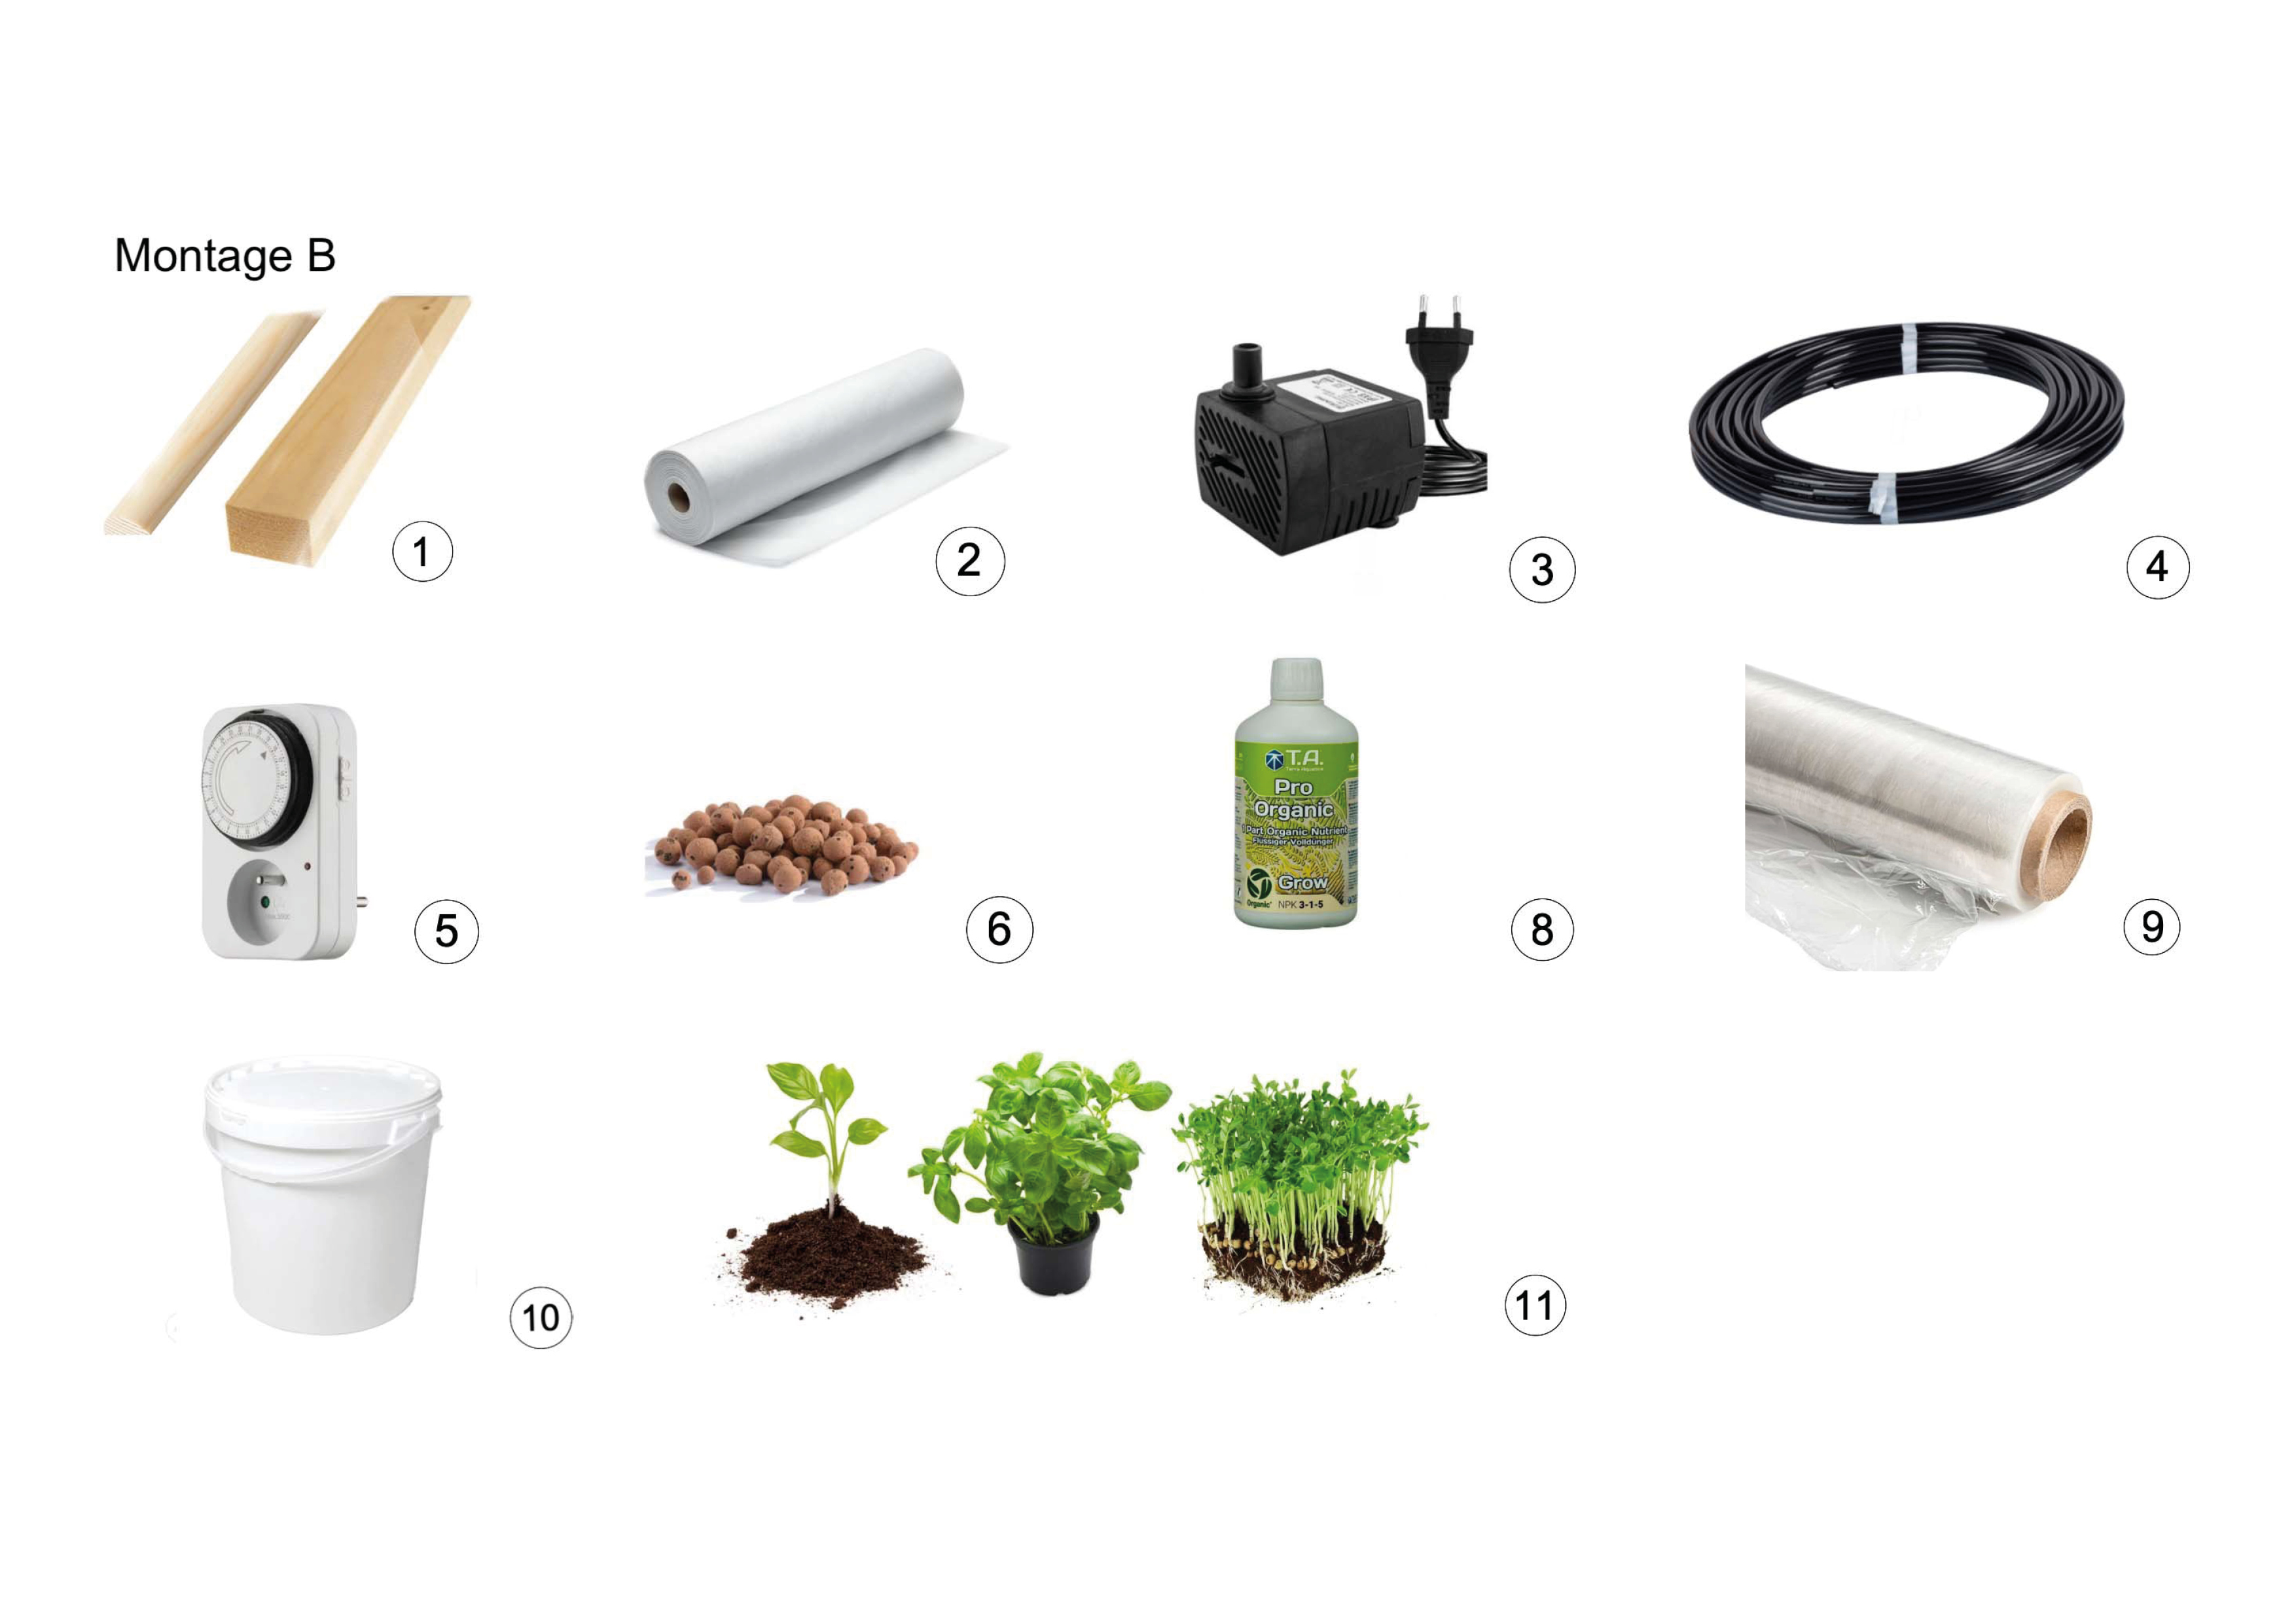
Assembly B (gutter without hydroponic pots)
- 2 wooden battens: 2400 x 18 x 44 mm (standard batten in a DIY store) (No. 1 in the image)
- 2 half-round rods, each 1000 mm long (No. 1 in the image)
- 2 pieces of fabric, with the following dimensions: 1000 x 500 mm; 1000 x 150 mm (No. 2 in the image)
- Water pump with a flow rate of 250 L/h, about 3W (No. 3 in the image)
- Hose, 1600 mm in length and 6 mm in diameter (the diameter should match your pump, usually 6 mm) (No. 4 in the image)
- Programmable plug (No. 5 in the image)
- 2 L of clay pebbles (No. 6 in the image)
- 1 bottle of organic fertilizer (to be ordered from the supplier communicated via email and through the WhatsApp conversation) (No. 8 in the image)
- A roll of plastic wrap (No. 9 in the image)
- A 10 L bucket, ideally opaque. If you have a transparent bucket, plan to use more fabric to make a cover for the bucket (No. 10 in the image)
- 8 young shoots, microgreens, seedlings, or plants (No. 11 in the image)
- 8 screws, 4 mm in diameter
- Staples
- 8 nails
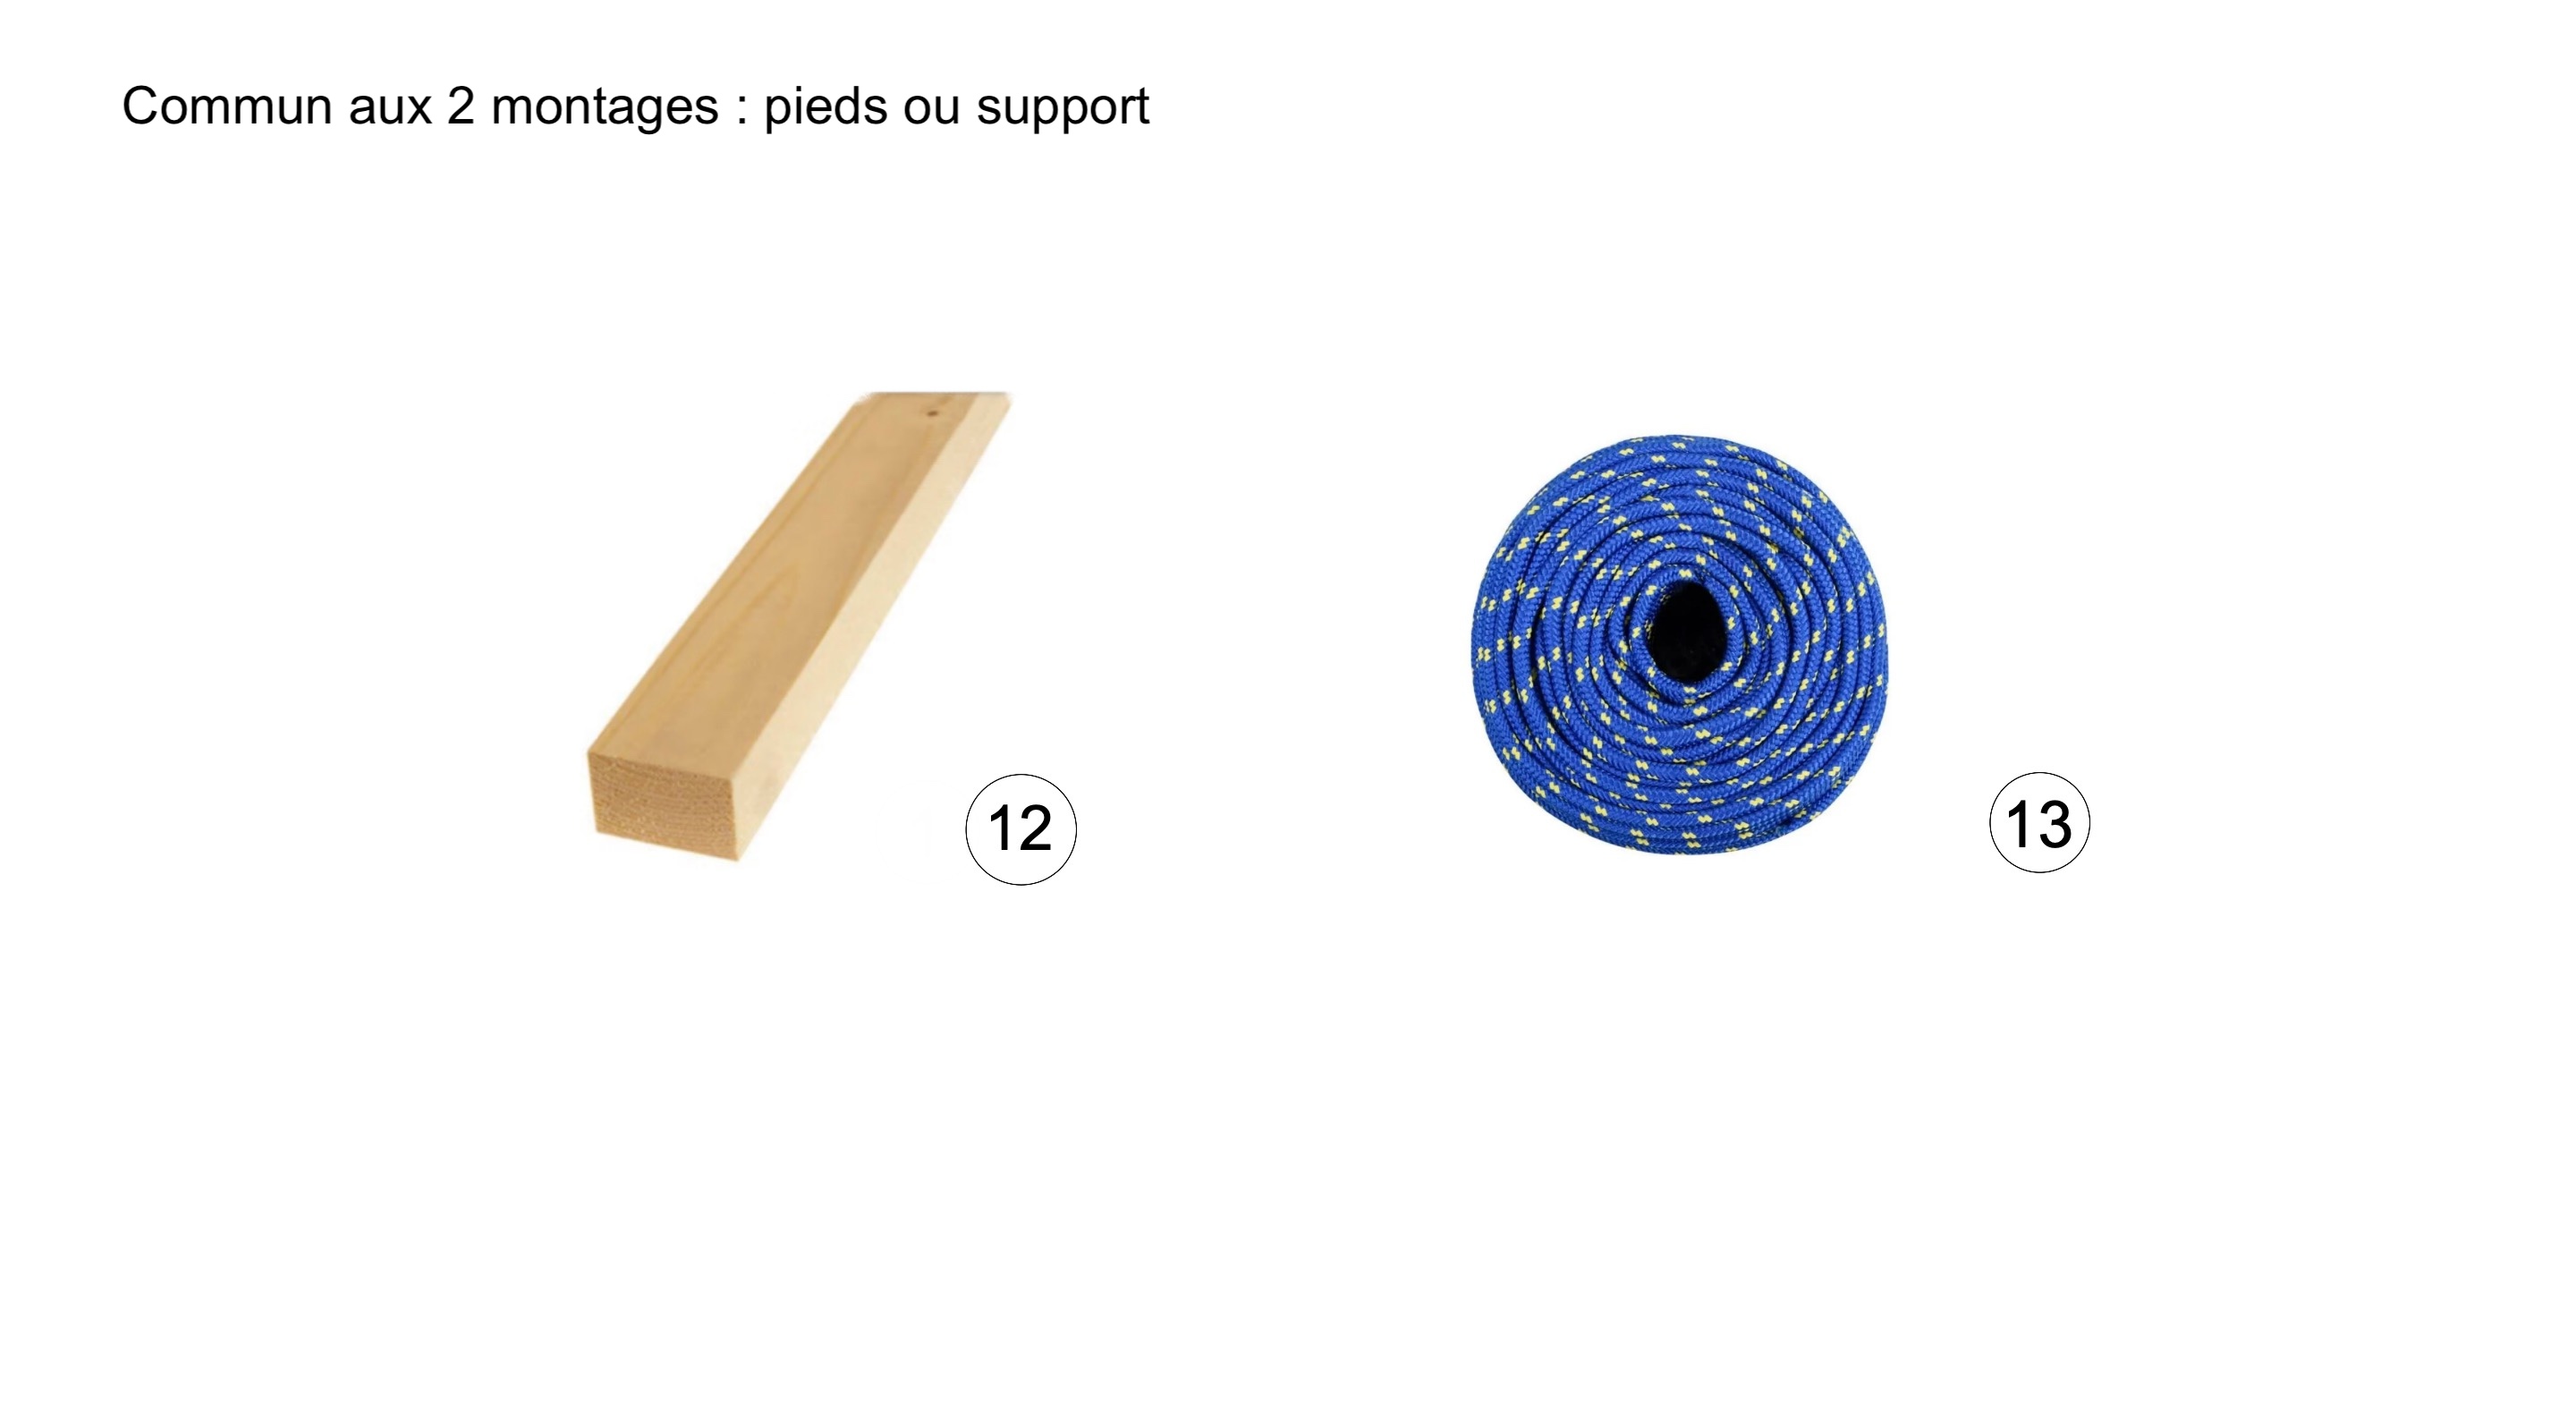
Common to both assemblies: feet or support
- 6 wooden battens or cord (No. 12 and No. 13 in the image)
Outils
This is an exhaustive list of tools to be adapted based on what you already have.
- Wood drill bit: 3 mm (to be adapted based on your screws)
- Staple gun
- Drill/screwdriver
- Hand saw or jigsaw
- Sewing machine or needle and thread
- Measuring tape
- Sandpaper
- Scissors
- Utility knife
- Hammer
- Permanent marker
- Work gloves
- Safety glasses
Étape 1 - Planning
- Preparing participants for the participatory science program from July 1 to August 31, 2024: Making the biopony garden. Feel free to use WhatsApp to ask other participants for help.
- Experimentation from September 1 to October 31, 2024 : Participants follow the protocol and answer the questionnaires.
Étape 2 - Purchasing equipment
Depending on the assembly you choose and your use of reuse, we estimate that it costs between 10 and 30 euros to build a bioponic garden.
Before making any purchases, we strongly advise you to read the entire tutorial, as the list of materials may vary from one assembly to another.
All the materials needed to build this kit can be found in DIY, gardening or fabric stores.
We encourage you to make group purchases to avoid waste and share any delivery costs. If necessary, we invite you to use the WhatsApp conversation. This could be an opportunity for you to get together to follow the rest of the tutorial and make the items together.
Étape 3 - Tips and precautions
Before starting work, make sure your workspace is secure and that your tools are optimally stored.
- Make sure your tools are in good condition and suitable for the job in hand.
- Read tool instructions carefully and pay attention to pictograms on packaging.
- Set up in an uncluttered, well-ventilated and well-lit area.
- Equip yourself with the necessary protective equipment: gloves, shoes, goggles, clothing, helmet, protective mask, earplugs (headphones/earplugs)...
- Unplug power tools and close products when not in use.
- Ask those around you for help if you have to handle heavy loads (tools, materials, etc.).
This is a non-exhaustive list of tips and precautions.
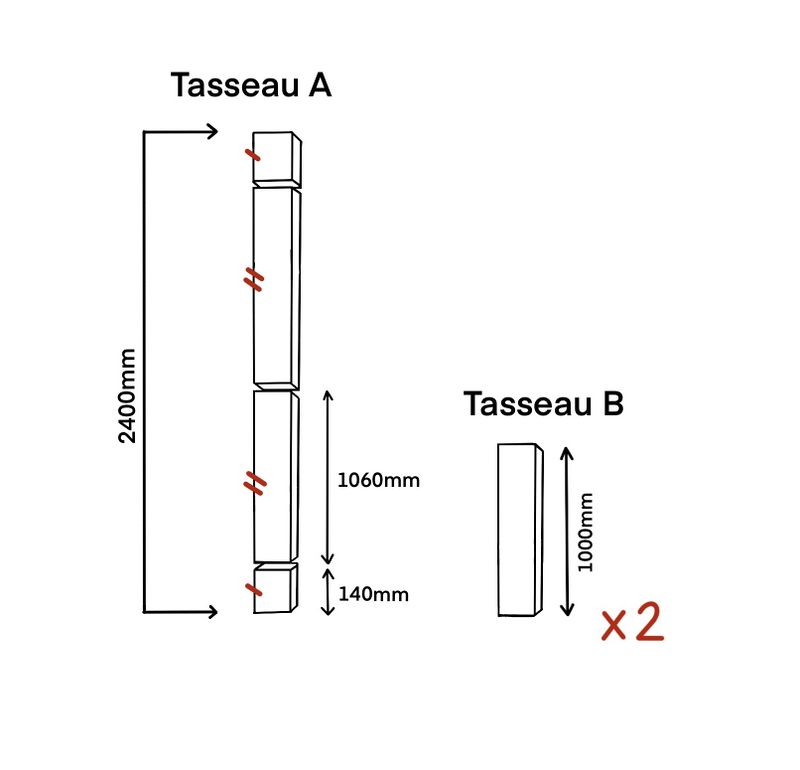
Étape 4 - Cutting the cleats
Cleat A
- Take a 2400 x 18 x 44 mm cleat (standard in DIY stores).
- Cut the cleat into 4 parts, according to the dimensions shown in the diagram (see photo).
Cleat B
- Use a 2400 x 18 x 44 mm cleat (standard in DIY stores).
- Cut 2 pieces, each 1000 mm long
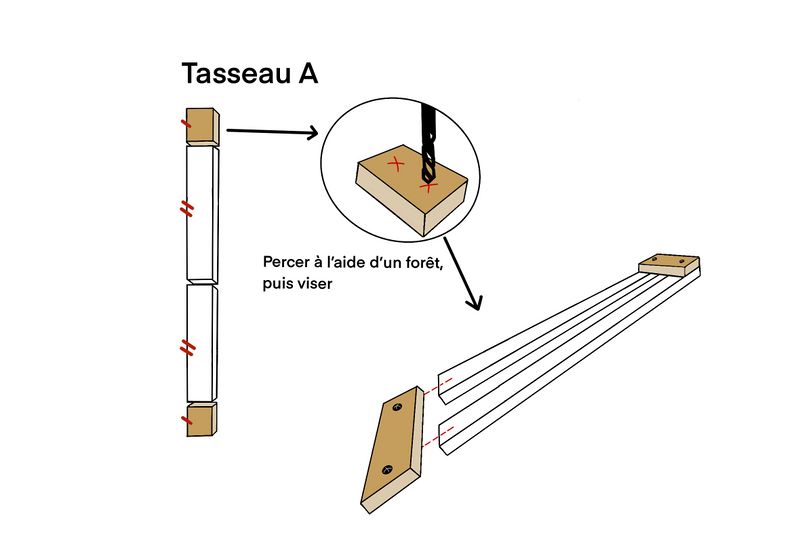
Étape 5 - Gutter structure
- Use cleat A
- Assemble the gutter by screwing the 2 short strips (140 mm) onto the 2 long strips (1060 mm). Here, we use a 3 mm drill bit and 4 mm screws.
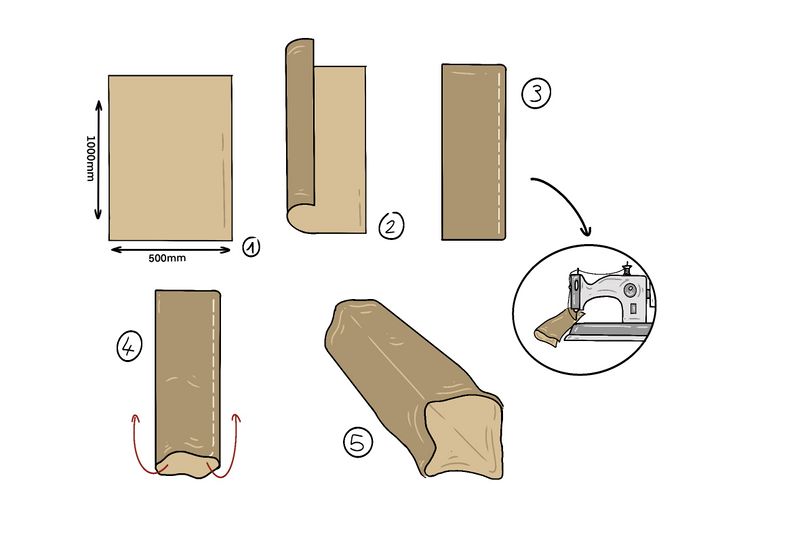
Étape 6 - Making the sock
- Take the 1000 x 500 mm textile (1)
- Fold it in 2 along the width (2)
- Sew along the entire length (with a machine or by hand) to create the sock (3)
- Turn the resulting assembly inside out (4)
- The sock is ready to use (5)
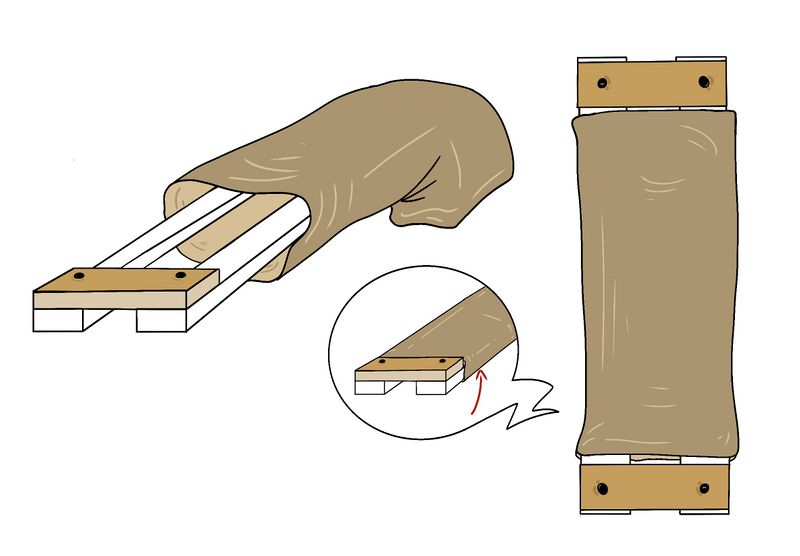
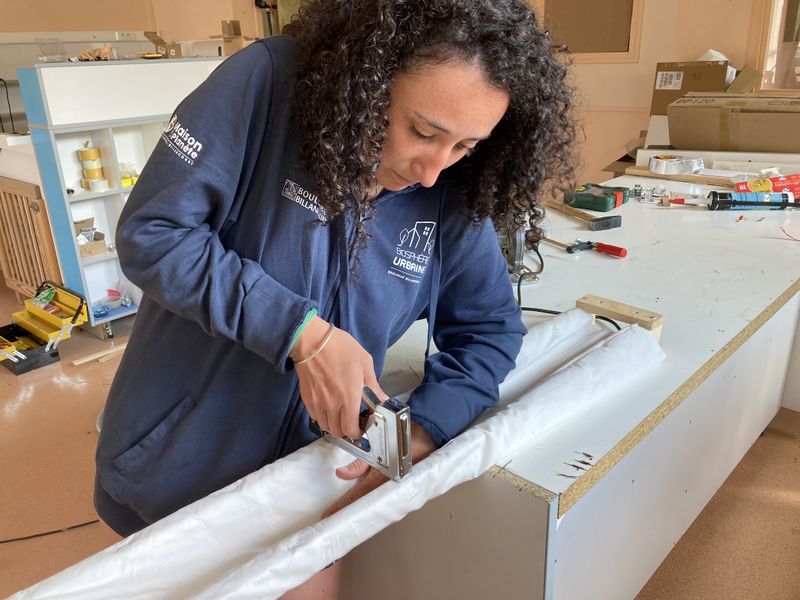
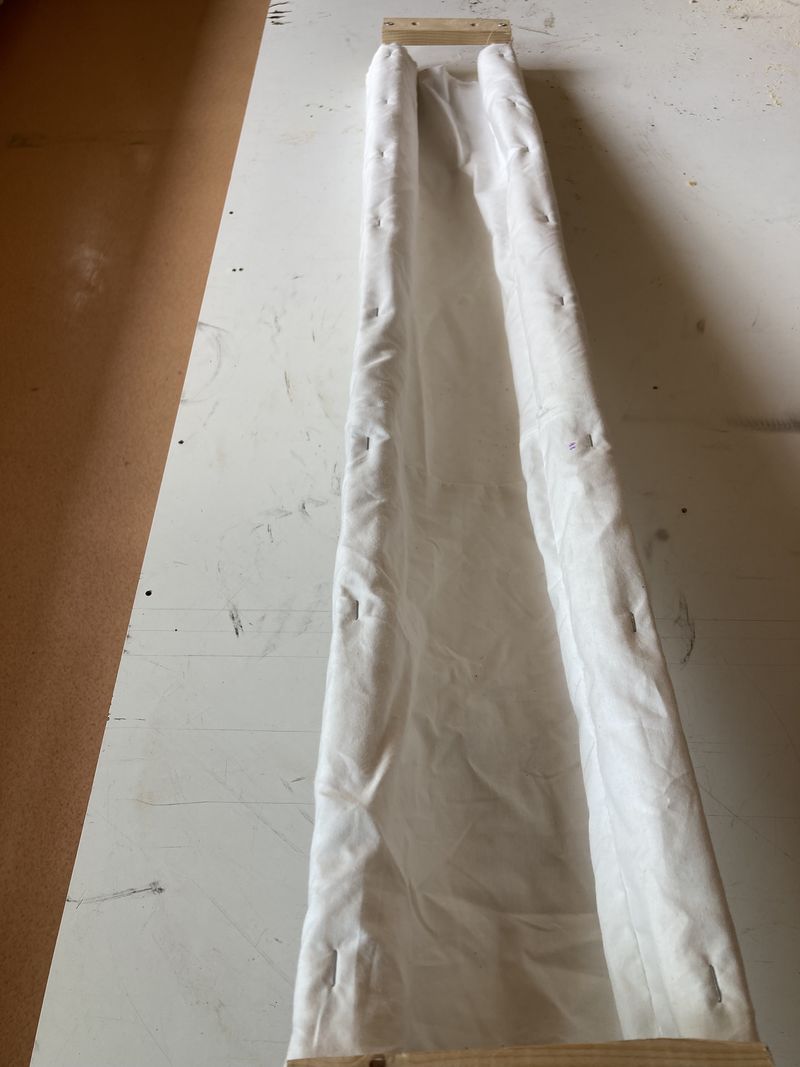
Étape 7 - Fitting the sock to the gutter
- Thread the sock onto the gutter and fit it between the 2 small 140 mm battens.
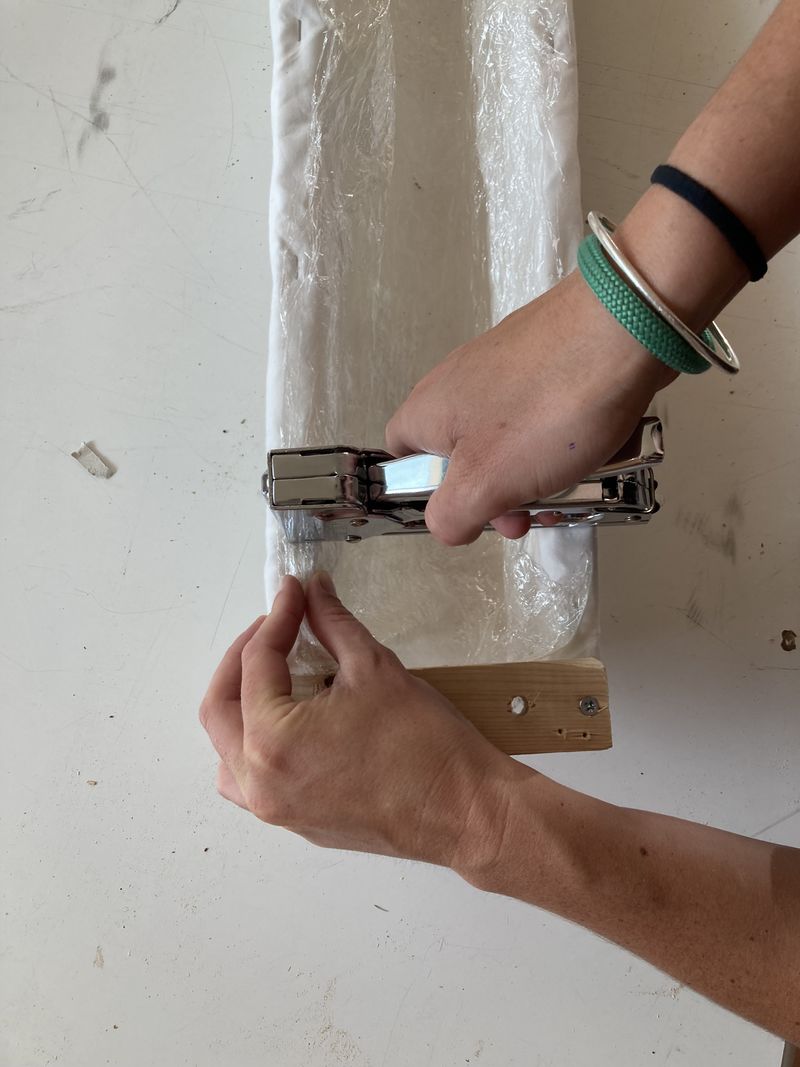
- Staple the sock to the frame. Make sure the fabric is well stretched in the gutter (U-shaped).
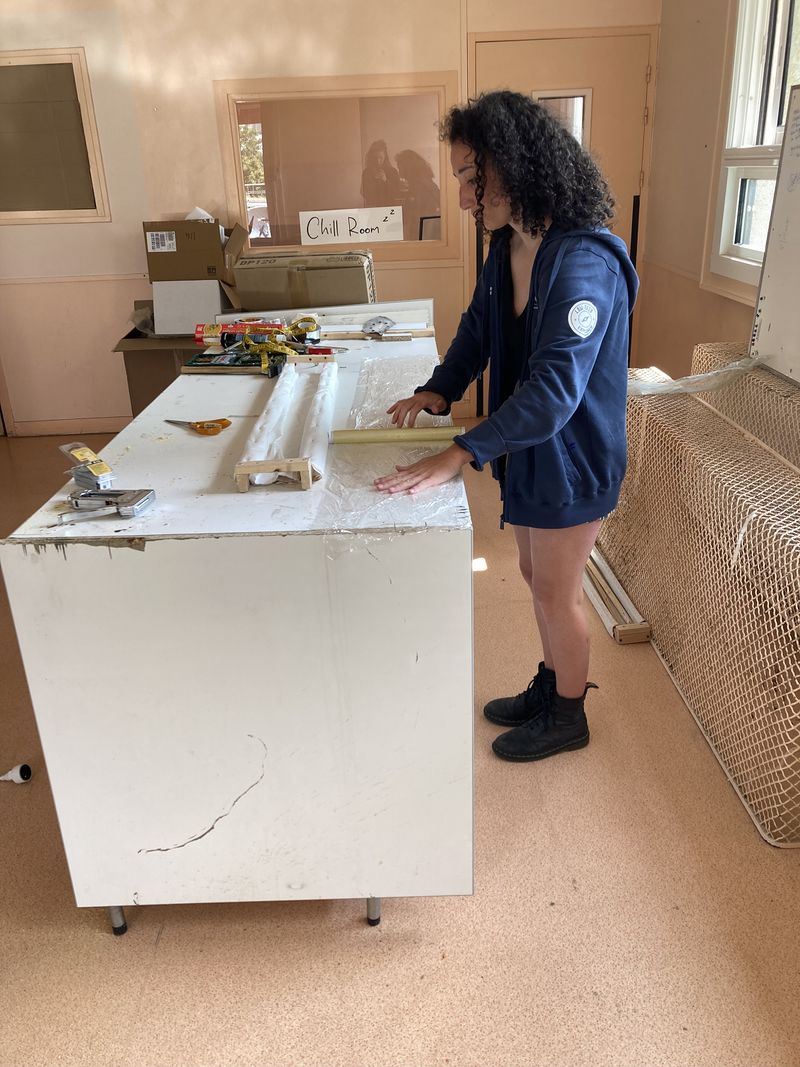
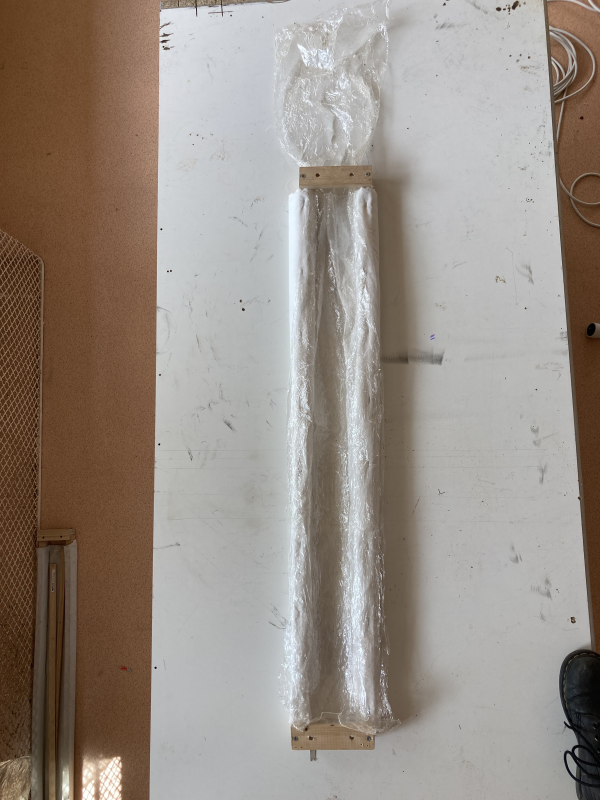
Étape 8 - Sealing the gutter
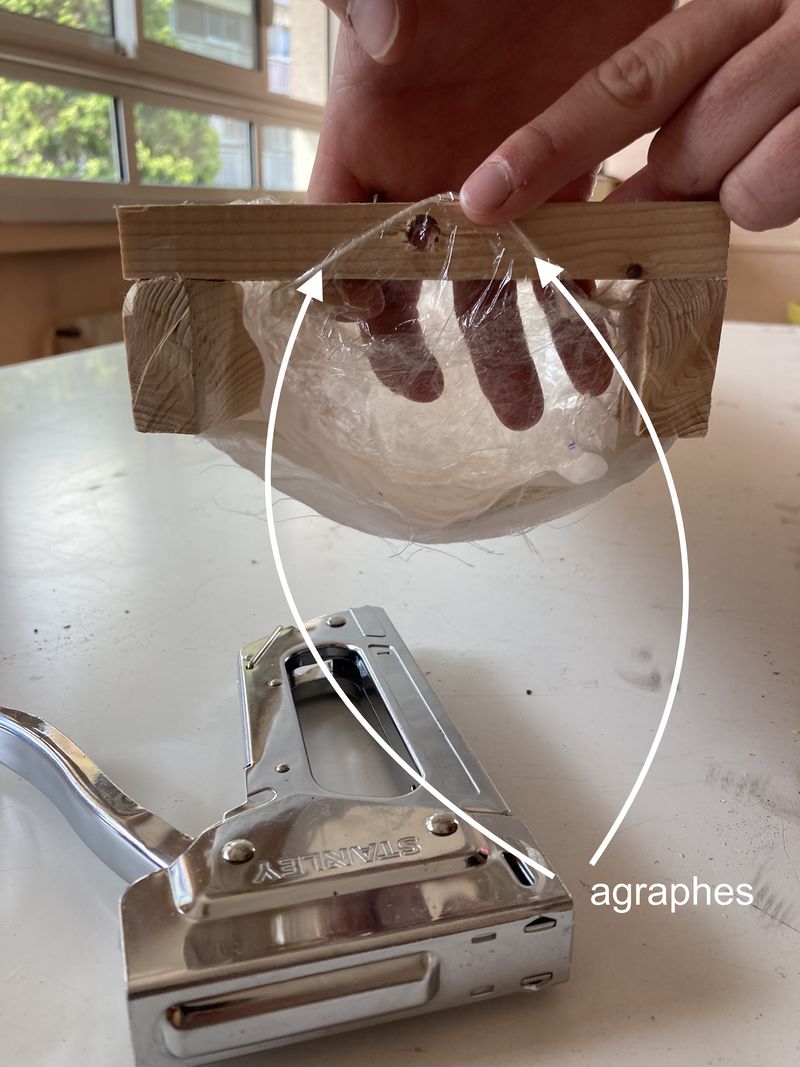
- Overlap 3 layers of cling film 1500 mm long (see photo 1).
- Place them in the gutter. Leave about twenty centimetres of cling film at one end of the gutter (see photo 2).
- Attach the cling film to the other end of the gutter (see photo 3).
- Secure the cling film along the entire length of the gutter (see photos 4 and 5). Make sure the cling film conforms to the shape of the sock.
Étape 9 - The following steps are for assembly A
So you've decided to make assembly A (with hydroponic pots)? Follow the steps below!
Étape 10 - Making the upper fabric
- Provide yourself with the 1000 x 150 mm textile.
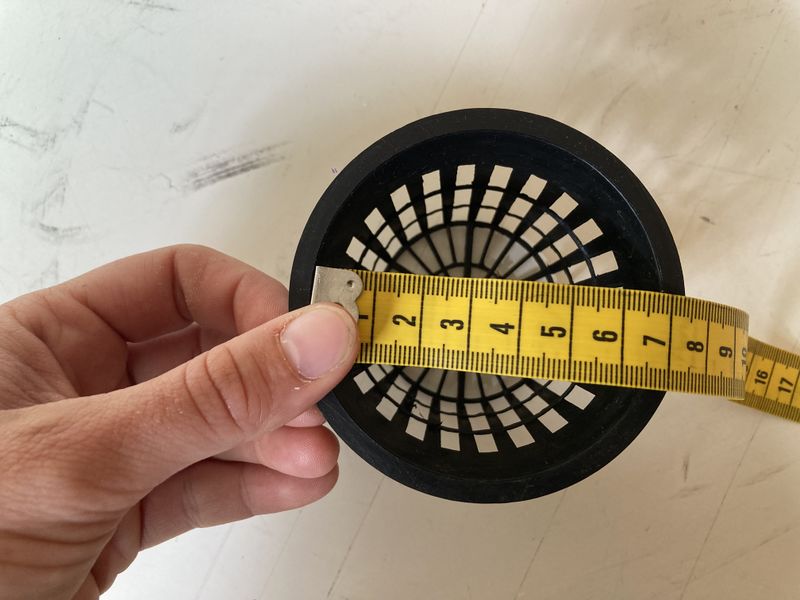
- Measure the inside diameter of your hydroponic pots. Here, it's 70 mm (see photo 1).
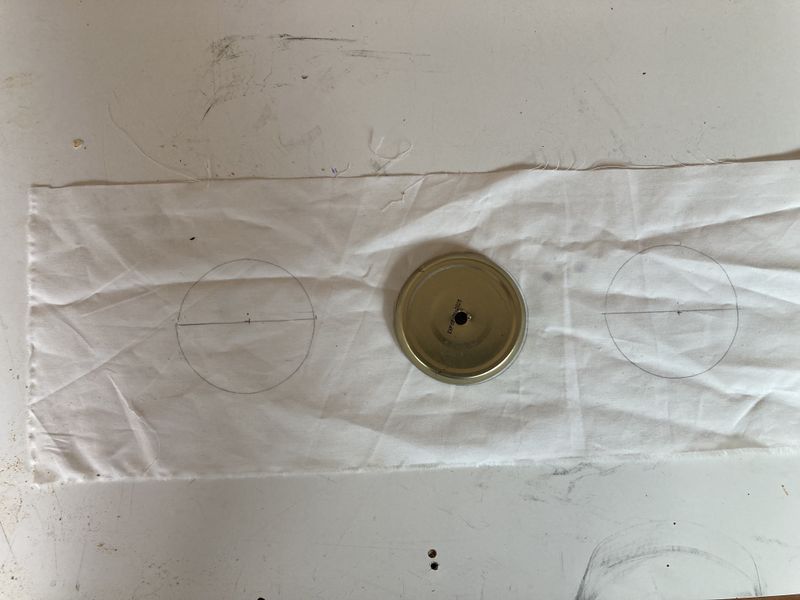
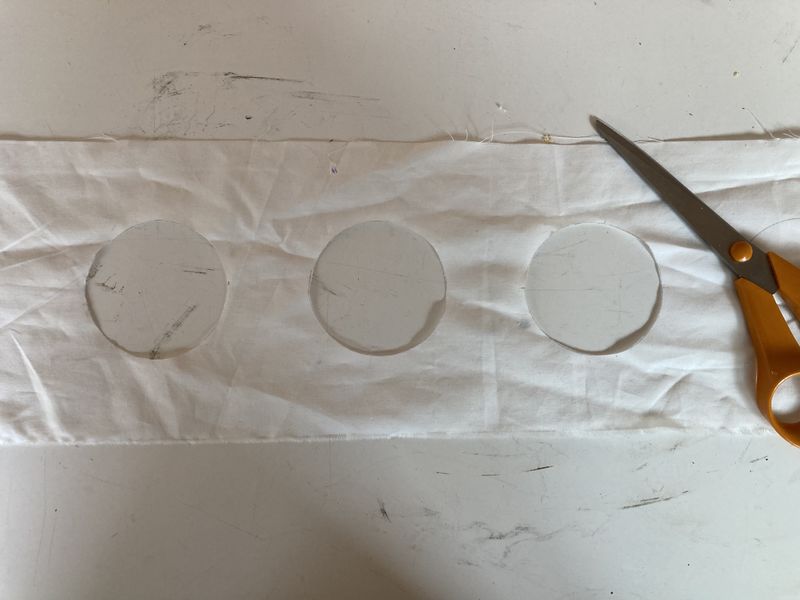
- Make 8 holes of 70 mm diameter along the length of the fabric. Here, holes are made every 110 mm (see photos 2 and 3).
Étape 11 - Sealing the upper fabric
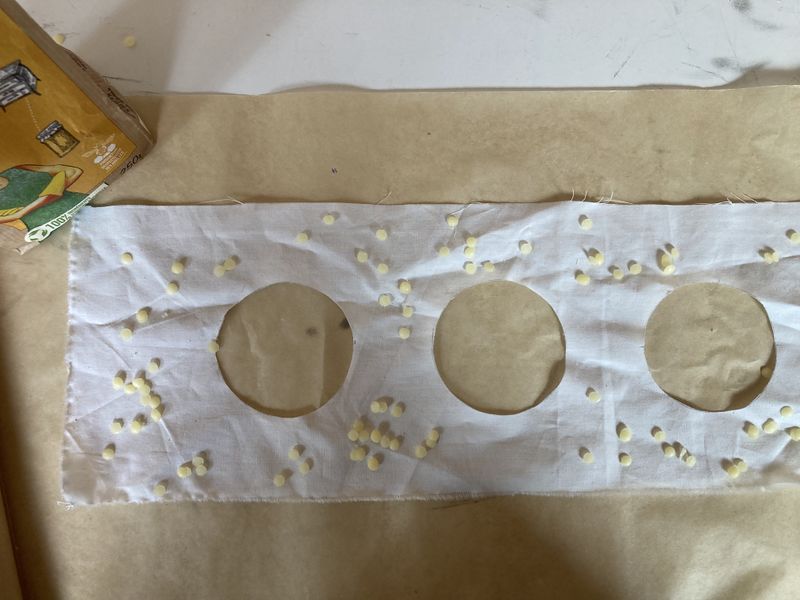
- Place baking paper under the upper fabric
- Apply beeswax to the upper fabric
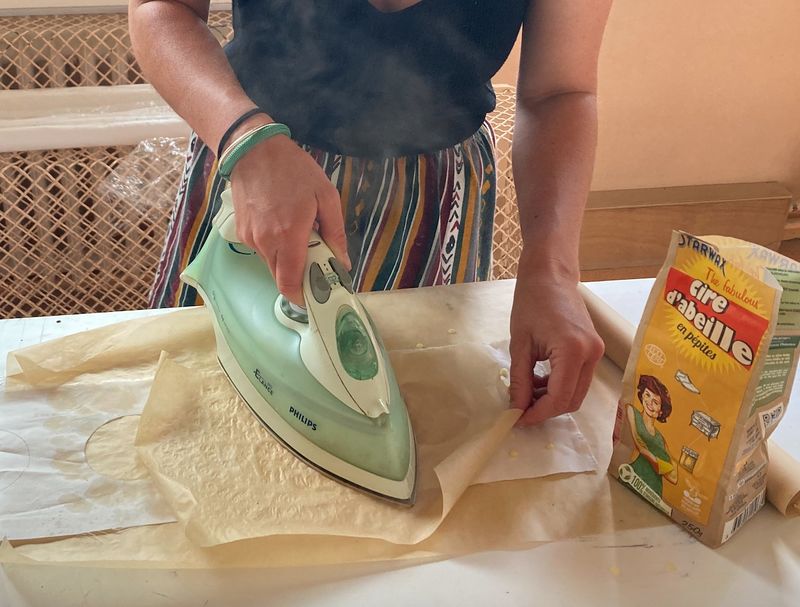
- Place another piece of baking paper on top
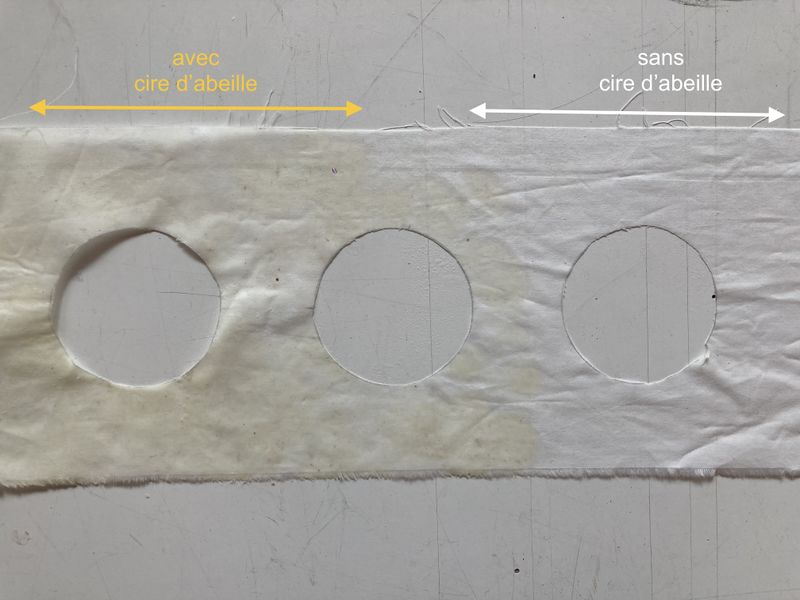
- Use an iron to melt the wax. Manipulate the baking paper to spread the liquid wax over the entire surface of the fabric.
- Leave to cool until hardened
Étape 12 - Fixing the waterproof fabric to the cleats
- Take the 2 B-strips cut in step 1 (each measuring 1000 x 18 x 44 mm).
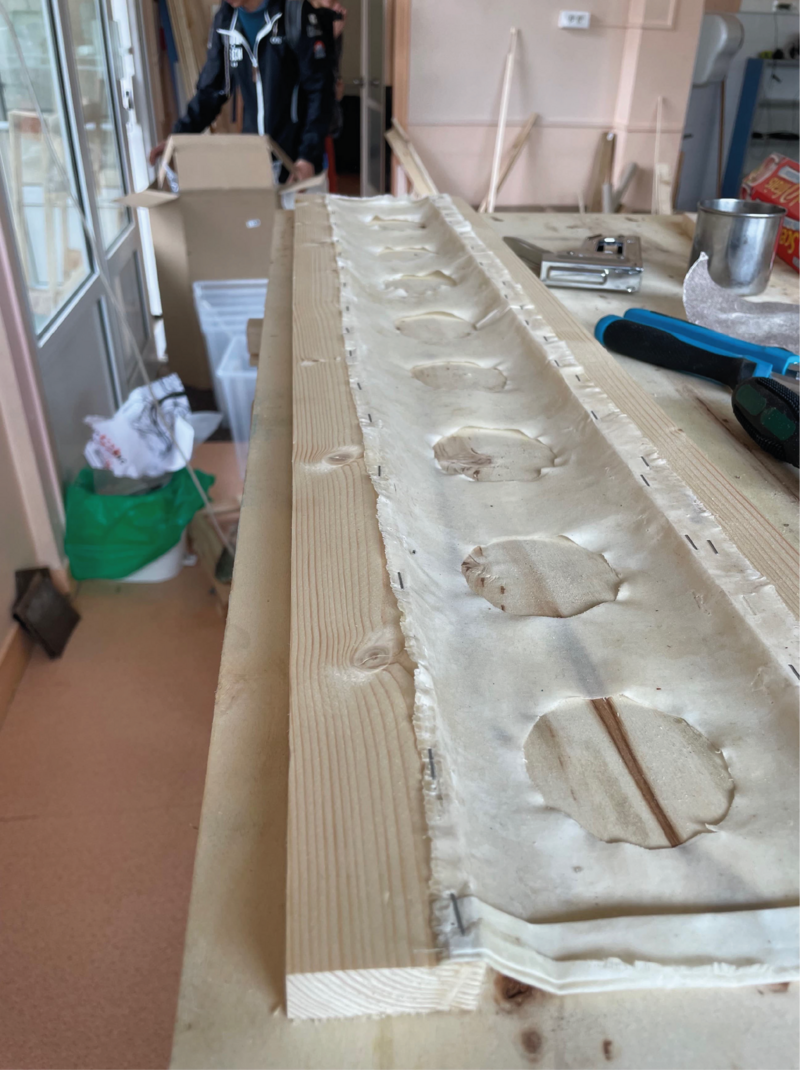
- Staple the waterproof fabric to the two wooden cleats (see photo). At this stage, make sure the fabric is taut.
Étape 14 - Finishing assembly B
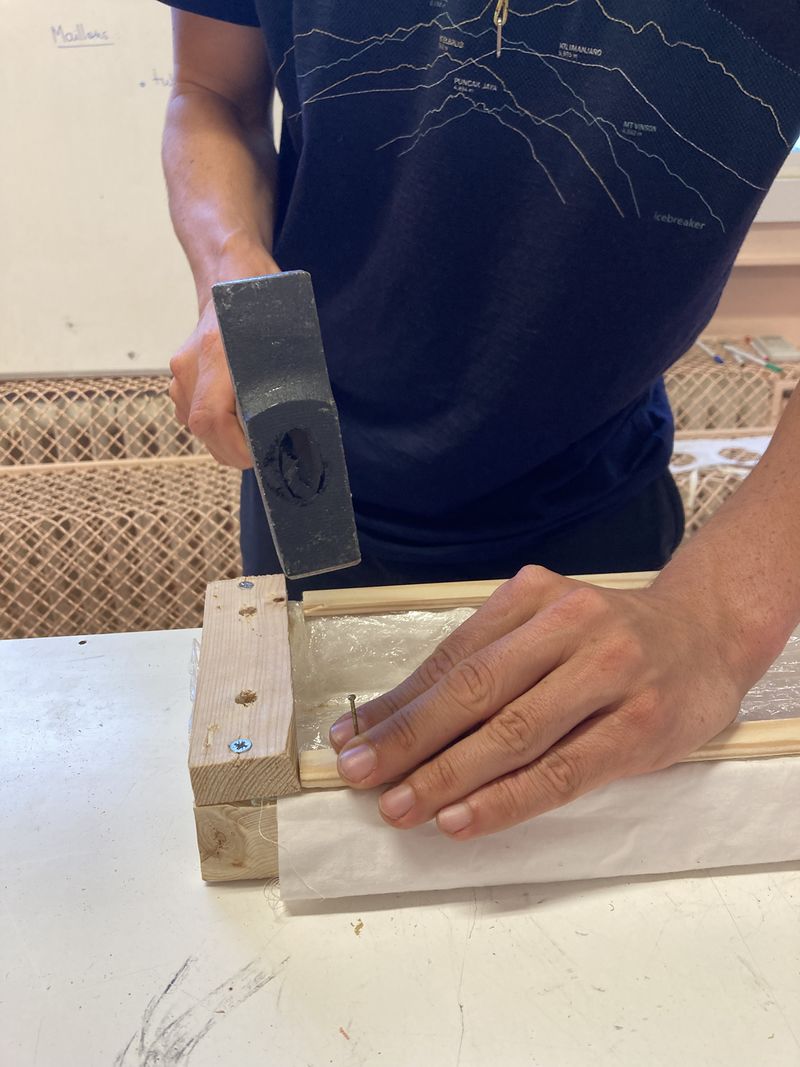
- Position the 2 half-round rods and fasten them to the cleats with nails
Étape 15 - The following steps are common to both assemblies
Now it's time to install the gutter in your home!
Étape 16 - Installing the gutter
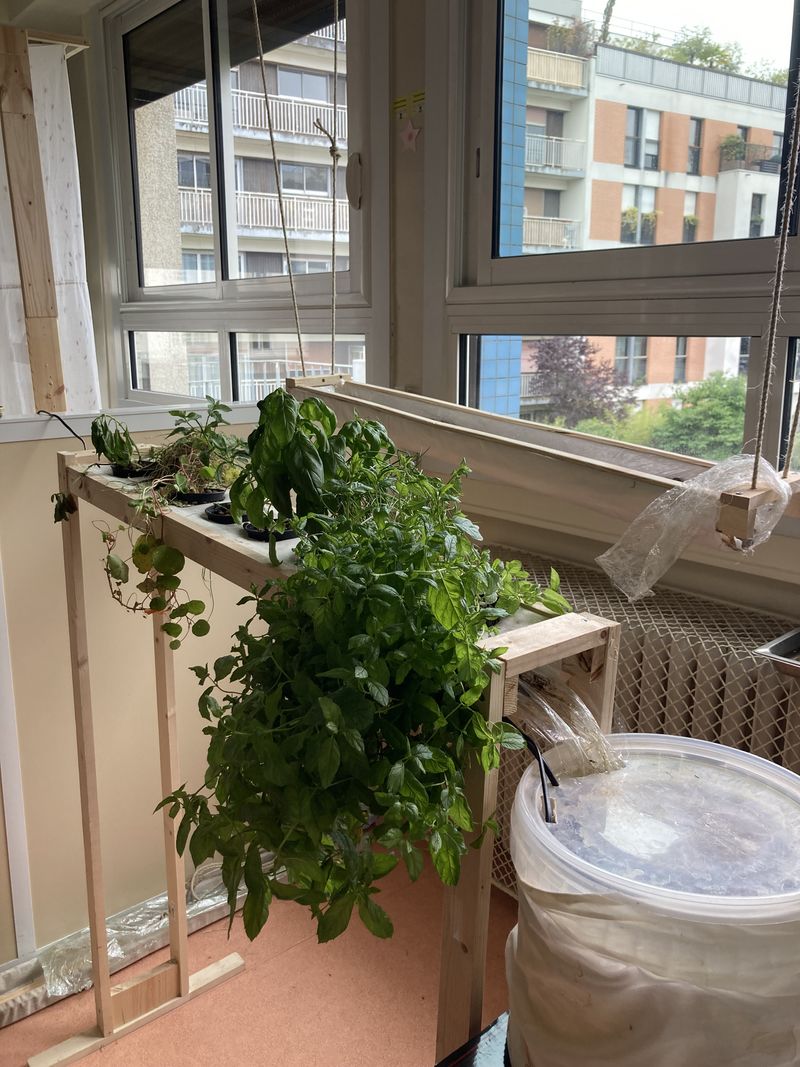
Deally, the bioponic gutter is positioned behind a window. In this location, you'll need an electrical outlet to connect the water pump.
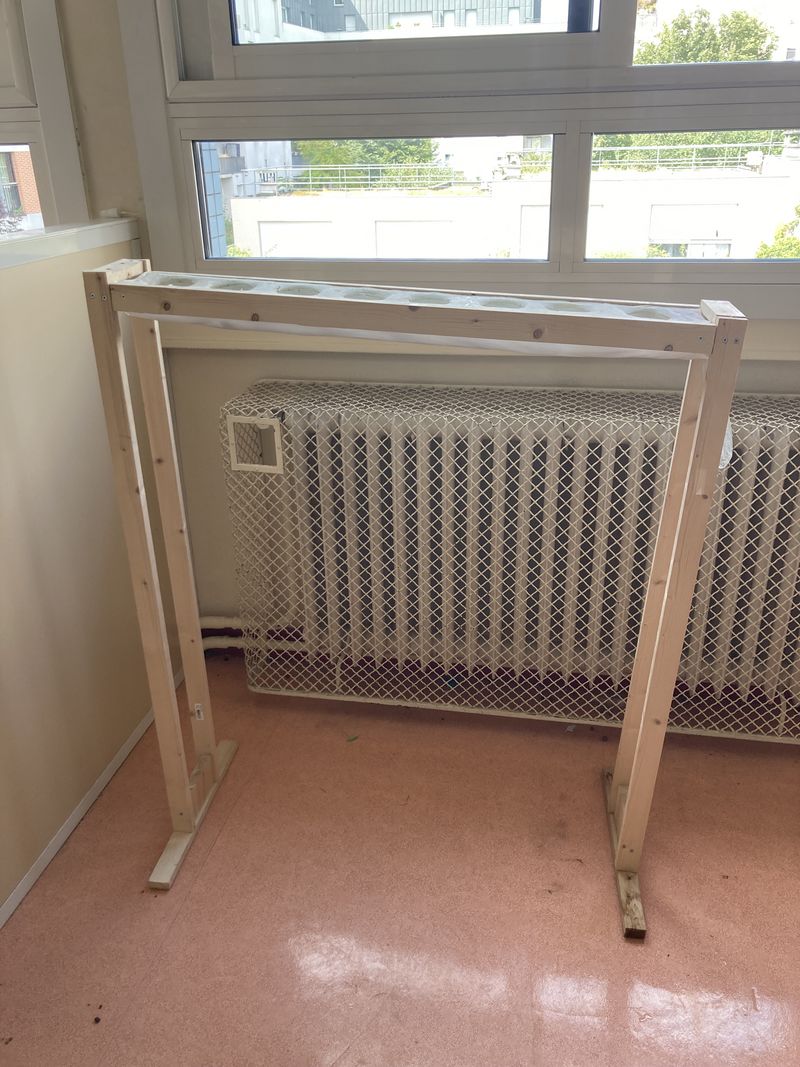
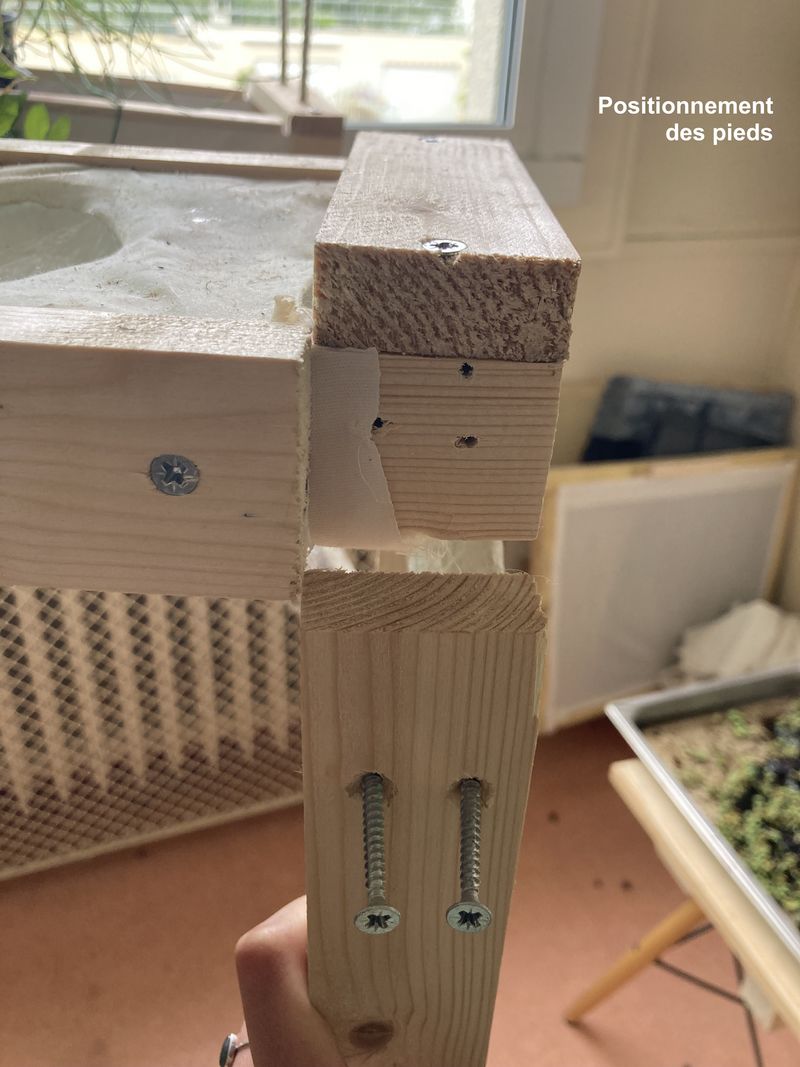
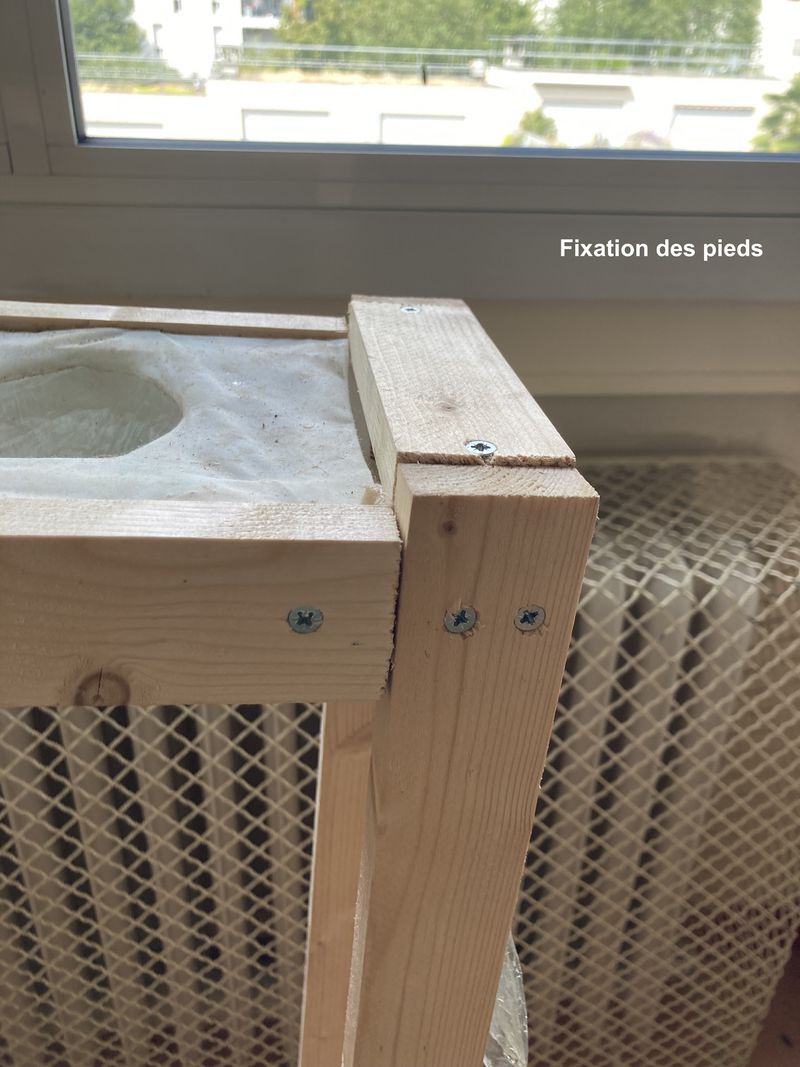
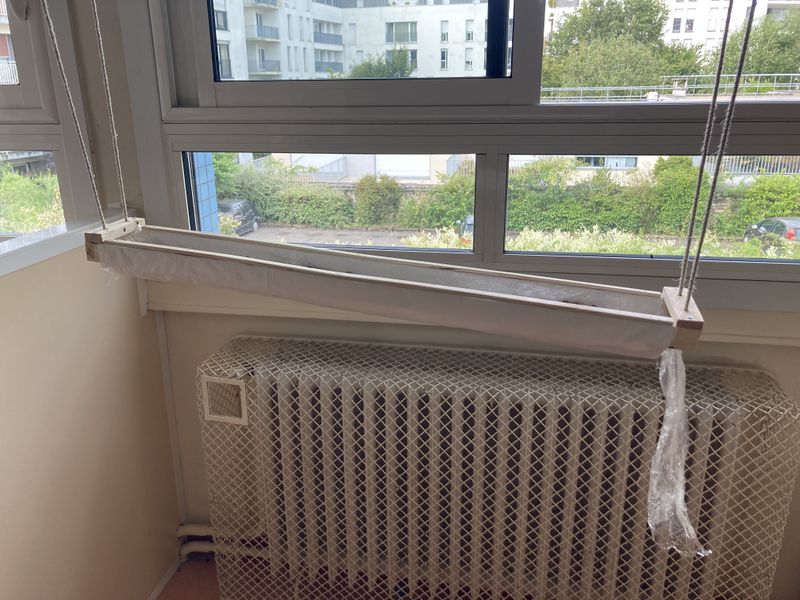
Up to you to choose the support to hold your gutter in place:
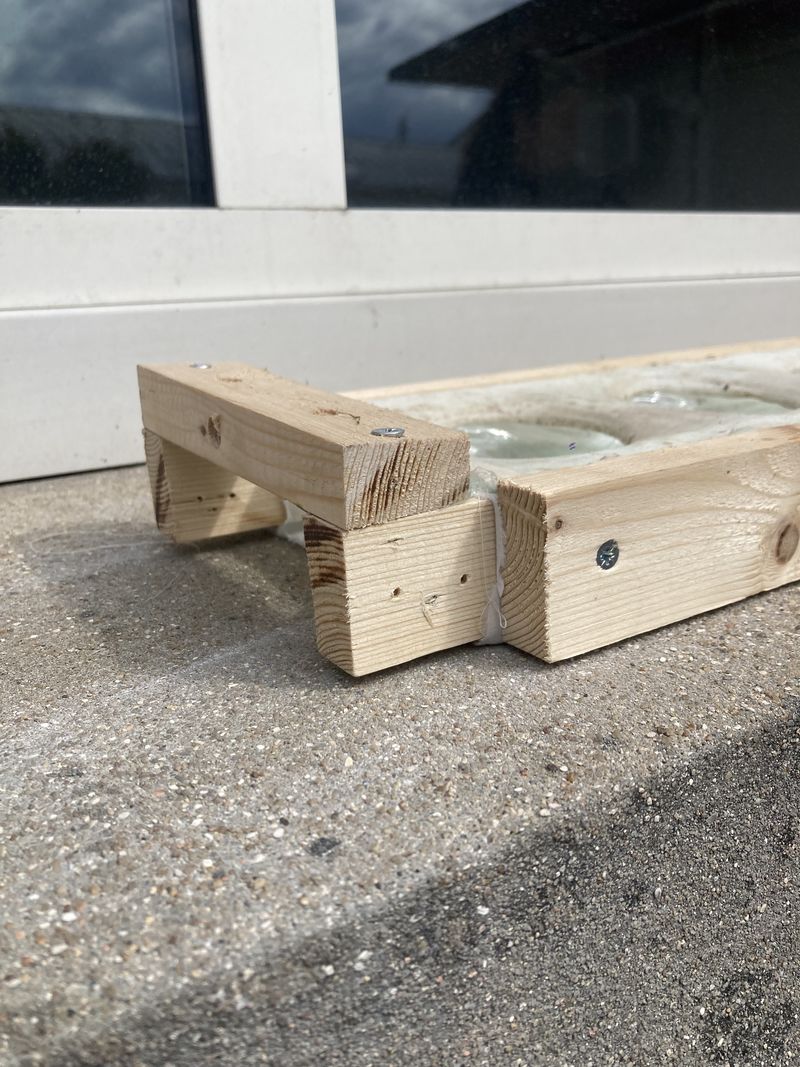
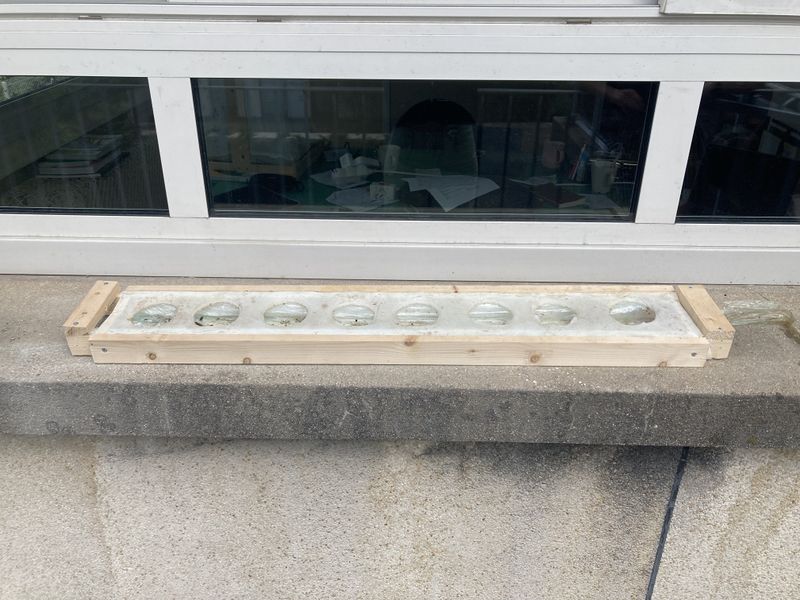
- Make feet (see photo 1)
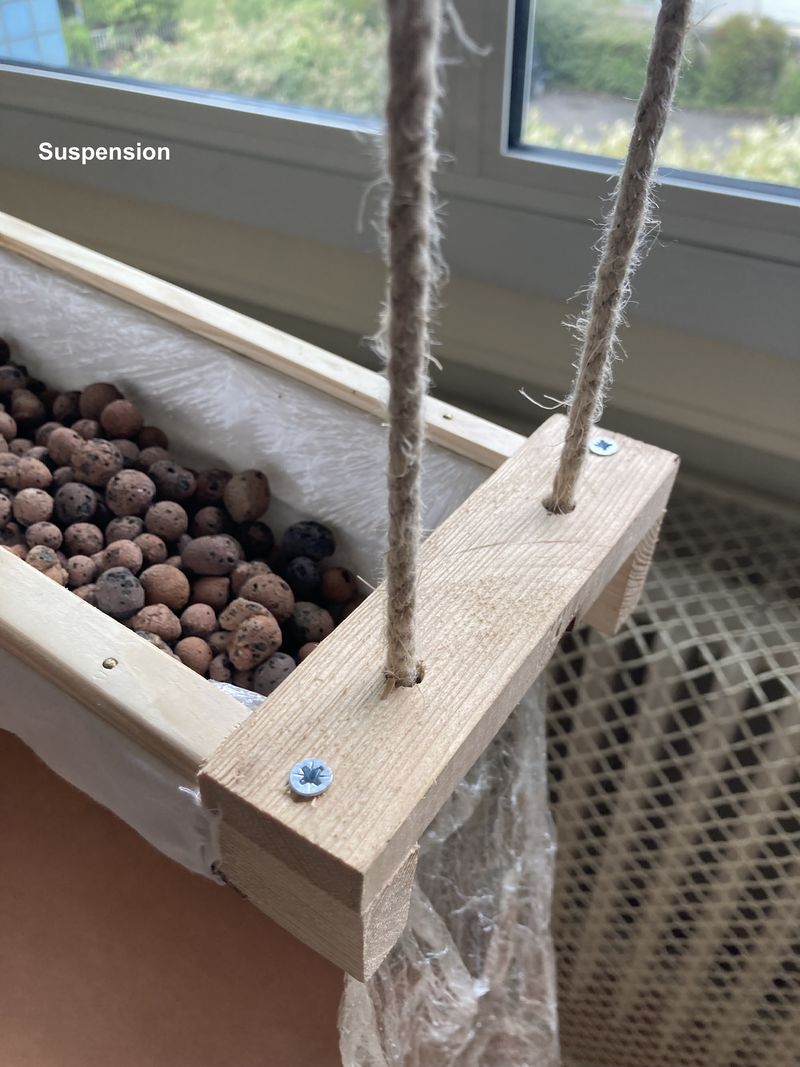
- Suspend it with ropes (see photo 4)
In both cases, you'll need to take into account the dimensions of your home to ensure that the gutter is in full view. You can also create a small slope to facilitate water run-off (around 2%).
Étape 17 - Irrigation system
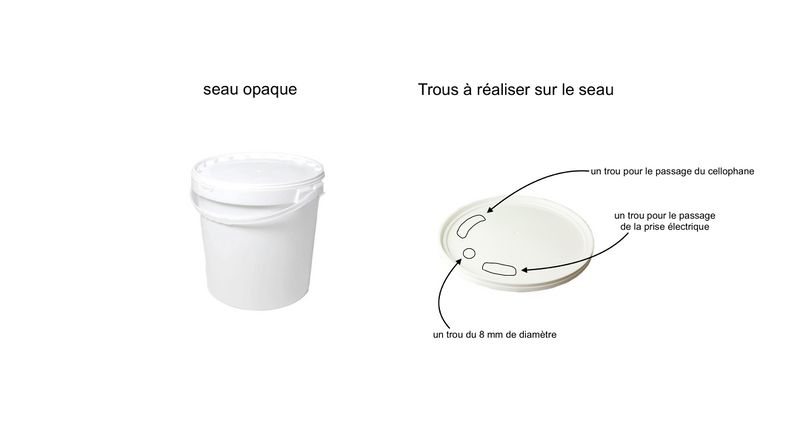
Preparing the bucket (see photo 1)
Equip yourself a 10 L bucket with a lid. Ideally, find an opaque bucket to prevent algae proliferation. If you can't find one, you can make a textile sock or tape the entire side of the bucket.
- Make a hole for the hose. Here, we're making 8 mm diameter holes.
- Make two larger holes for the cling film and the electrical socket. The cling-film will ensure that the water flows back into the bucket. Here, we've used a cutter to make the holes.
Installing the irrigation system
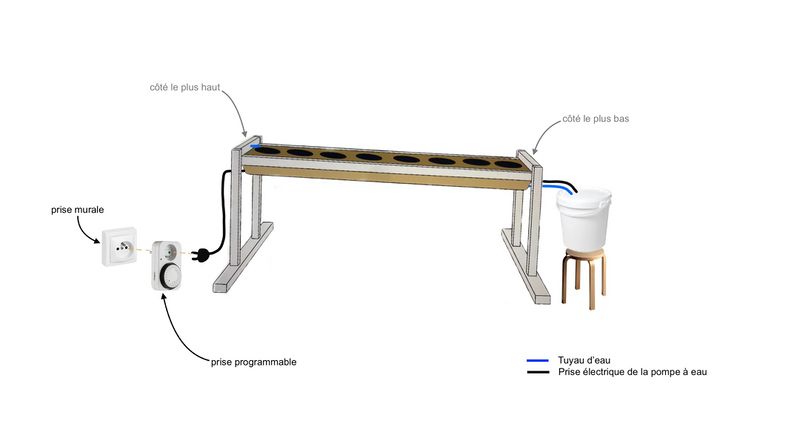
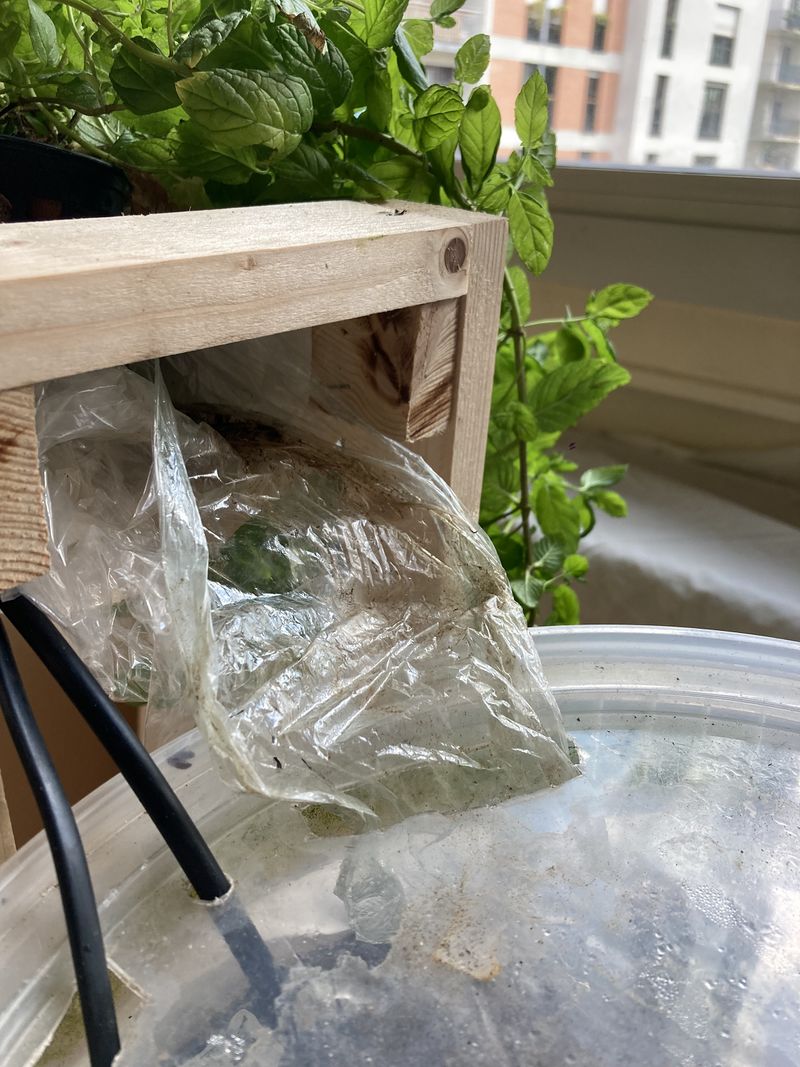
- Position the bucket on the lower side of the gutter (see photo 2). You may wish to place it a little higher up, to make it easier for the pump to work. For example, you can raise the bucket with a stool.
- Place the piece of cling film in one of the bucket's holes (see photo 3).
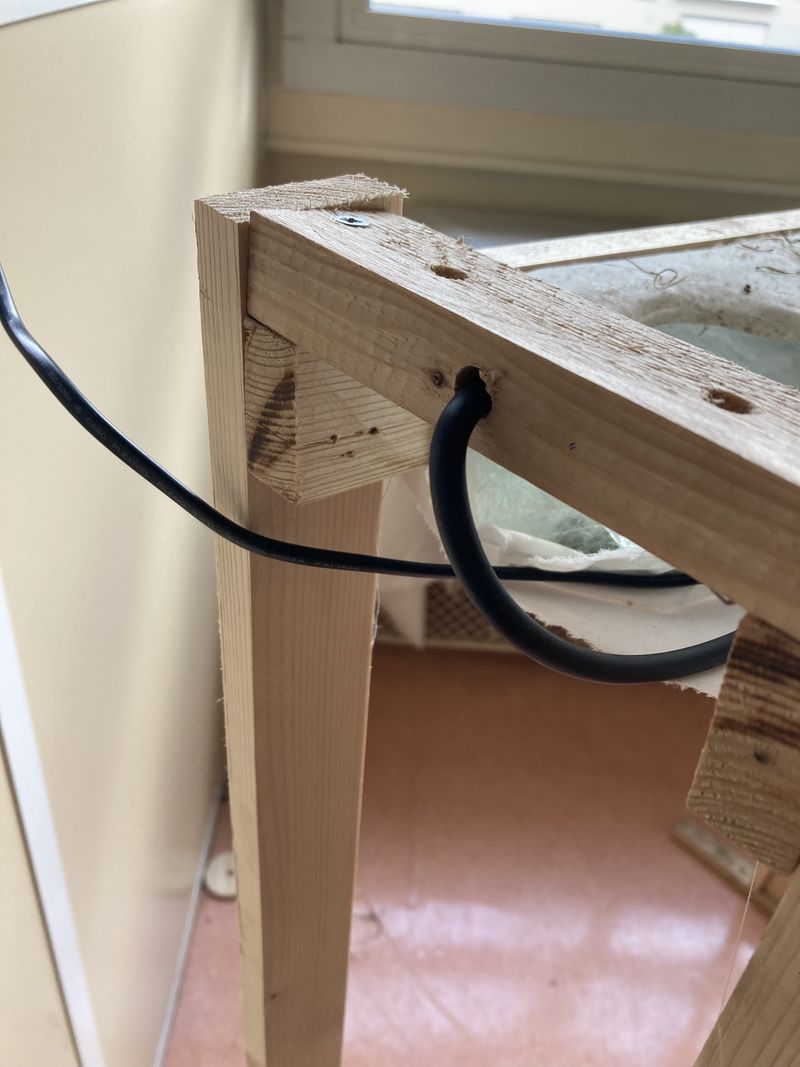
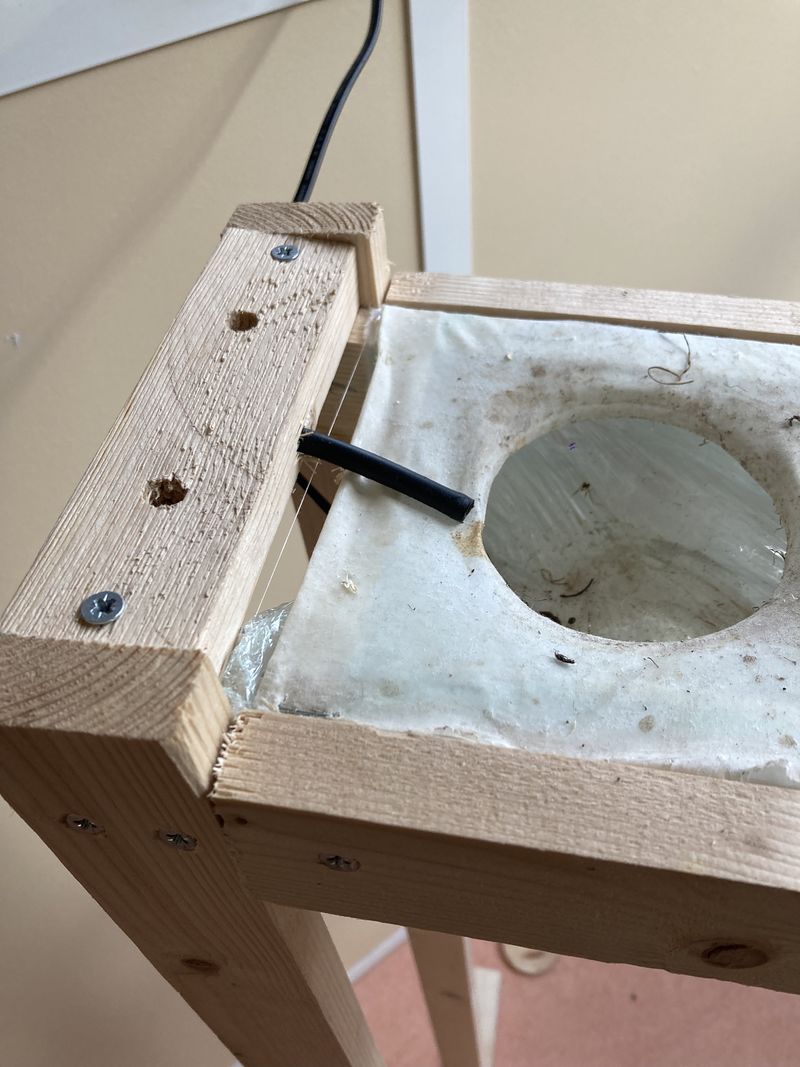
- Drill the 140 mm strip on the highest side of the gutter (see photo 4). Here, a 6.5 mm diameter drill bit is used for a 6 mm diameter pipe.
- Tuck one end of the pipe into the hole and let it protrude about 50 mm (up to the first hole in the waterproof fabric) (see photo 5).
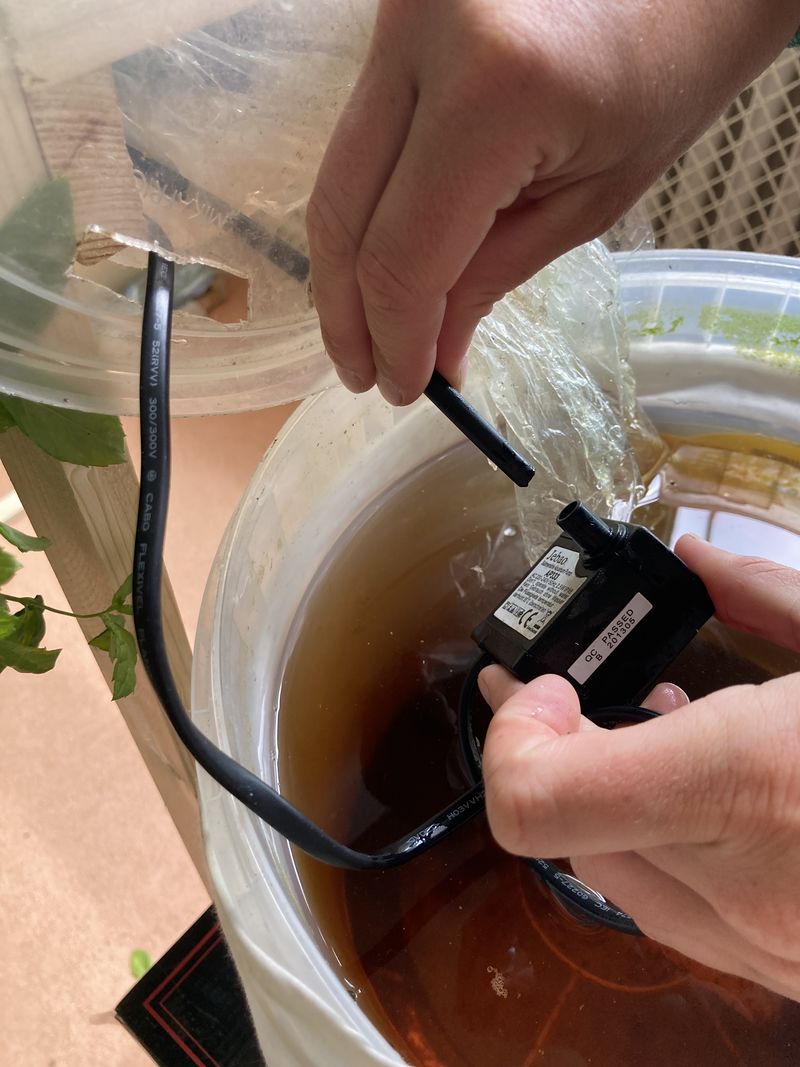
- Pass the other end of the hose inside the sock, insert it into the 8 mm diameter hole in the bucket and connect it to the water pump (see photo 6). Place the water pump in the bucket
- Pass the water pump's electrical wire through the bucket's hole, insert it inside the sock and connect it to the programmable plug.
Étape 18 - Experimentation phase
The next steps concern the experimental phase, which runs from September 1 to October 31, 2024.
Participants in the participatory science program :
- built their own bioponic system
- collected seedlings, micro-sprouts or made their own seedlings
- purchased organic fertilizer from the supplier
Étape 19 - Choice of plants
Here is the list of plants that we have tested in biopony and that work (as seedlings, seedlings or cuttings):
- Lemon basil
- Thai basil
- Melissa
- Sage
- Chives
- Mint
- Oxalys
- Rosemary
- Rocket
- Pineapple sage
- Celery stalks
- Basil, Genovese
- Basil, purple
- Beet
- Bok choy
- Nasturtium
- Cardoon
- Cabbage, Fresh
- Kale
- Watercress
- Spinach
- Corn salad
- Mizuna
- Giant mustard
- Red mustard
- Wasabina mustard
- Bok choy
- Parsley
- Summer purslane
- Round radish
- Chard
- Large thyme
- HierbaBuena
- Lemon balm
- Morning Glory
- Oregano
- Rauram
- Tatsoï
- Sweet potato
- Cherry tomato
Étape 20 - Positioning the plants in the gutter
Assembly A
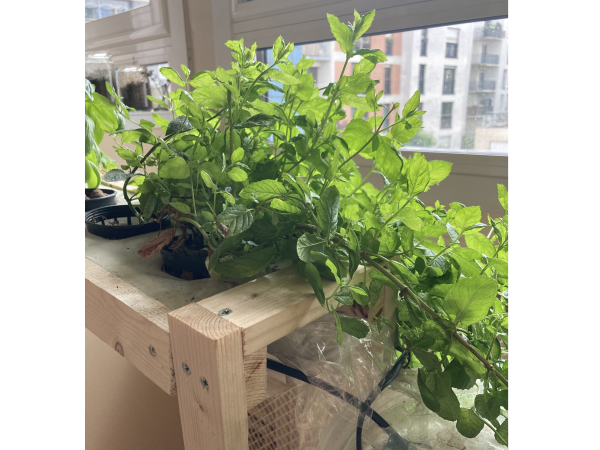
- Collect seedlings, micro-shoots or make your own seedlings. Wash your plants to remove all soil from the roots (see photo 1)
- Place the plants in your hydroponic pots, then cover the roots with clay balls up to the top of the pot (see photo 2).
- Place your hydroponic pots in the holes in the waterproof fabric (see photo 3).
- Fill the bucket with 10 L of water. Mark this height with an indelible marker (see photo 5).
- Add 2 mL of organic fertilizer to 1 L of water in the bucket. Here, we have a 10 L bucket, so add 20 mL of organic fertilizer.
- Connect the program plug to your home's power supply. Make sure the water pump is always immersed in the water in the bucket. Set your program plug to 15 min every hour (see photo 6).
Assembly B
- Collect seedlings, micro-sprouts or make your own seedlings. Wash your plant to remove all soil from the roots (see photo 1).
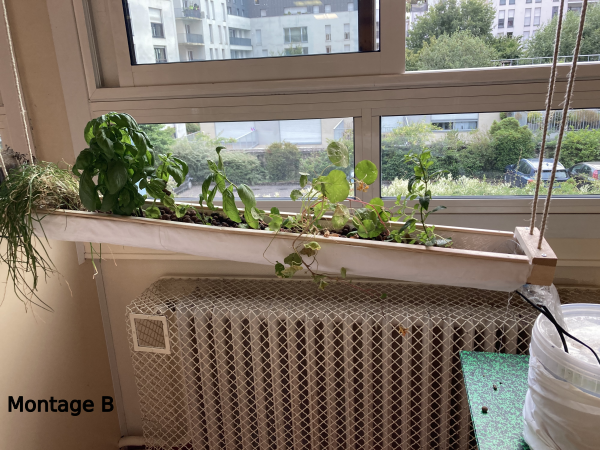
- Fill the gutter with clay balls, about 50 mm high. Place your plants directly in the clay balls (see photo 4).
- Fill the bucket with 10 L of water. Mark this height with an indelible marker (see photo 5).
- Add 2 mL of organic fertilizer to 1 L of water in the bucket. Here, we have a 10 L bucket, so add 20 mL of organic fertilizer.
- Connect the program plug to your home's power supply. Make sure the water pump is always immersed in the water in the bucket. Set your programmable plug to 15 min every hour (see photo 6).
Étape 21 - Maintenance and follow-up
Daily maintenance involves ensuring that the water level in the bucket is stable, that the pump is always submerged and that the plants are healthy.
Maintenance time : 2 minutes per day
- At the start ofthe experiment, dose at approximately 0.6 g/L of water, i.e. 6 g for a 10 L bucket. Mix the solution thoroughly
- Throughout the experiment, make sure your water level is stable and that the water pump is always immersed in the bucket. Add water when necessary
- Every 15 days, add 0.4 g/L of water, i.e. 4 g for a 10 L bucket. Mix the solution well
Monitoring growth
- We encourage you to record your observations as your plants grow, and to share your questions and tips on the WhatsApp group to which you've been added.
Questionnaires
- Don't forget to fill in the questionnaire every Sunday!
Notes et références
Document written by Emma Bousquet-Pasturel as part of Biosphère Expérience's participatory science program.
Draft



 Français
 English
 Deutsch
 Español
 Italiano
 Português