(Page créée avec « - 2 4mm diameter washers ») |
(Page créée avec « All you have to do is turn the spool by hand using the handle to collect the filament. ») |
||
| (46 révisions intermédiaires par le même utilisateur non affichées) | |||
| Ligne 54 : | Ligne 54 : | ||
- 2 4mm diameter washers | - 2 4mm diameter washers | ||
| − | - | + | - 10mm PVC tube, 30cm long |
| − | - | + | - 10cm long wooden prism (3x3cm) |
- Polystyrène | - Polystyrène | ||
| − | - 5cm | + | - 5cm of end or electrical cable |
<br /> | <br /> | ||
| − | |Tools=- | + | |Tools=-Clamp |
| − | - | + | -3D Printer |
| − | - | + | -Screwdriver |
| − | - | + | - Screwing machine |
| − | - | + | - 4mm and 20mm wood drill bits |
| − | - | + | - Metal drills |
}} | }} | ||
{{Tuto Step | {{Tuto Step | ||
| − | |Step_Title= | + | |Step_Title=Creating the support for the system |
| − | |Step_Content= | + | |Step_Content=You'll need a 50cm x 70cm board. |
| − | + | Required thickness 10mm. | |
|Step_Picture_00=Extrudeuse_de_filament_3D_planche.jpg | |Step_Picture_00=Extrudeuse_de_filament_3D_planche.jpg | ||
}} | }} | ||
{{Tuto Step | {{Tuto Step | ||
| − | |Step_Title= | + | |Step_Title=3D printing of the ‘bottle cut-out’ section |
| − | |Step_Content= | + | |Step_Content=Print the part in STL |
| − | + | Link to 3D file: https://www.thingiverse.com/thing:6482361 | |
|Step_Picture_00=Extrudeuse_de_filament_3D_bootle_cut.png | |Step_Picture_00=Extrudeuse_de_filament_3D_bootle_cut.png | ||
}} | }} | ||
{{Tuto Step | {{Tuto Step | ||
| − | |Step_Title= | + | |Step_Title=Insert the ball bearings on the part and screw everything together |
| − | |Step_Content= | + | |Step_Content=Use M4 CHC screws and M4 nuts to screw in the bearings |
| − | + | The screw heads are below the 3D printed part | |
| − | + | Put a washer around the screw head and nut. | |
<br /> | <br /> | ||
}} | }} | ||
{{Tuto Step | {{Tuto Step | ||
| − | |Step_Title= | + | |Step_Title=Fix the system to the board using 4 wood screws |
| − | |Step_Content= | + | |Step_Content=Using the 4 wood screws on the board |
|Step_Picture_00=Extrudeuse_de_filament_3D_prj_et3_impr3D.jpg | |Step_Picture_00=Extrudeuse_de_filament_3D_prj_et3_impr3D.jpg | ||
}} | }} | ||
{{Tuto Step | {{Tuto Step | ||
| − | |Step_Title= | + | |Step_Title=Screw on a threaded rod for the bottle |
| − | |Step_Content= | + | |Step_Content=Make a countersunk hole in the board (the chamber will be 5mm deep and 20mm in diameter, and the diameter of the hole will be equal to that of the threaded rod). |
| − | + | This hole corresponds to the centre of the arc of the 3D printed part. | |
| − | + | The bedroom will be below the board) | |
| − | + | Cut the threaded rod to a length of 20cm. | |
| − | + | Screw the threaded rod with the M4 nuts onto the board at the centre of the arc of the previously 3D printed part. The threaded rod must not extend beyond the underside of the board. | |
| − | + | Insert a nut on the threaded rod and then a washer to hold the pipe in place on the rod. | |
| − | + | Cut the pipe to a length 3cm shorter than the top of the threaded rod | |
| − | + | Fit the last washer and nut to tighten the PVC pipe. | |
<br /> | <br /> | ||
| Ligne 128 : | Ligne 128 : | ||
}} | }} | ||
{{Tuto Step | {{Tuto Step | ||
| − | |Step_Title= | + | |Step_Title=Nozzle section (extrusion) |
| − | |Step_Content=- | + | |Step_Content=- If necessary, drill holes in the bracket so that the holes are co-axial with the holes in the heating part of the nozzle. |
| − | - | + | -Fasten the heating part of the nozzle to the bracket using the bolts. |
| − | - | + | -Drill the nozzle to a diameter of 1.75 mm. |
| − | - | + | -Screw this nozzle into the heating section |
| − | - | + | -Screw the bracket to the wood using the wood screws (the nozzle must be in line with the band made by the bottle). |
|Step_Picture_00=Extrudeuse_de_filament_3D_equerre_buse.jpg | |Step_Picture_00=Extrudeuse_de_filament_3D_equerre_buse.jpg | ||
}} | }} | ||
{{Tuto Step | {{Tuto Step | ||
| − | |Step_Title= | + | |Step_Title=Arduino wiring |
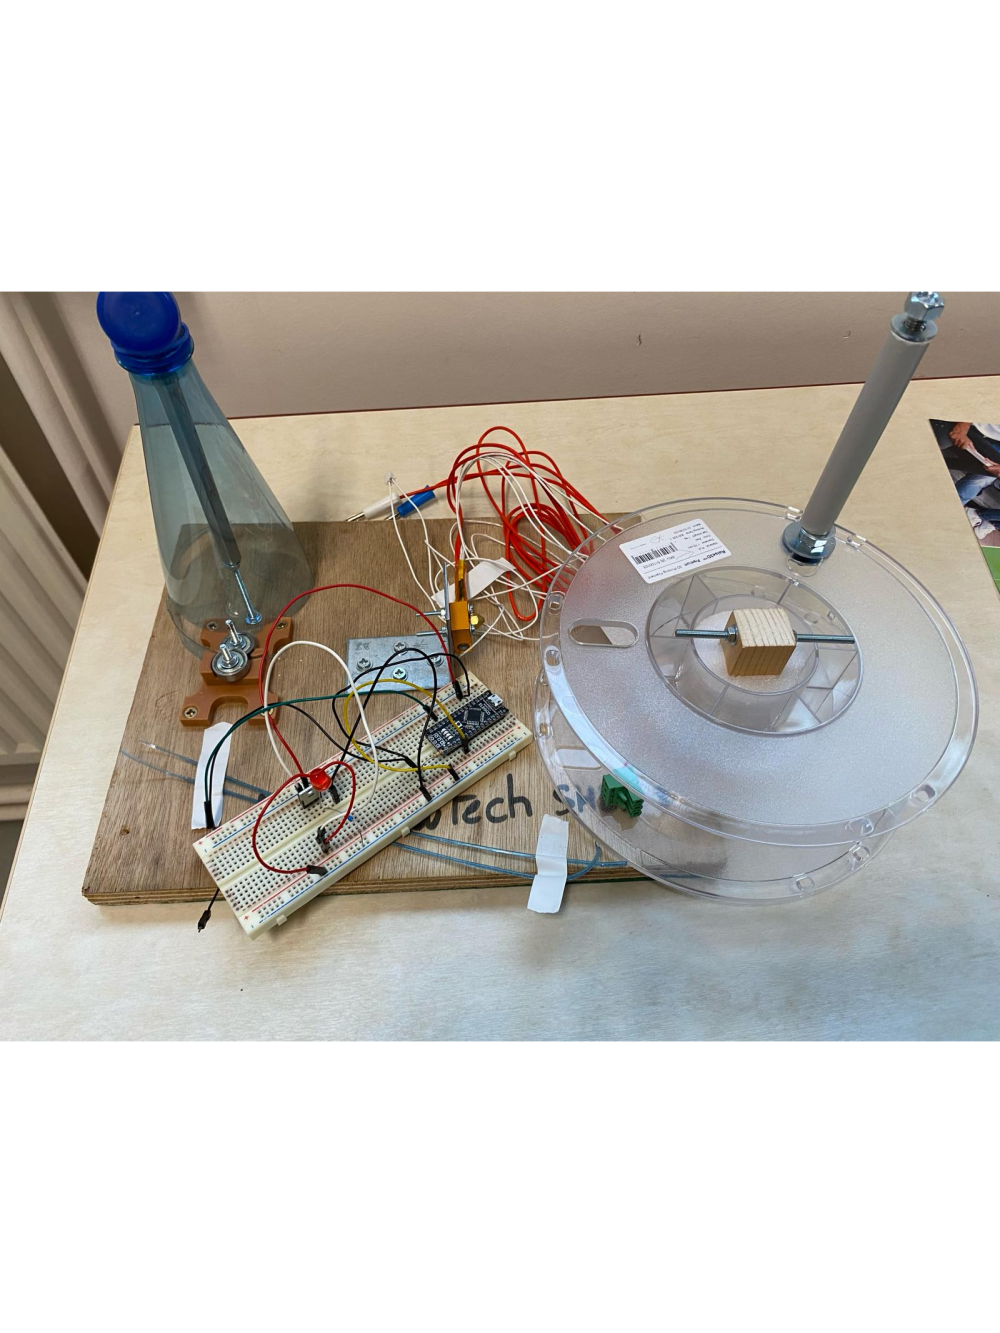
| − | |Step_Content= | + | |Step_Content=Wiring it all up (see photo) |
| − | Code | + | Arduino Code : |
| Ligne 154 : | Ligne 154 : | ||
}} | }} | ||
{{Tuto Step | {{Tuto Step | ||
| − | |Step_Title= | + | |Step_Title=Filament reception |
| − | |Step_Content=- | + | |Step_Content=- Cut the dowels, the PVC tube and the prism to the required length. |
| − | - | + | - Also cut two polystyrene cylinders 14cm in diameter and extrude a 3x3cm prism down the centre. |
| − | - | + | - Fix the 8mm diameter stud to the empty coil using two washers and two 8mm nuts. |
| − | - | + | - Insert the PVC tube around the stud and secure it with another 8mm nut |
| − | - | + | - Drill a 4mm diameter hole in the prism at a distance of 3cm. |
| − | - | + | - Fix to the main wooden board using a screw (whatever the reference), then add the pieces of polystyrene, the coil and finally the 4mm diameter stud which is fixed around the prism using two washers and two 4mm nuts. |
| − | + | All you have to do is turn the spool by hand using the handle to collect the filament. | |
|Step_Picture_00=Extrudeuse_de_filament_3D_IMG_0072.jpg | |Step_Picture_00=Extrudeuse_de_filament_3D_IMG_0072.jpg | ||
|Step_Picture_01=Extrudeuse_de_filament_3D_IMG_0076.jpg | |Step_Picture_01=Extrudeuse_de_filament_3D_IMG_0076.jpg | ||
Version actuelle datée du 16 août 2024 à 14:04

Difficulté
Moyen
Durée
20 heure(s)
Coût
30 EUR (€)
Description
The aim of this system is to recycle plastic bottles into filament for a 3D printer. (not yet finished)
Sommaire
Sommaire
- 1 Description
- 2 Sommaire
- 3 Étape 1 - Creating the support for the system
- 4 Étape 2 - 3D printing of the ‘bottle cut-out’ section
- 5 Étape 3 - Insert the ball bearings on the part and screw everything together
- 6 Étape 4 - Fix the system to the board using 4 wood screws
- 7 Étape 5 - Screw on a threaded rod for the bottle
- 8 Étape 6 - Nozzle section (extrusion)
- 9 Étape 7 - Arduino wiring
- 10 Étape 8 - Filament reception
- 11 Notes et références
- 12 Commentaires
Matériaux
-Wooden board 50cm x 70cm x 10mm
-3D printer filament
-Wood screws diameter M2 and L = 8mm
-Metal screws diameter M3
-Metal bracket
-2 Ball bearings Dint 6mm, Dext 20mm, Thickness 6mm
-2 M4 diameter CHC screws
-1 3D printer nozzle with heating part
-1 Arduino
-1 transistor
-Arduino cables
- 3 x 8 mm nuts
- 3 x 8mm washers
- 1 empty reel
- 8mm dowel, 15cm long
- 4mm dowel, 7 cm long
- 2 4mm diameter nuts
- 2 4mm diameter washers
- 10mm PVC tube, 30cm long
- 10cm long wooden prism (3x3cm)
- Polystyrène
- 5cm of end or electrical cable
Outils
-Clamp
-3D Printer
-Screwdriver
- Screwing machine
- 4mm and 20mm wood drill bits
- Metal drills
Étape 1 - Creating the support for the system
You'll need a 50cm x 70cm board.
Required thickness 10mm.

Étape 2 - 3D printing of the ‘bottle cut-out’ section
Print the part in STL
Link to 3D file: https://www.thingiverse.com/thing:6482361

Étape 3 - Insert the ball bearings on the part and screw everything together
Use M4 CHC screws and M4 nuts to screw in the bearings
The screw heads are below the 3D printed part
Put a washer around the screw head and nut.
Étape 4 - Fix the system to the board using 4 wood screws
Using the 4 wood screws on the board

Étape 5 - Screw on a threaded rod for the bottle
Make a countersunk hole in the board (the chamber will be 5mm deep and 20mm in diameter, and the diameter of the hole will be equal to that of the threaded rod).
This hole corresponds to the centre of the arc of the 3D printed part.
The bedroom will be below the board)
Cut the threaded rod to a length of 20cm.
Screw the threaded rod with the M4 nuts onto the board at the centre of the arc of the previously 3D printed part. The threaded rod must not extend beyond the underside of the board.
Insert a nut on the threaded rod and then a washer to hold the pipe in place on the rod.
Cut the pipe to a length 3cm shorter than the top of the threaded rod
Fit the last washer and nut to tighten the PVC pipe.

Étape 6 - Nozzle section (extrusion)
- If necessary, drill holes in the bracket so that the holes are co-axial with the holes in the heating part of the nozzle.
-Fasten the heating part of the nozzle to the bracket using the bolts.
-Drill the nozzle to a diameter of 1.75 mm.
-Screw this nozzle into the heating section
-Screw the bracket to the wood using the wood screws (the nozzle must be in line with the band made by the bottle).

Étape 7 - Arduino wiring
Wiring it all up (see photo)
Arduino Code :

Étape 8 - Filament reception
- Cut the dowels, the PVC tube and the prism to the required length.
- Also cut two polystyrene cylinders 14cm in diameter and extrude a 3x3cm prism down the centre.
- Fix the 8mm diameter stud to the empty coil using two washers and two 8mm nuts.
- Insert the PVC tube around the stud and secure it with another 8mm nut
- Drill a 4mm diameter hole in the prism at a distance of 3cm.
- Fix to the main wooden board using a screw (whatever the reference), then add the pieces of polystyrene, the coil and finally the 4mm diameter stud which is fixed around the prism using two washers and two 4mm nuts.
All you have to do is turn the spool by hand using the handle to collect the filament.


Notes et références
https://arduiblog.com/2023/04/23/recreator-3d/
Draft
 Français
 English
 Deutsch
 Español
 Italiano
 Português