(Page créée avec « We have several types of board that make up the press frame: ») |
(Page créée avec « '''Warning!! The juice must be sterilised before drinking.''' ») |
||
| (50 révisions intermédiaires par le même utilisateur non affichées) | |||
| Ligne 61 : | Ligne 61 : | ||
We have several types of board that make up the press frame: | We have several types of board that make up the press frame: | ||
| − | - | + | -Large legs x2: Section: 100mmx50mm, Height: 1200mm (pallet boards) |
| − | - | + | -Cross boards x4: Section: 100mmx50mm, Height: 65mm (pallet boards) |
| − | - | + | -Foot boards x2:40mmx120mm height: 600mm (pallet boards) |
| − | - | + | -The base for the jack: 200mmx200mm height: 30mm |
| − | - | + | - Pre-built cube (press tank): 530mm square |
| − | - | + | -Inner pressure boards x4 (used to create layers to extract juice more quickly): 300mmx300mm, Height 20mm (agglomerate boards) |
| − | ''' | + | '''For shredder:''' |
| − | + | For the large funnel : | |
| − | - | + | -Follow the photos for the boards on the sides because of the complex geometry |
| − | - | + | - Large boards for side x2 :300mmx335mm |
| − | - | + | -Small boards at bottom x2:200mmx300mm |
| − | - | + | - Plank feet x4: pallet planks: height 500mm (not in photo) |
| − | - | + | - Log: Diameter: 160mm, Length: 280mm |
| − | + | Now all your wooden parts are cut out and ready to assemble. | |
|Step_Picture_00=Extracteur_de_jus_de_pomme_planches_presseur_.jpg | |Step_Picture_00=Extracteur_de_jus_de_pomme_planches_presseur_.jpg | ||
|Step_Picture_01=Extracteur_de_jus_de_pomme_planche_broyeur.jpg | |Step_Picture_01=Extracteur_de_jus_de_pomme_planche_broyeur.jpg | ||
| Ligne 99 : | Ligne 99 : | ||
}} | }} | ||
{{Tuto Step | {{Tuto Step | ||
| − | |Step_Title= | + | |Step_Title=Assembling the different parts |
| − | |Step_Content=''' | + | |Step_Content='''For the press:''' |
| − | + | First we need to set the framework: | |
| − | - | + | - Connect two large legs at their ends with 2 cross boards on either side of the large legs. This will be the top part of your frame. |
| − | - | + | - Fix the base for the jack to the middle of the cross-boards, facing downwards, |
| − | ''' | + | '''Warning!!''' The positioning of the next two transverse boards is the most complicated because it requires a little calculation: the distance between the base of the jack and the lower transverse boards must be equal to the height of your pressing vat (here our crate) plus the minimum height of the jack (we advise you to add 2-3 cm for a better practicality of the machine. |
| − | + | This distance is precise because it must allow the jack to press correctly (if the tray is too low, the jack will not have the necessary length to press properly) and must also allow the pressing tray (our crate) to be removed when the jack is completely closed. | |
| − | - | + | -The bottom of our cross boards are positioned 270mm from the bottom of our frame with our own dimensions. |
| − | - | + | -After checking the distance (place the tray and the jack, without fixing the jack, and check that everything fits into the space), fix the jack on its base. |
| − | - | + | -Finally, place the foot boards perpendicular to the cross boards, so that the frame is stable. |
| − | - | + | - Drill a hole in the bottom of the squeezer tray to allow the juice to flow out |
| − | ''' | + | '''For shredder:''' |
| − | Modification | + | Modification of the log : |
| − | - | + | -Screw screws into the log |
| − | - | + | -Drill holes on the central axis of the log to accommodate the threaded rod. length: 50mm |
| − | + | Preparing the funnel : | |
| − | - | + | -Drill a hole in the sides of the funnel to accommodate the axis of your log. |
| − | ''' | + | '''Warning!!''' This hole must be high enough for the log + screws that are in the log can turn but low enough for the apples are crushed in the log and the walls of the funnel. This hole must also be big enough to let the threaded rod through but not the bolts. |
| − | + | See previous plate diagrams for dimensions. | |
| − | '''-''' | + | '''-''' Fix the boards with the screws to create the funnel |
| − | - | + | - Place the feet at the bottom of the funnel to make it stable |
| − | ''' | + | '''Warning!!''' The feet must not interfere with the rotation of the pedal. |
| − | - | + | - Place the log opposite the holes and insert the threaded rod on each side, cutting it in half through the holes. |
| − | - | + | - Secure the rod and therefore the log with bolts on either side of the walls. |
| − | - | + | - Secure the pedal to the spindle using bolts |
| − | + | And voilà! Your shredder is ready! If you're having trouble with our explanations, please refer to the photos and videos. | |
<br /> | <br /> | ||
| Ligne 165 : | Ligne 165 : | ||
}} | }} | ||
{{Notes | {{Notes | ||
| − | |Notes=<u> | + | |Notes=<u>‘’‘Usage advice:’‘’</u> |
| − | - | + | -Place the food container under the grinder |
| − | - | + | - Pour the apples little by little into the shredder, turning the log with the pedal. |
| − | ''' | + | '''Careful!! not too many apples, risk of blockage''' |
| − | '''-''' | + | '''-''' Recover crushed apples from old T-shirts 4 |
| − | - | + | - Create layers of apples in the presser tray with the square boards and apple-filled t-shirts. |
| − | - | + | - Recover the juice in bottles |
| − | ''' | + | '''Warning!! The juice must be sterilised before drinking.''' |
}} | }} | ||
{{PageLang | {{PageLang | ||
Version actuelle datée du 18 juillet 2024 à 11:00
Description
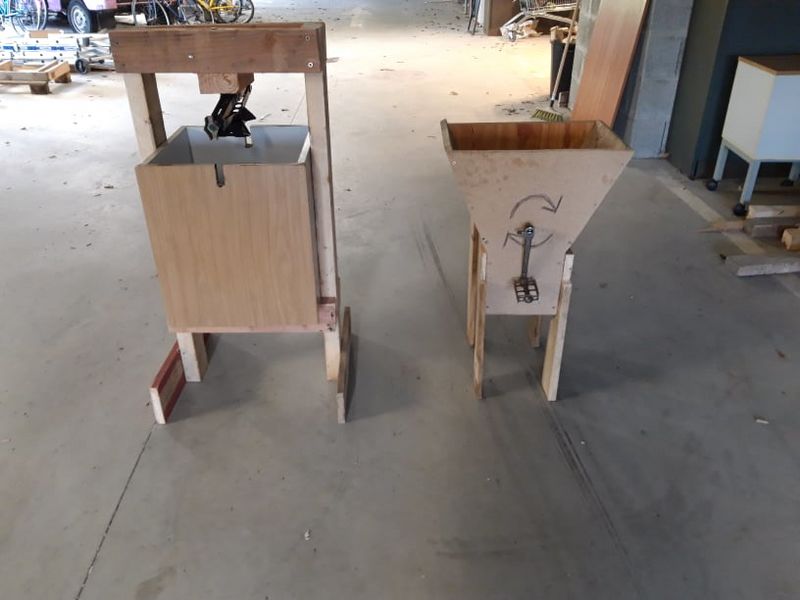
Two low-tech machines, an apple crusher and an apple press, producing apple juice.
Introduction
Matériaux
- Screws 60mm x 15 and 40mm x 50
- Bolts x 10
- Threaded rod 200mm
.
- Wooden case (very specific to our machine, can be made of wood)
- Wooden planks (e.g. chipboard or other long, flat wooden planks)
- Wooden planks (from pallets)
- Car jack (from a car wreck)
- Old t-shirts
- Food tank
- Bicycle pedal
Outils
- Drill / screwdriver
- Wood saw
- Metal saw
- Hammer / crowbar (for removing planks from pallets)
Étape 1 - Cutting and recovering materials
This first stage is common to both machines.
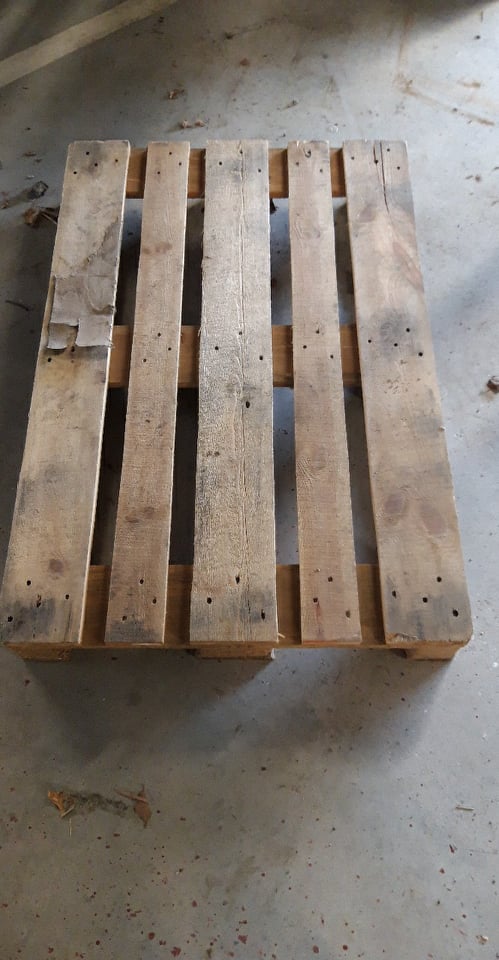
The first step is to break up the pallets to recover the wooden planks.
You also need to collect screws and bolts. That's our only expense.
Étape 2 - Cutting out the different parts
Dimensions are expressed as length * width * height
All dimensions are specific to our materials and can therefore be modified.
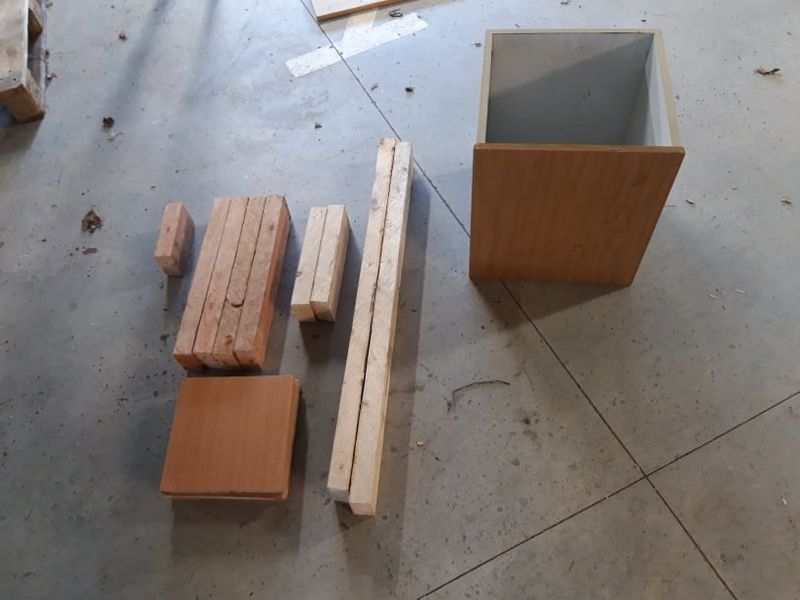
For the press:
Having collected some wooden crates that form a 530mm cube, we decided to base our dimensions on this base.
We have several types of board that make up the press frame:
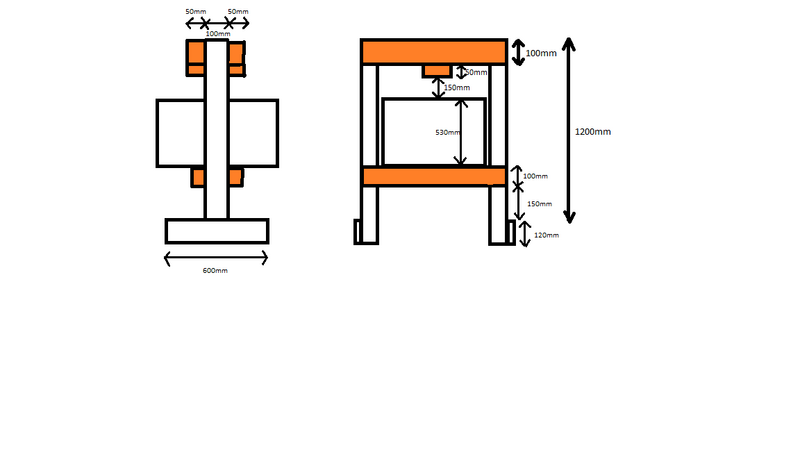
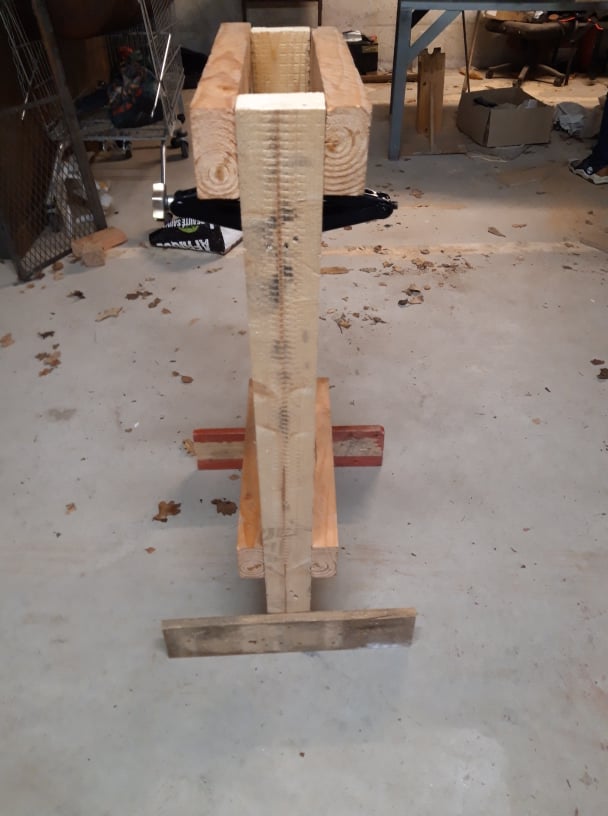
-Large legs x2: Section: 100mmx50mm, Height: 1200mm (pallet boards)
-Cross boards x4: Section: 100mmx50mm, Height: 65mm (pallet boards)
-Foot boards x2:40mmx120mm height: 600mm (pallet boards)
-The base for the jack: 200mmx200mm height: 30mm
- Pre-built cube (press tank): 530mm square
-Inner pressure boards x4 (used to create layers to extract juice more quickly): 300mmx300mm, Height 20mm (agglomerate boards)
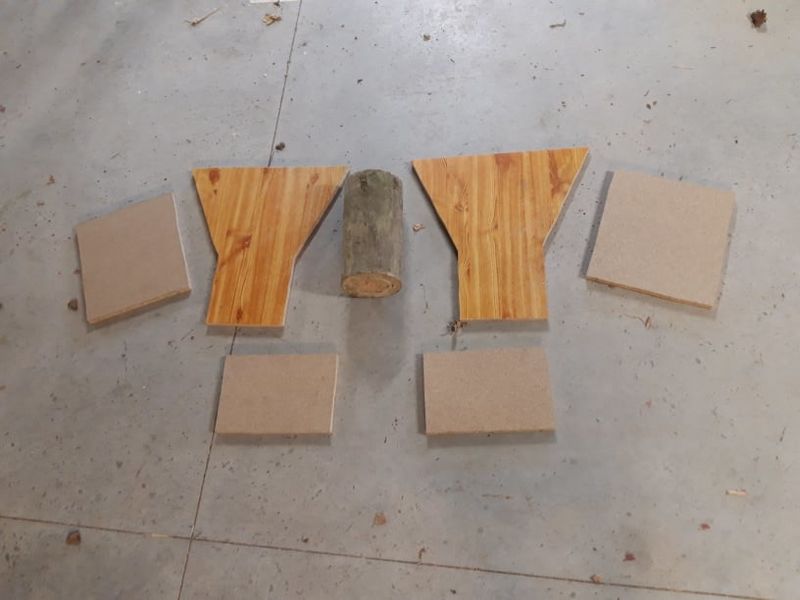
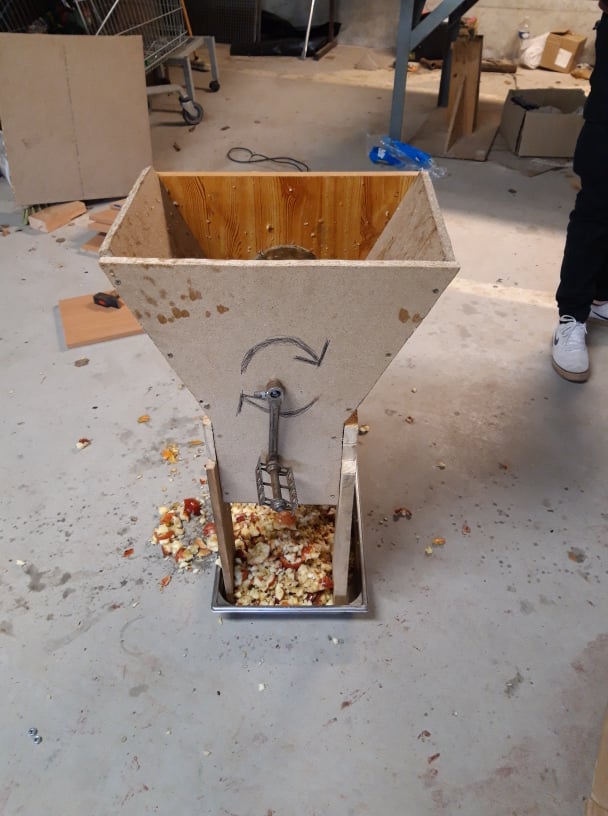
For shredder:
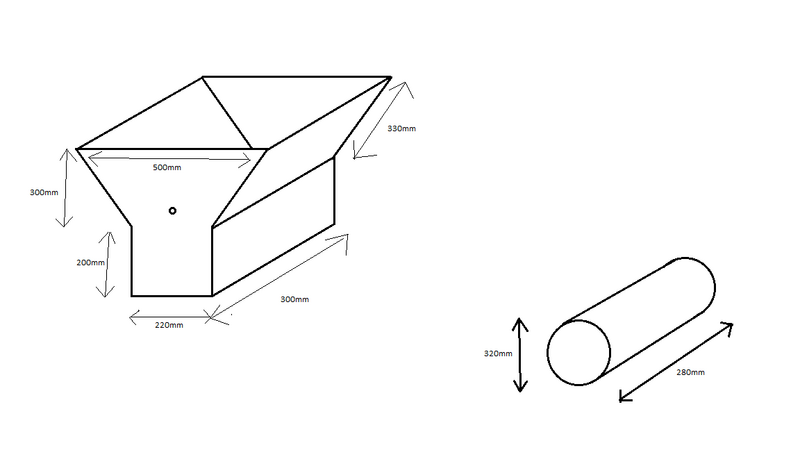
For the large funnel :
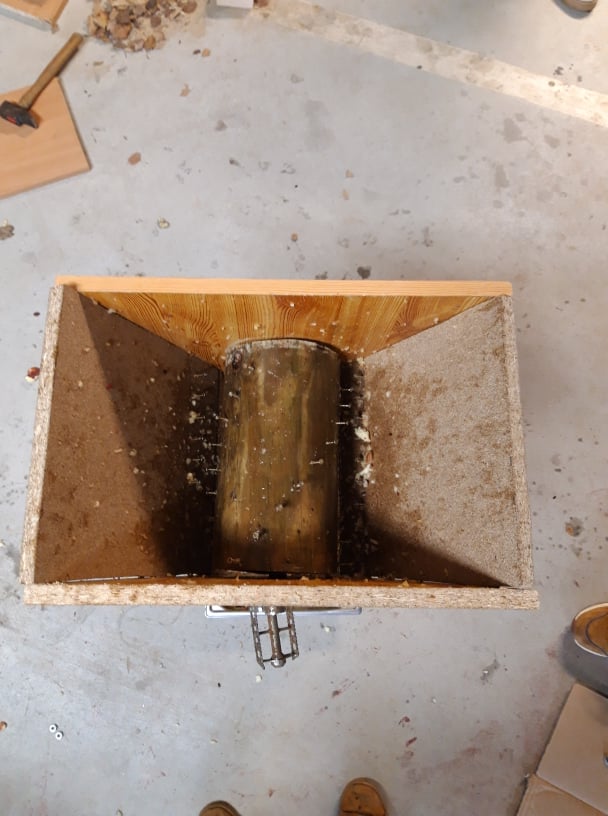
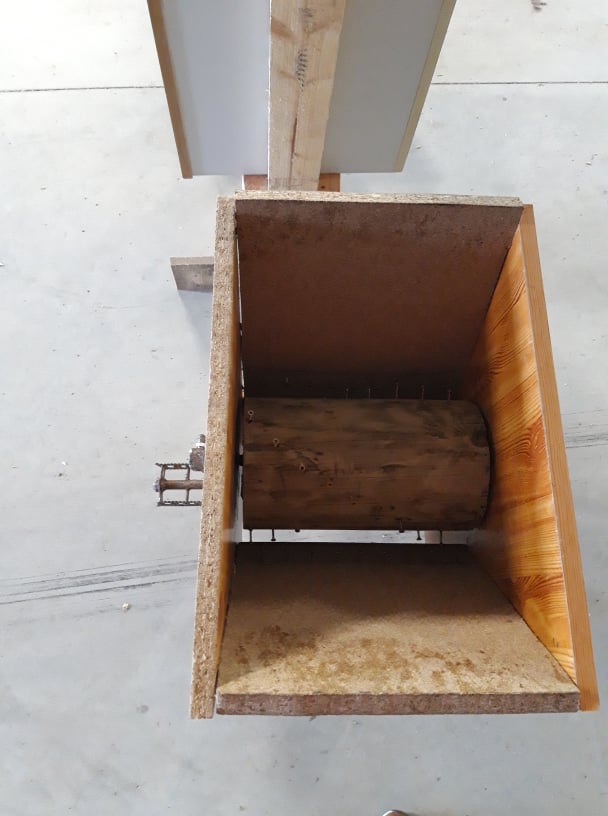
-Follow the photos for the boards on the sides because of the complex geometry
- Large boards for side x2 :300mmx335mm
-Small boards at bottom x2:200mmx300mm
- Plank feet x4: pallet planks: height 500mm (not in photo)
- Log: Diameter: 160mm, Length: 280mm
Now all your wooden parts are cut out and ready to assemble.
Étape 3 - Assembling the different parts
For the press:
First we need to set the framework:
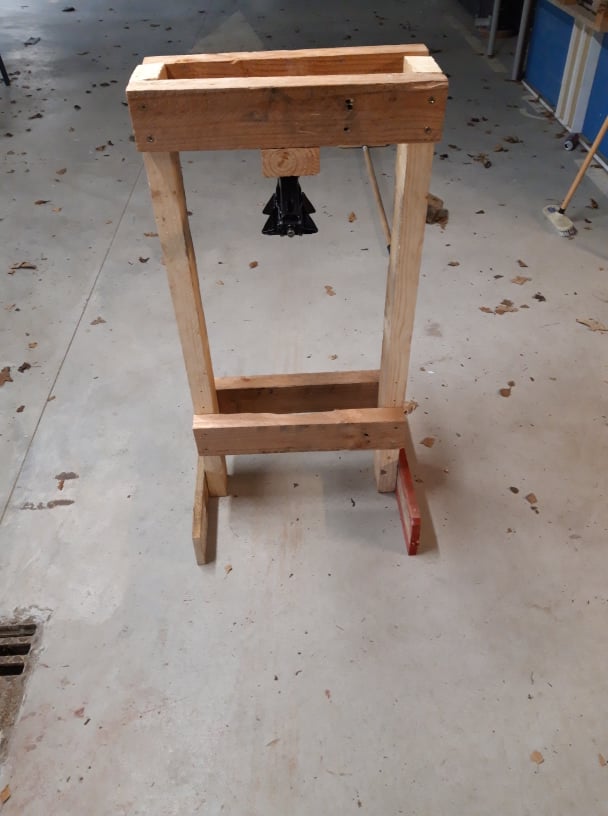
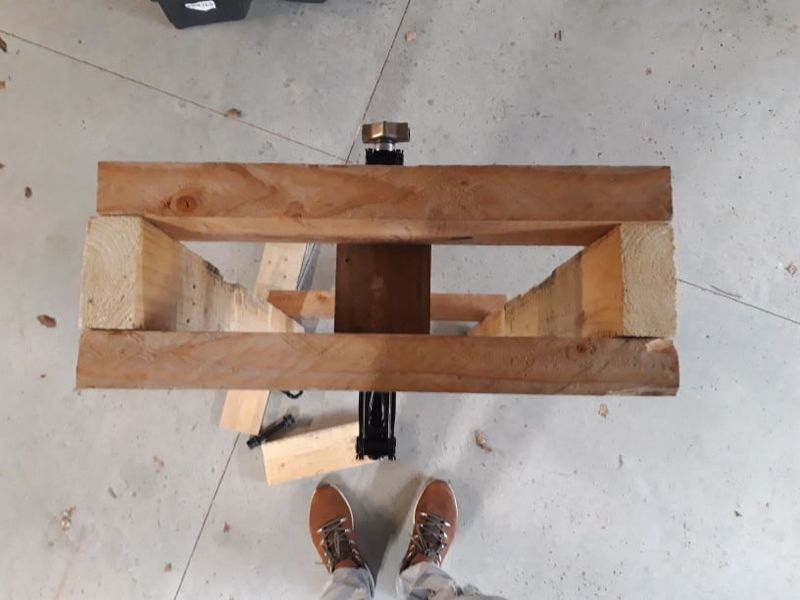
- Connect two large legs at their ends with 2 cross boards on either side of the large legs. This will be the top part of your frame.
- Fix the base for the jack to the middle of the cross-boards, facing downwards,
Warning!! The positioning of the next two transverse boards is the most complicated because it requires a little calculation: the distance between the base of the jack and the lower transverse boards must be equal to the height of your pressing vat (here our crate) plus the minimum height of the jack (we advise you to add 2-3 cm for a better practicality of the machine.
This distance is precise because it must allow the jack to press correctly (if the tray is too low, the jack will not have the necessary length to press properly) and must also allow the pressing tray (our crate) to be removed when the jack is completely closed.
-The bottom of our cross boards are positioned 270mm from the bottom of our frame with our own dimensions.
-After checking the distance (place the tray and the jack, without fixing the jack, and check that everything fits into the space), fix the jack on its base.
-Finally, place the foot boards perpendicular to the cross boards, so that the frame is stable.
- Drill a hole in the bottom of the squeezer tray to allow the juice to flow out
For shredder:
Modification of the log :
-Screw screws into the log
-Drill holes on the central axis of the log to accommodate the threaded rod. length: 50mm
Preparing the funnel :
-Drill a hole in the sides of the funnel to accommodate the axis of your log.
Warning!! This hole must be high enough for the log + screws that are in the log can turn but low enough for the apples are crushed in the log and the walls of the funnel. This hole must also be big enough to let the threaded rod through but not the bolts.
See previous plate diagrams for dimensions.
- Fix the boards with the screws to create the funnel
- Place the feet at the bottom of the funnel to make it stable
Warning!! The feet must not interfere with the rotation of the pedal.
- Place the log opposite the holes and insert the threaded rod on each side, cutting it in half through the holes.
- Secure the rod and therefore the log with bolts on either side of the walls.
- Secure the pedal to the spindle using bolts
And voilà! Your shredder is ready! If you're having trouble with our explanations, please refer to the photos and videos.
Notes et références
‘’‘Usage advice:’‘’
-Place the food container under the grinder
- Pour the apples little by little into the shredder, turning the log with the pedal.
Careful!! not too many apples, risk of blockage
- Recover crushed apples from old T-shirts 4
- Create layers of apples in the presser tray with the square boards and apple-filled t-shirts.
- Recover the juice in bottles
Warning!! The juice must be sterilised before drinking.
Published
 Français
 English
 Deutsch
 Español
 Italiano
 Português