
Difficulté
Difficile
Durée
2 jour(s)
Coût
150 EUR (€)
Description
The boiler stove is a system designed for homes to heat a water tank with wood.
Sommaire
Sommaire
- 1 Description
- 2 Sommaire
- 3 Introduction
- 4 Étape 1 - Material recovery
- 5 Étape 2 - Cleaning barrels
- 6 Étape 3 - Barrel cutting
- 7 Étape 4 - Foyer installation
- 8 Étape 5 - Making the base for the cumulus
- 9 Étape 6 - Assembly
- 10 Étape 7 - Water exchanger connection
- 11 Étape 8 - How it works
- 12 Étape 9 - Safety rules
- 13 Commentaires
Introduction
We're still working on these instructions, as we haven't yet been able to produce a prototype.
We're a group of students at the Ecole Nationale d'Ingénieurs de Brest (ENIB), and as part of our LowTech module, we have to carry out a project involving setting up a boiler stove. The boiler stove is a system designed for homes to heat a house initially or to heat a water tank when we have no way of doing so in bad weather or when it's cold. This project is in collaboration with the association LowTech With Refugee Briançon to help build a house for people in need. The main purpose of this boiler stove is to heat a water tank so that the refugees can have hot water when they shower. Once the information has been gathered, one person will use 6 litres of water for a shower, and the LowTech team in Briançon can house around 10 people. The system we need to put in place must be able to heat at least 60 litres of water.
To illustrate this notice we are using images from Les Outils de l'Autonomie which are shareable and sharable for non-commercial purposes.


Matériaux
- 2 x 208L barrels
- Water heater (diameter < 55cm)
- Safety group for water heater
- 1 pair of stainless steel water supply connection hoses
- Slabs
- Vermiculite concrete insulation
- Smoke evacuation pipe (a wood stove pipe)
Outils
- Grinder (or sabre saw)
- Welding machine
- Drilling machine
Étape 1 - Material recovery
The first step in making the boiling stove is to collect all the materials we need.
To recover the 208-litre drums, you can pick them up from local businesses (from a garage, for example), and you'll be lucky if they're already empty.
For the cumulus, you can collect it from places where they donate equipment, such as a recycling centre, where the equipment has already been used.
To get a security system, you're going to have to spend money. We want our system to be as reliable as possible, so we'll need to spend a bit of money. For our project, we decided to use a security unit.
A pipe will be needed to evacuate the smoke. We use the same type of pipe as for wood-burning stoves to evacuate the smoke.
Étape 2 - Cleaning barrels
The paint is sensitive to heat and may peel off. It's best to start by sanding the paint off the barrel.
You'll need to open the drums to clean the inside. To do this, cut out the bottom of the barrel following the beading around the edges.
Barrels are very likely to be soiled. To clean them, it's best to find out what was in the barrel and dispose of the residue at a waste disposal site. Sawdust or sand can be used to remove the residue.
Warning: before proceeding, check that both barrels are clean. If this is not the case, it could be dangerous during operation.
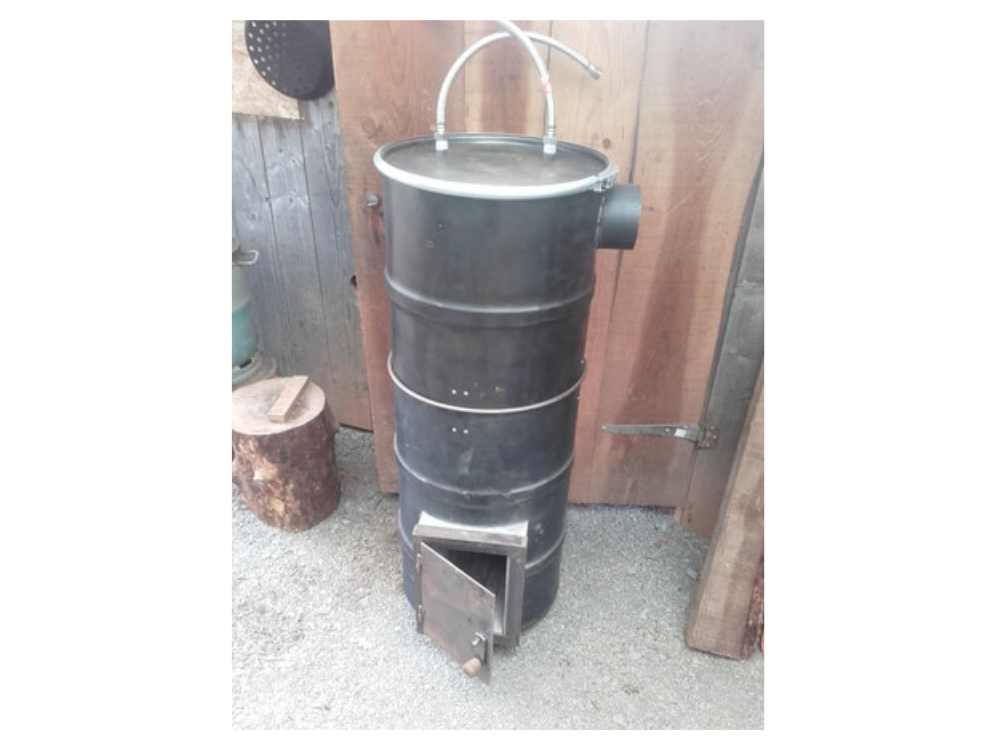
Étape 3 - Barrel cutting
On the first barrel we're going to cut out a rectangle for the firebox opening. You can use a grinder to make this opening, which will be easier to do. This opening will be located at the bottom of the barrel and will be used to feed wood into the barrel to heat the cumulus.
(See example in the following photo)
On the second barrel, cut a circle the diameter of your smoke exhaust pipe. You'll need to install a large pipe like the one used for wood-burning stoves so that the smoke can escape outside to avoid any danger of suffocation inside the house.

Étape 4 - Foyer installation
On the first barrel, we'll install the slabs to contain the firebox.
To begin with, lay a first layer of vermiculite concrete about 6 cm thick to insulate the floor.
Then place the 5 slabs to create the chamber that will house the fireplace. Make a hole in the roof of the fireplace to allow the smoke to pass through.
Now that we've got the fireplace in place, we need to create our vermiculite concrete. To prepare it with a shovel, you need to dry mix the vermiculite and the cement. This is easy to do, either on a (clean) floor or on a thick sheet of plastic. Using a shovel, stir the two products together to obtain a uniform shade of grey.
Then add the necessary amount of water (2 bags of vermiculite for 1 bag of cement for 60 litres of water), adding the water gradually while stirring with a shovel. To avoid losing water, you can pour it into the middle of the mixture. Be careful not to overwork the mixture, as this will crush the vermiculite.
Finally, fill the barrel to the top with vermiculite concrete.


Étape 5 - Making the base for the cumulus
Before assembling the water heater and the barrels, a base must be made to hold the water heater upright. The principle is simple: a base must be made to hold it up so that a fire can be built in the firebox and the smoke can heat the water heater and hold it above the firebox. Exhaust pipes must be made on this base so that the smoke from the fire can rise and heat the hot water tank.
For the design, we'll need to make a base like the following images:


Étape 6 - Assembly
Once you've finished preparing all the necessary materials (cutting out the canister, preparing the base for the water heater, etc.), you now need to move on to assembling the whole thing. To do this, place the base in the can on the hearth, then the water heater can be placed on top so that it stays high and the smoke can heat the water heater. To hold the water heater in place so that it doesn't move, you can weld it to the wall of the canister, which will prevent it from moving.

Étape 7 - Water exchanger connection
Now we need to connect the cold water to the hot water tank and get the hot water out. To do this, there are two types of inlet in a cumulus, the blue inlet for cold water and the red outlet for hot water. You need to connect a flexible stainless steel connecting pipe to the inlet and outlet and then connect it to the main water heater.

Étape 8 - How it works
In this section, we'll look at how our boiler stove works. To make it work, you need to feed the firebox with wood. The smoke produced by the fire will go into the hot water tank, which will heat it up. The smoke will then exit towards the outlet that we had planned to get rid of it.
To feed the fire, we recommend using wood, as this is more practical.


Étape 9 - Safety rules
First of all, making this boiling stove can be dangerous, for example using a grinder (if you use this tool) for a child. If a child is involved, they should be accompanied.
Next, we'll look at the safety rules for using this stove. Be careful when using this boiler stove. To heat the hot water tank, we'll need to feed a fire, so be careful not to put too much wood in to heat the tank too quickly. This will serve no purpose other than to heat the canister more and you risk getting burnt.
Make sure that the smoke outlet is outside, otherwise you risk suffocating if the smoke from the chimney comes inside the house.
Faire attention à la sortie d’eau du cumulus, l’eau qui est contenu à l’intérieur peut monter à 70°C, on peut risquer de se brûler lorsque l’eau sortira.
Le groupe de sécurité contenant une soupape de sécurité est obligatoire pour éviter tout risque de surpression du ballon.
Published
 Français
 English
 Deutsch
 Español
 Italiano
 Português