(Page créée avec « Stick the spike into the cork deep enough so that the two pieces are joined together. ») |
(Page créée avec « *jig saw + diamond blade (for cutting) **ALTERNATIVE: drill + masonry bit (diameter ~70mm) **ALTERNATIVE: grinder + diamond blade + parrot clamp {{Info|A "wood/metal" jigs... ») |
||
| (26 révisions intermédiaires par le même utilisateur non affichées) | |||
| Ligne 2 : | Ligne 2 : | ||
|Main_Picture=Oyas_main.jpg | |Main_Picture=Oyas_main.jpg | ||
|Licences=Attribution (CC BY) | |Licences=Attribution (CC BY) | ||
| − | |Description= | + | |Description=Semi-buried micro-irrigation system. |
|Area=Water | |Area=Water | ||
|Type=Tutorial | |Type=Tutorial | ||
| Ligne 13 : | Ligne 13 : | ||
}} | }} | ||
{{Introduction | {{Introduction | ||
| − | |Introduction= | + | |Introduction=Oyas (or ollas) are pear-shaped earthenware vessels. They are porous and have an opening at the top. They have been used since ancient times to gently irrigate the soil. All you have to do is bury them, leaving only the top part protruding so that they can be filled. |
| − | + | This tutorial will take you through the process of making a ~7L oya, capable of keeping soil moist within a radius of ~60 cm (between 1 and 1.5 m2) for around ~10 days. | |
| − | + | Note: different sizes of oyas can be made by following the same steps. The dimensions shown here are for guidance only. | |
| − | + | There are many advantages to this method of irrigation: | |
| − | * | + | * water consumed does not evaporate, so the soil is not washed away, and fungal diseases caused by damp foliage (e.g. mildew) are prevented. |
| − | * | + | * water spreads slowly through the soil, giving neighbouring roots time to take advantage of it |
| − | * | + | * plant (or tree) roots sink into the soil, rather than remaining on the surface |
| − | * | + | *when the soil is already wet (e.g. after a heavy rain) the water stays in the oya |
| − | * | + | * watering is quicker (just fill the oya) and simpler (you can leave it to a neighbour who doesn't garden) |
| − | * | + | *the water in the oya is brought up to temperature, so there's no thermal shock for the plant |
| − | {{Idea| | + | {{Idea|To save time: |
| − | * | + | * producing several oyas in a single session saves a lot of time, as a large part of the work consists of preparing and cleaning the site. |
| − | * | + | * it's easy to divide up the work between several people, as many stages can be carried out in parallel }}<br />. |
}} | }} | ||
{{Materials | {{Materials | ||
| − | |Material=*2 pots | + | |Material=*2 terracotta pots (unpainted) |
| − | **1 | + | **1 large: diameter = 23 cm (measured on the outside of the high rim) |
| − | **1 | + | **1 small: diameter = 21 cm |
| − | * | + | *saucer adapted to the small pot: diameter = 16 cm |
| − | * | + | *tile shards (approx. 5 cm x 5 cm) |
| − | * | + | *Tile glue (allow ~50 g per oya) |
| − | * | + | *white paint |
| − | *1 | + | *1 skewer (or 1 nail + 2 plastic straws) |
| − | *~30 cm | + | *~30 cm of wire |
| − | *1 | + | *1 cork stopper |
| − | |Tools=* | + | |Tools=*mason's pencil (or marker) |
| − | *[https://fr.wikipedia.org/wiki/R%C3%A2pe_(outil)#/media/Fichier:Raspel_Baiter.jpg râpe à bois demi-ronde] "grosse piqûre" ( | + | *[https://fr.wikipedia.org/wiki/R%C3%A2pe_(outil)#/media/Fichier:Raspel_Baiter.jpg râpe à bois demi-ronde] "grosse piqûre" (to grate the edges) |
| − | **ALTERNATIVE : | + | **ALTERNATIVE: sander + coarse abrasive (<60 grit) |
| − | **ALTERNATIVE : | + | **ALTERNATIVE: grinder + diamond disc |
| − | * | + | *jig saw + diamond blade (for cutting) |
| − | **ALTERNATIVE : | + | **ALTERNATIVE: drill + masonry bit (diameter ~70mm) |
| − | **ALTERNATIVE : | + | **ALTERNATIVE: grinder + diamond blade + parrot clamp |
| − | {{Info| | + | {{Info|A "wood/metal" jigsaw blade, or a "multi-material" drill bit will work for 2 or 3 oyas but will wear out very quickly}} |
*deep bucket or tub for soaking | *deep bucket or tub for soaking | ||
| Ligne 162 : | Ligne 162 : | ||
<br /> | <br /> | ||
| − | * '' | + | * ''Straw and nail'' option |
| − | + | Drive the nail completely into the cork. On the point protruding from the cork, attach the first straw and assemble as many straws as you need to cover the height of the cork. | |
<br /> | <br /> | ||
}} | }} | ||
{{Tuto Step | {{Tuto Step | ||
| − | |Step_Title= | + | |Step_Title=Attach the float to the cover |
| − | |Step_Content=<u> | + | |Step_Content=<u>Goal:</u> allow the float to protrude from the oya and keep it in a vertical position |
| − | + | Using the drill fitted with the thick bit, drill the hole in the centre of the saucer through which the float will pass. | |
| − | + | Using the thin drill bit, drill three holes around the main hole to lay the wire. | |
| − | + | Use the wire (and wire cutters) to make a shape that will allow you to..: | |
| − | * | + | * fix the wire via the three fine holes |
| − | * | + | * keep the float vertical |
<br /> | <br /> | ||
}} | }} | ||
{{Tuto Step | {{Tuto Step | ||
| − | |Step_Title= | + | |Step_Title=Paint the cover |
| − | |Step_Content=<u> | + | |Step_Content=<u>Goal:</u> to make it easier to locate the oya when it is installed and to reflect the sun's rays |
| − | + | Once your oya is installed, the saucer will be its cap and will be the only part visible on the ground. | |
| − | + | Apply the white paint to the visible part of the saucer. (i.e. the underside) | |
|Step_Picture_00=Oyas_flotteur.jpg | |Step_Picture_00=Oyas_flotteur.jpg | ||
}} | }} | ||
{{Tuto Step | {{Tuto Step | ||
| − | |Step_Title= | + | |Step_Title=Installing the oya |
| − | |Step_Content=<u> | + | |Step_Content=<u>Goal:</u> bury the oya in your cultivated area (or at the foot of a tree) |
| − | + | Dig a hole approximately 40cm deep and 30cm in diameter. | |
| − | + | Install the oya, making sure it is vertical. | |
| − | + | Place the oya in a mixture of soil and potting compost suitable for the crops to be grown. For installation at the foot of a tree: | |
| − | * | + | *choose a distance from the trunk that will not damage the tree's root system (ideally, the tree and the oya should be installed at the same time) |
| − | * | + | *anticipate growth in the diameter of the tree trunk |
|Step_Picture_00=Oyas_20210421_163900.jpg | |Step_Picture_00=Oyas_20210421_163900.jpg | ||
|Step_Picture_00_annotation={"version":"3.5.0","objects":[{"type":"image","version":"3.5.0","originX":"left","originY":"top","left":0,"top":0,"width":4128,"height":3096,"fill":"rgb(0,0,0)","stroke":null,"strokeWidth":0,"strokeDashArray":null,"strokeLineCap":"butt","strokeDashOffset":0,"strokeLineJoin":"miter","strokeMiterLimit":4,"scaleX":0.15,"scaleY":0.15,"angle":0,"flipX":false,"flipY":false,"opacity":1,"shadow":null,"visible":true,"clipTo":null,"backgroundColor":"","fillRule":"nonzero","paintFirst":"fill","globalCompositeOperation":"source-over","transformMatrix":null,"skewX":0,"skewY":0,"crossOrigin":"","cropX":0,"cropY":0,"src":"https://wiki.lowtechlab.org/images/1/19/Oyas_20210421_163900.jpg","filters":[]}],"height":450,"width":600} | |Step_Picture_00_annotation={"version":"3.5.0","objects":[{"type":"image","version":"3.5.0","originX":"left","originY":"top","left":0,"top":0,"width":4128,"height":3096,"fill":"rgb(0,0,0)","stroke":null,"strokeWidth":0,"strokeDashArray":null,"strokeLineCap":"butt","strokeDashOffset":0,"strokeLineJoin":"miter","strokeMiterLimit":4,"scaleX":0.15,"scaleY":0.15,"angle":0,"flipX":false,"flipY":false,"opacity":1,"shadow":null,"visible":true,"clipTo":null,"backgroundColor":"","fillRule":"nonzero","paintFirst":"fill","globalCompositeOperation":"source-over","transformMatrix":null,"skewX":0,"skewY":0,"crossOrigin":"","cropX":0,"cropY":0,"src":"https://wiki.lowtechlab.org/images/1/19/Oyas_20210421_163900.jpg","filters":[]}],"height":450,"width":600} | ||
Version actuelle datée du 12 juillet 2024 à 11:14


Difficulté
Facile
Durée
1 heure(s)
Coût
10-15 EUR (€)
Description
Semi-buried micro-irrigation system.
Sommaire
Sommaire
- 1 Description
- 2 Sommaire
- 3 Introduction
- 4 Étape 1 - Matching (and adjusting) the two pots
- 5 Étape 2 - Enlarge the hole at the bottom of the pot
- 6 Étape 3 - Smoothing the edges of the hole
- 7 Étape 4 - Wet the surfaces to be bonded
- 8 Étape 5 - Plug the bottom of the large pot
- 9 Étape 6 - Join the two pots
- 10 Étape 7 - Assembling the float
- 11 Étape 8 - Attach the float to the cover
- 12 Étape 9 - Paint the cover
- 13 Étape 10 - Installing the oya
- 14 Commentaires
Introduction
Oyas (or ollas) are pear-shaped earthenware vessels. They are porous and have an opening at the top. They have been used since ancient times to gently irrigate the soil. All you have to do is bury them, leaving only the top part protruding so that they can be filled.
This tutorial will take you through the process of making a ~7L oya, capable of keeping soil moist within a radius of ~60 cm (between 1 and 1.5 m2) for around ~10 days.
Note: different sizes of oyas can be made by following the same steps. The dimensions shown here are for guidance only.
There are many advantages to this method of irrigation:
- water consumed does not evaporate, so the soil is not washed away, and fungal diseases caused by damp foliage (e.g. mildew) are prevented.
- water spreads slowly through the soil, giving neighbouring roots time to take advantage of it
- plant (or tree) roots sink into the soil, rather than remaining on the surface
- when the soil is already wet (e.g. after a heavy rain) the water stays in the oya
- watering is quicker (just fill the oya) and simpler (you can leave it to a neighbour who doesn't garden)
- the water in the oya is brought up to temperature, so there's no thermal shock for the plant
.
Matériaux
- 2 terracotta pots (unpainted)
- 1 large: diameter = 23 cm (measured on the outside of the high rim)
- 1 small: diameter = 21 cm
- saucer adapted to the small pot: diameter = 16 cm
- tile shards (approx. 5 cm x 5 cm)
- Tile glue (allow ~50 g per oya)
- white paint
- 1 skewer (or 1 nail + 2 plastic straws)
- ~30 cm of wire
- 1 cork stopper
Outils
- mason's pencil (or marker)
- râpe à bois demi-ronde "grosse piqûre" (to grate the edges)
- ALTERNATIVE: sander + coarse abrasive (<60 grit)
- ALTERNATIVE: grinder + diamond disc
- jig saw + diamond blade (for cutting)
- ALTERNATIVE: drill + masonry bit (diameter ~70mm)
- ALTERNATIVE: grinder + diamond blade + parrot clamp
- deep bucket or tub for soaking
- small masonry equipment
- fine shovel ("cat's tongue" type)
- mason's bucket or dipper
- heavy duty sponge
- brush
- hand towel (or old towel)
- drill
- 1 fine drill bit (~2.5mm): wire diameter
- 1 thick drill (~4.5mm): > the diameter of the skewer (or straws)
- cutting pliers (for the wire)
Étape 1 - Matching (and adjusting) the two pots
Goal: that the upper parts of the pots fit together well enough two by two to then allow a solid, watertight seal.
Even when manufactured industrially, clay pots are not always perfectly round, and their dimensions can vary.
If the 2 pots do not fit together sufficiently:
- look for a better fit by turning the top one on its axis
- plane the rim of the pot using a wood file, a sander or an angle grinder
Once fitted, mark the chosen position.


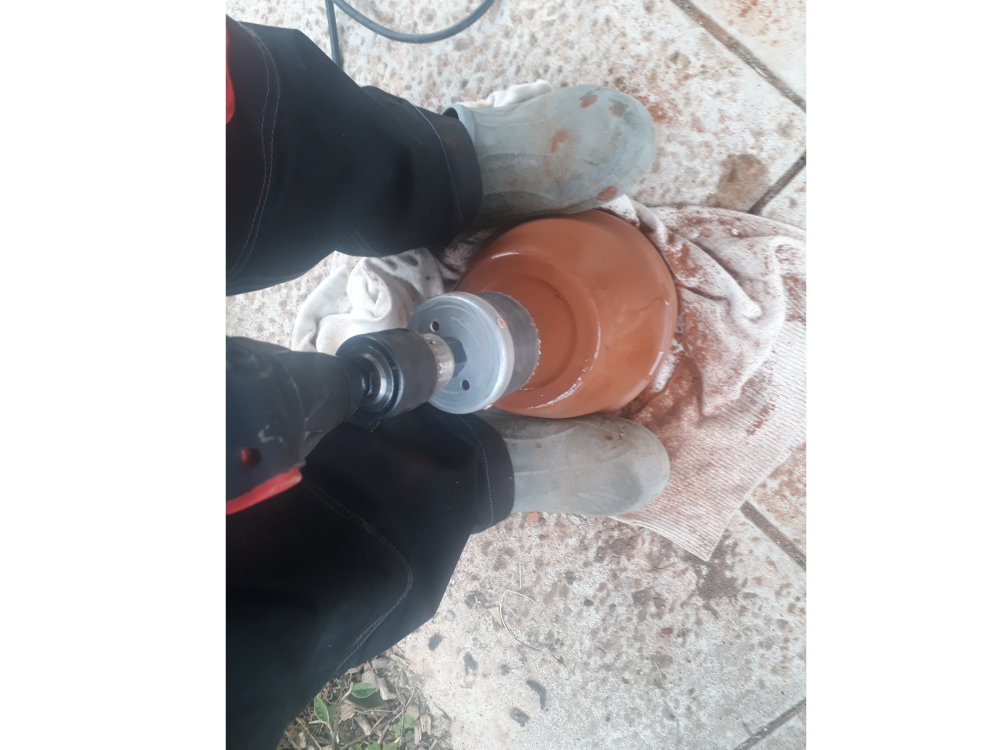
Étape 2 - Enlarge the hole at the bottom of the pot
Goal: make it easier to fill and clean the oya
Place the pot on the tea towel (or towel), open side down.
Using the jigsaw, cut a spiral shape until you reach a disc that you can pass your hand through.
During cutting, be sure to press the pot firmly downwards to limit vibration.
No jigsaw? You can achieve the same result with
- a drill + drill bit
- or an angle grinder + parrot beak pliers

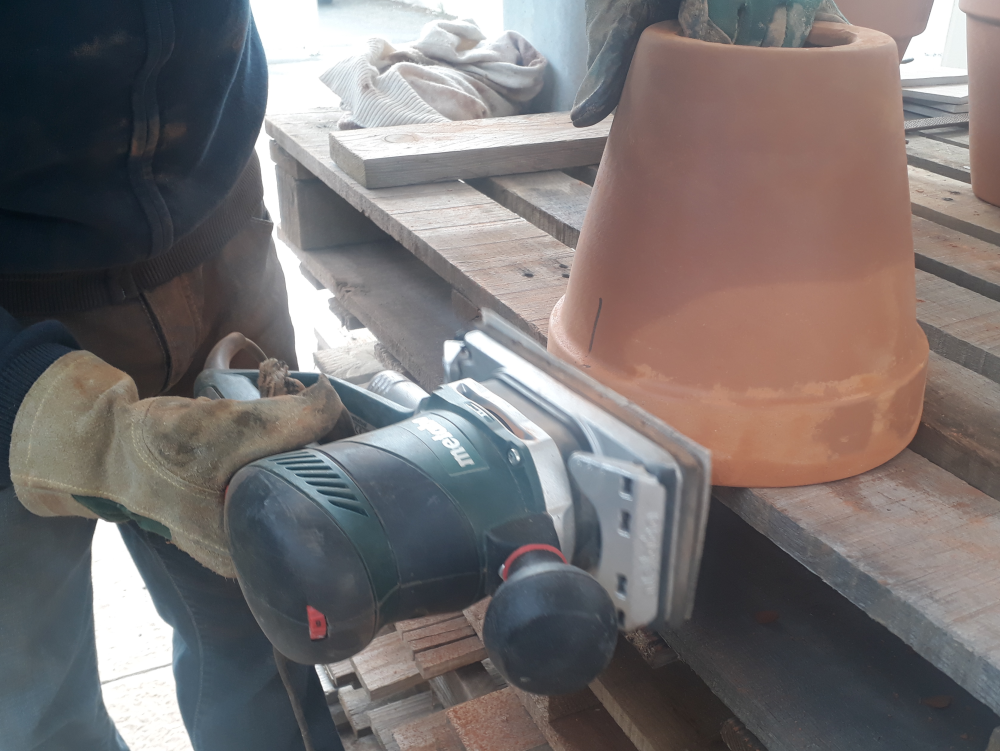
Étape 3 - Smoothing the edges of the hole
Once you've removed the base of the pot, smooth the edges with a wood rasp to avoid injuring yourself when you reach in.

Étape 4 - Wet the surfaces to be bonded
Goal: that the glue doesn't set too quickly
Ideally, the pots should be completely immersed for 2~3 minutes.
If you don't have a large enough container, try to wet the parts that will receive the glue.

Étape 5 - Plug the bottom of the large pot
Goal: promote slow, lateral water diffusion in the future oya
Prepare ~0.5L of tile adhesive (refer to the instructions on the bag).
Use around a third to "butter" the shard of tiles, place it over the hole and fill the bottom of the large pot.
Drying time: refer to the instructions for the tile adhesive used
The rest is for storage (in the shade) and will be used later to assemble the two pots.

Étape 6 - Join the two pots
Goal: create an assembly that is watertight (so that water doesn't come out between the two pots), and solid (so that the oya can be easily transported and reused)
Match the two pots by referring to the mark made in step 1.
Use the remaining glue to fill the gap in the groove between the pots (pressing the glue down firmly).
When you have finished, wipe the joint with a slightly damp sponge to remove any excess glue and smooth the joint.
Drying time: refer to the instructions for the tile adhesive used

Étape 7 - Assembling the float
Goal: make a float that will indicate the level of water remaining in the oya
- Option " skewer pick "
Stick the spike into the cork deep enough so that the two pieces are joined together.
- Straw and nail option
Drive the nail completely into the cork. On the point protruding from the cork, attach the first straw and assemble as many straws as you need to cover the height of the cork.
Étape 8 - Attach the float to the cover
Goal: allow the float to protrude from the oya and keep it in a vertical position
Using the drill fitted with the thick bit, drill the hole in the centre of the saucer through which the float will pass.
Using the thin drill bit, drill three holes around the main hole to lay the wire.
Use the wire (and wire cutters) to make a shape that will allow you to..:
- fix the wire via the three fine holes
- keep the float vertical
Étape 9 - Paint the cover
Goal: to make it easier to locate the oya when it is installed and to reflect the sun's rays
Once your oya is installed, the saucer will be its cap and will be the only part visible on the ground.
Apply the white paint to the visible part of the saucer. (i.e. the underside)

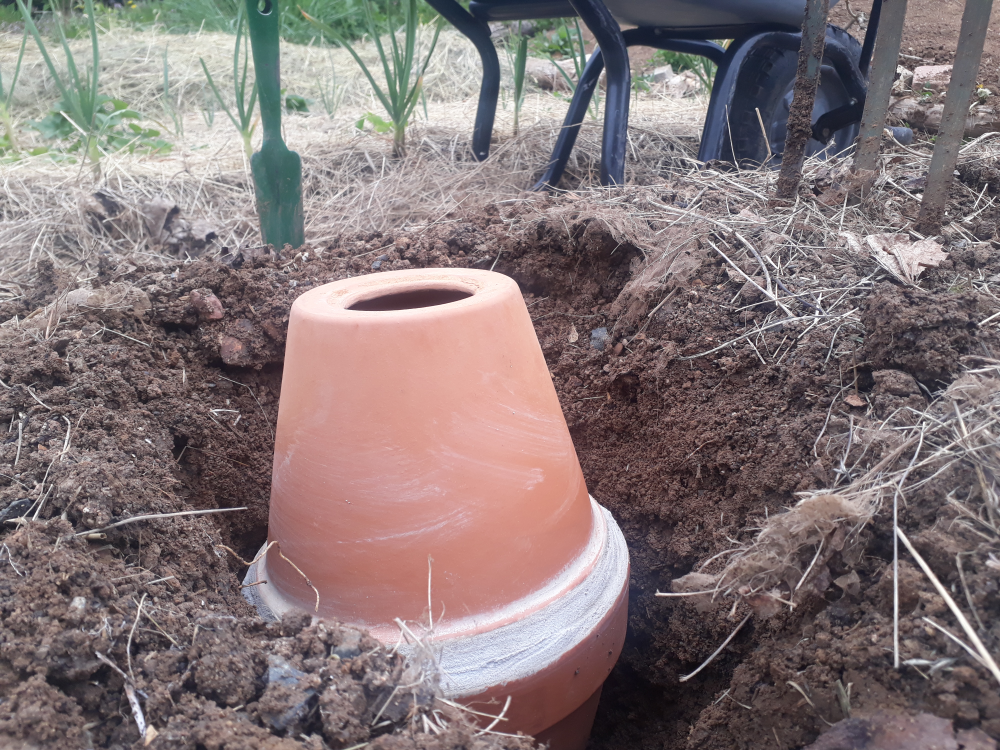
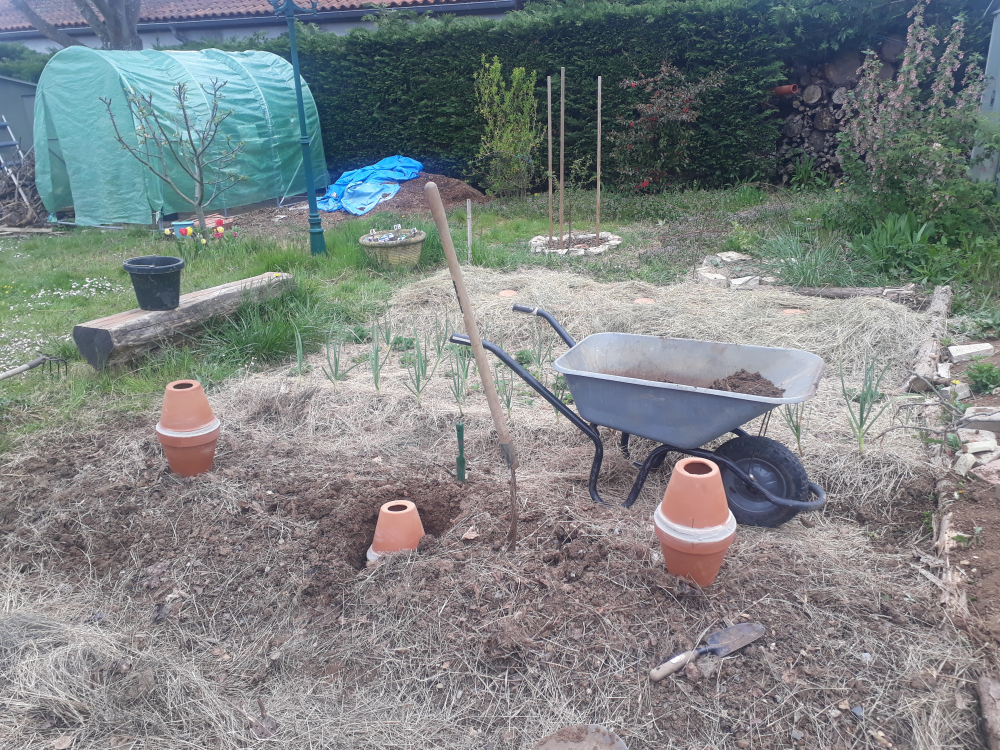
Étape 10 - Installing the oya
Goal: bury the oya in your cultivated area (or at the foot of a tree)
Dig a hole approximately 40cm deep and 30cm in diameter.
Install the oya, making sure it is vertical.
Place the oya in a mixture of soil and potting compost suitable for the crops to be grown. For installation at the foot of a tree:
- choose a distance from the trunk that will not damage the tree's root system (ideally, the tree and the oya should be installed at the same time)
- anticipate growth in the diameter of the tree trunk


Published
 Français
 English
 Deutsch
 Español
 Italiano
 Português
#/media/Fichier:Raspel_Baiter.jpg)