(Page créée avec « Here we present our low-tech rainwater storage system. Connected to a gutter, it will provide you with water for watering your garden or washing your car. For our part, it... ») |
(Page créée avec « We were able to see that the water did indeed come out of the valve, so we attached the hose to the valve so that we could use the water collector in the way we had imagined. ») |
||
| (21 révisions intermédiaires par le même utilisateur non affichées) | |||
| Ligne 18 : | Ligne 18 : | ||
Here we present our low-tech rainwater storage system. Connected to a gutter, it will provide you with water for watering your garden or washing your car. For our part, it will be installed on our school campus to clean surfboards. | Here we present our low-tech rainwater storage system. Connected to a gutter, it will provide you with water for watering your garden or washing your car. For our part, it will be installed on our school campus to clean surfboards. | ||
| − | + | On our campus, some buildings are equipped with a highly efficient rainwater harvesting system. At home, all you need to do is connect it to your gutter. | |
| − | + | To obtain a good flow rate, the tank must be as large and as high as possible. For the mathematically minded, we'll give you a short demonstration below. | |
<br /> | <br /> | ||
| Ligne 27 : | Ligne 27 : | ||
|Step_Picture_00=r_sevoir_d_eau_Capture_d_e_cran_2022-02-09_a_09.28.35.png | |Step_Picture_00=r_sevoir_d_eau_Capture_d_e_cran_2022-02-09_a_09.28.35.png | ||
|Step_Picture_01=r_sevoir_d_eau_Capture_d_e_cran_2022-02-09_a_09.32.15.png | |Step_Picture_01=r_sevoir_d_eau_Capture_d_e_cran_2022-02-09_a_09.32.15.png | ||
| − | |Material=* | + | |Material=* wooden pallets (3-4 depending on the size of the crates), ours were 160cm*280cm |
| − | * | + | * gutter connection / bracket |
| − | * | + | * a plastic valve |
| − | * | + | * pipes, we used diameters 25-27 |
| − | * | + | * watertight barrel with lid |
| − | * | + | * screws, we used 160cm screws |
| − | + | Here are a few tips to help you find the equipment you need: | |
| − | * | + | * the wooden pallets were found in a company near our school |
| − | * | + | * the barrel was given to us by a car garage, but we had also found one at a recycling centre |
| − | * | + | * the hose was found at a recycling centre |
| − | * | + | * the screws and tap were bought in a Mr Bricolage/Brico Dépôt store |
| − | |Tools=* | + | |Tools=* DIY tools and protective equipment (circular saw, screwdriver/drill, gloves, goggles) |
| − | * | + | * mastic to seal joints |
|Tuto_Attachments={{Tuto Attachments | |Tuto_Attachments={{Tuto Attachments | ||
|Attachment=r_sevoir_d_eau_Approche_the_orique.pdf | |Attachment=r_sevoir_d_eau_Approche_the_orique.pdf | ||
| Ligne 49 : | Ligne 49 : | ||
}} | }} | ||
{{Tuto Step | {{Tuto Step | ||
| − | |Step_Title= | + | |Step_Title=the wooden base |
| − | |Step_Content= | + | |Step_Content=Firstly, you need to cut the pallets so that only the right size pieces remain. |
| − | + | We decided to keep the same length and width of 3 slats, as on the 1st | |
| − | + | We decided to cut out 3 pallets like these, and fix the last side with their offcuts, as shown in the last photo. | |
|Step_Picture_00=r_sevoir_d_eau_Capture_d_e_cran_2022-02-09_a_09.33.32.png | |Step_Picture_00=r_sevoir_d_eau_Capture_d_e_cran_2022-02-09_a_09.33.32.png | ||
|Step_Picture_01=r_sevoir_d_eau_Capture_d_e_cran_2022-02-09_a_09.34.44.png | |Step_Picture_01=r_sevoir_d_eau_Capture_d_e_cran_2022-02-09_a_09.34.44.png | ||
| Ligne 62 : | Ligne 62 : | ||
}} | }} | ||
{{Tuto Step | {{Tuto Step | ||
| − | |Step_Title= | + | |Step_Title=the watertight barrel |
| − | |Step_Content= | + | |Step_Content=The lid is fixed to the barrel, so we only have access to the 2 holes at the top (1st image). |
| − | + | We glued one in place, and kept the 2nd to run the pipe from the gutter. | |
| − | + | Next, we drilled the barrel to fit our valve: we drilled it with a drill, then filed the edges. We then put some mastic on the tap before installing it, and we put some more on top of it to make sure it was watertight. Be careful, the mastic dries quickly on your fingers, so we advise you to keep a bottle on hand, as you can see in the photo. You'll then need to wait at least 24 hours for the mastic to dry. | |
|Step_Picture_00=r_sevoir_d_eau_Capture_d_e_cran_2022-02-09_a_10.00.26.png | |Step_Picture_00=r_sevoir_d_eau_Capture_d_e_cran_2022-02-09_a_10.00.26.png | ||
|Step_Picture_01=r_sevoir_d_eau_272241439_683672306330502_5984916673029156735_n.jpg | |Step_Picture_01=r_sevoir_d_eau_272241439_683672306330502_5984916673029156735_n.jpg | ||
| Ligne 75 : | Ligne 75 : | ||
}} | }} | ||
{{Tuto Step | {{Tuto Step | ||
| − | |Step_Title= | + | |Step_Title=assembly |
| − | |Step_Content= | + | |Step_Content=To secure the barrel, we added a 'floor', 2 extra slats as shown in the photo alongside. The barrel is then blocked by the edges of the base. |
| − | + | You can see the system for diverting the water falling into the gutter: a flange was installed on the cable, under the metal protection. A valve was fitted, then we added the pipe, fixed to the barrel and sealed with mastic. | |
| − | + | We were able to see that the water did indeed come out of the valve, so we attached the hose to the valve so that we could use the water collector in the way we had imagined. | |
|Step_Picture_00=r_sevoir_d_eau_Capture_d_e_cran_2022-02-09_a_10.02.14.png | |Step_Picture_00=r_sevoir_d_eau_Capture_d_e_cran_2022-02-09_a_10.02.14.png | ||
|Step_Picture_01=r_sevoir_d_eau_Capture_d_e_cran_2022-02-09_a_10.02.52.png | |Step_Picture_01=r_sevoir_d_eau_Capture_d_e_cran_2022-02-09_a_10.02.52.png | ||
Version actuelle datée du 28 juin 2024 à 16:08

Difficulté
Facile
Durée
1 jour(s)
Coût
35 EUR (€)
Description
Rainwater harvesting system. The system is simple and sober. Connected to a gutter, the tank installed on a wooden structure contains the recovered water.
Introduction
"We love water, but in 20-30 years there won't be any left". Even Jean Claude Van Damme understood the importance of water for our future. If this theme is important to you and you like DIY, then this tutorial is for you!
Here we present our low-tech rainwater storage system. Connected to a gutter, it will provide you with water for watering your garden or washing your car. For our part, it will be installed on our school campus to clean surfboards.
On our campus, some buildings are equipped with a highly efficient rainwater harvesting system. At home, all you need to do is connect it to your gutter.
To obtain a good flow rate, the tank must be as large and as high as possible. For the mathematically minded, we'll give you a short demonstration below.


Matériaux
- wooden pallets (3-4 depending on the size of the crates), ours were 160cm*280cm
- gutter connection / bracket
- a plastic valve
- pipes, we used diameters 25-27
- watertight barrel with lid
- screws, we used 160cm screws
Here are a few tips to help you find the equipment you need:
- the wooden pallets were found in a company near our school
- the barrel was given to us by a car garage, but we had also found one at a recycling centre
- the hose was found at a recycling centre
- the screws and tap were bought in a Mr Bricolage/Brico Dépôt store
Outils
- DIY tools and protective equipment (circular saw, screwdriver/drill, gloves, goggles)
- mastic to seal joints
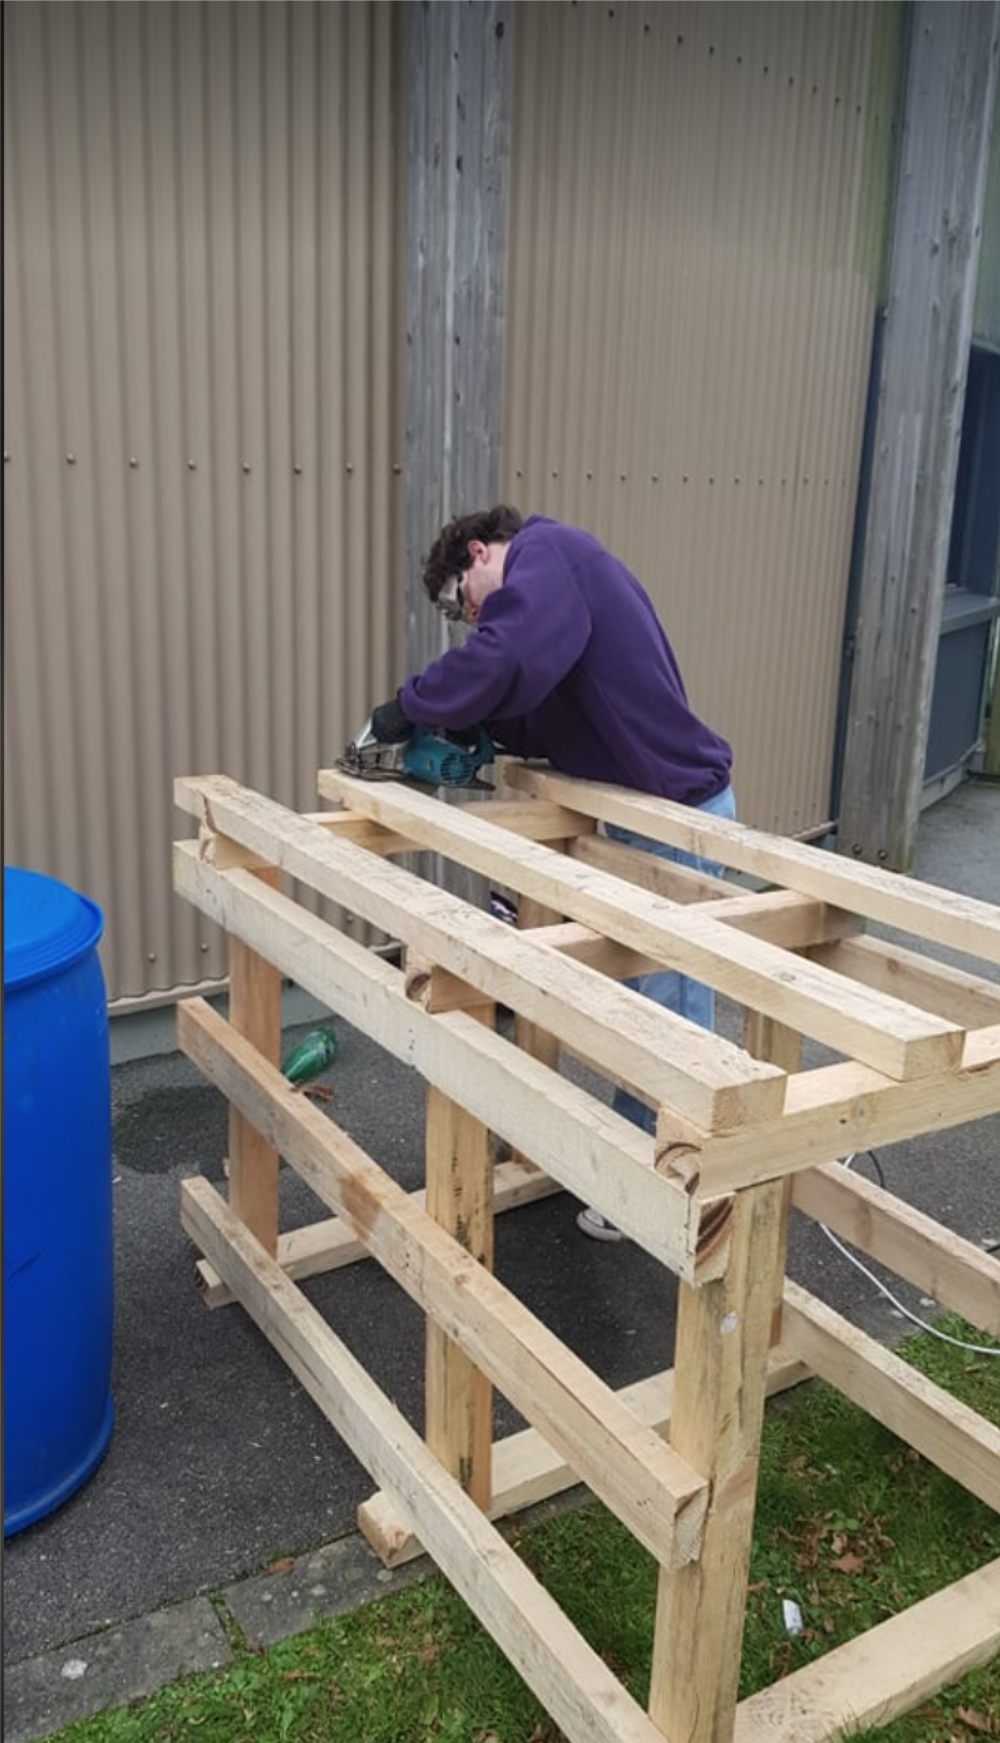
Étape 1 - the wooden base
Firstly, you need to cut the pallets so that only the right size pieces remain.
We decided to keep the same length and width of 3 slats, as on the 1st
We decided to cut out 3 pallets like these, and fix the last side with their offcuts, as shown in the last photo.


Étape 2 - the watertight barrel
The lid is fixed to the barrel, so we only have access to the 2 holes at the top (1st image).
We glued one in place, and kept the 2nd to run the pipe from the gutter.
Next, we drilled the barrel to fit our valve: we drilled it with a drill, then filed the edges. We then put some mastic on the tap before installing it, and we put some more on top of it to make sure it was watertight. Be careful, the mastic dries quickly on your fingers, so we advise you to keep a bottle on hand, as you can see in the photo. You'll then need to wait at least 24 hours for the mastic to dry.


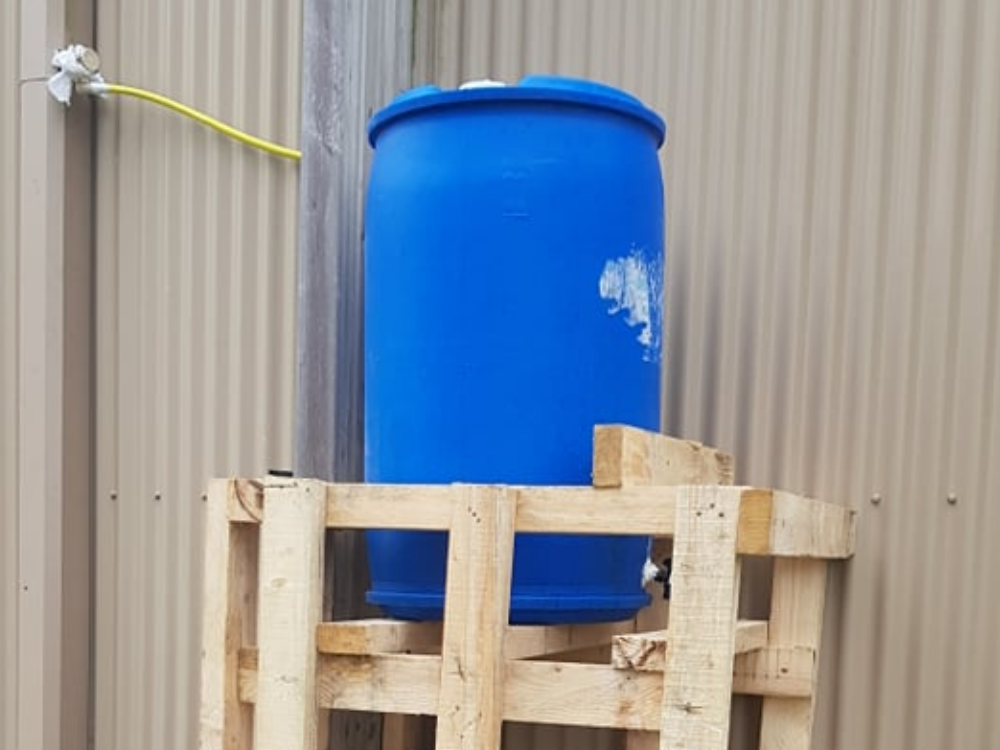
Étape 3 - assembly
To secure the barrel, we added a 'floor', 2 extra slats as shown in the photo alongside. The barrel is then blocked by the edges of the base.
You can see the system for diverting the water falling into the gutter: a flange was installed on the cable, under the metal protection. A valve was fitted, then we added the pipe, fixed to the barrel and sealed with mastic.
We were able to see that the water did indeed come out of the valve, so we attached the hose to the valve so that we could use the water collector in the way we had imagined.


Published
 Français
 English
 Deutsch
 Español
 Italiano
 Português