
| Ligne 44 : | Ligne 44 : | ||
}} | }} | ||
{{Tuto Step | {{Tuto Step | ||
| − | |Step_Title=<translate> | + | |Step_Title=<translate>collect materials</translate> |
|Step_Content=<translate>Here, we collect materials before adapting the plan to what we find. | |Step_Content=<translate>Here, we collect materials before adapting the plan to what we find. | ||
| Ligne 55 : | Ligne 55 : | ||
}} | }} | ||
{{Tuto Step | {{Tuto Step | ||
| − | |Step_Title=<translate> | + | |Step_Title=<translate>cut the frame to size</translate> |
|Step_Content=<translate>All dimensions were adjusted to the board, to avoid cutting it. Best is to adapt them according to your needs and what you have gathered. | |Step_Content=<translate>All dimensions were adjusted to the board, to avoid cutting it. Best is to adapt them according to your needs and what you have gathered. | ||
| Ligne 73 : | Ligne 73 : | ||
}} | }} | ||
{{Tuto Step | {{Tuto Step | ||
| − | |Step_Title=<translate> | + | |Step_Title=<translate>fix the wheels (1/2)</translate> |
|Step_Content=<translate>To fix the wheels, we use a similar technique than is done on bikes - using metal brackets. I bought 4 mounting brackets, which had an existing 10 mm hole ( which fits the bike axle) | |Step_Content=<translate>To fix the wheels, we use a similar technique than is done on bikes - using metal brackets. I bought 4 mounting brackets, which had an existing 10 mm hole ( which fits the bike axle) | ||
| Ligne 89 : | Ligne 89 : | ||
}} | }} | ||
{{Tuto Step | {{Tuto Step | ||
| − | |Step_Title=<translate> | + | |Step_Title=<translate>fix the wheels (2/2)</translate> |
|Step_Content=<translate>To easily screw and unscrew the wheels - if you need to change the inner tube - we create a slot in the beams surrounding the wheels, allowing to access the axle (see picture) | |Step_Content=<translate>To easily screw and unscrew the wheels - if you need to change the inner tube - we create a slot in the beams surrounding the wheels, allowing to access the axle (see picture) | ||
| Ligne 102 : | Ligne 102 : | ||
}} | }} | ||
{{Tuto Step | {{Tuto Step | ||
| − | |Step_Title=<translate> | + | |Step_Title=<translate>making holes (optional)</translate> |
|Step_Content=<translate>I decided to make a grid of holes on the trolley board. It bears several functions - but is optional. | |Step_Content=<translate>I decided to make a grid of holes on the trolley board. It bears several functions - but is optional. | ||
| Ligne 116 : | Ligne 116 : | ||
}} | }} | ||
{{Tuto Step | {{Tuto Step | ||
| − | |Step_Title=<translate> | + | |Step_Title=<translate>assembling the frame</translate> |
|Step_Content=<translate>Frame is ready for assembly. | |Step_Content=<translate>Frame is ready for assembly. | ||
| Ligne 130 : | Ligne 130 : | ||
}} | }} | ||
{{Tuto Step | {{Tuto Step | ||
| − | |Step_Title=<translate> | + | |Step_Title=<translate>Fix trolley to bike (1/2)</translate> |
|Step_Content=<translate>Now that the frame is done, we need to attach it to the bike. | |Step_Content=<translate>Now that the frame is done, we need to attach it to the bike. | ||
| Ligne 143 : | Ligne 143 : | ||
}} | }} | ||
{{Tuto Step | {{Tuto Step | ||
| − | |Step_Title=<translate> | + | |Step_Title=<translate>Fix trolley to bike (2/2)</translate> |
|Step_Content=<translate>'''To keep in mind:''' | |Step_Content=<translate>'''To keep in mind:''' | ||
| Ligne 168 : | Ligne 168 : | ||
}} | }} | ||
{{Tuto Step | {{Tuto Step | ||
| − | |Step_Title=<translate> | + | |Step_Title=<translate>Done!</translate> |
|Step_Content=<translate>The trolley is done! | |Step_Content=<translate>The trolley is done! | ||
Version actuelle datée du 8 septembre 2022 à 09:11
Dernière modification le 08/09/2022
Difficulté
Facile
Durée
2 jour(s)
Coût
30 EUR (€)
Description
Method to create a simple bike trolley, using up-cycled materials. Easily fixated to every bike (adult size). Holes on the board help attach any kind of cargo. It’s made out of wood and simple hand tools, no welding required! Dimensions are detailed and can easily be adapted to the material available. (price depends of what materials you use, of course!).
Sommaire
Sommaire
- 1 Description
- 2 Sommaire
- 3 Introduction
- 4 Étape 1 - collect materials
- 5 Étape 2 - cut the frame to size
- 6 Étape 3 - fix the wheels (1/2)
- 7 Étape 4 - fix the wheels (2/2)
- 8 Étape 5 - making holes (optional)
- 9 Étape 6 - assembling the frame
- 10 Étape 7 - Fix trolley to bike (1/2)
- 11 Étape 8 - Fix trolley to bike (2/2)
- 12 Étape 9 - Done!
- 13 Notes et références
- 14 Commentaires
Introduction
—> Here, we build a wooden bike trolley. After some research, I wasn’t convinced by the trolley tutorials I found: either welding is required, either a lot of things are required, or the design seems clumsy.
—> constraints :


Matériaux
- x2 bike wheels (front is better) - 16 in here - look for similar tyres.
- x9 small wooden beams - here up-cycled bed slates (hard wood is better) - we used 45x16 mm profiles - 800mm long
- x4 large mounting brackets, with a 10 mm hole(see picture)
- +/- 8 mounting bracket (any will do)
- +++ screws
- x1 M8 wing nut + washer + bolt +/- 10 bolts - washers - bolts M4/M5/M6
- x1 wooden board
- x1 bike bell mounting ring (see picture)
Outils
- Drill (3mm, 4mm, 8mm, 10mm, 20mm drillbits)
- Spin
- Metal saw
- Wood saw
- Screwdriver / screwer
- Socket wrenches
- Flat wrenches
- Files
- sanding paper
- Wood glue
Étape 1 - collect materials
Here, we collect materials before adapting the plan to what we find.
At the local charity store, I found a bunch of single bed slates and a wooden board - 9€
I talked with someone who fixes second-hand bikes and sold me 2 kid front wheels - 5€
For hardware, we used whatever we had at home and headed to the hardware store to complete our set - spent around 13€

Étape 2 - cut the frame to size
All dimensions were adjusted to the board, to avoid cutting it. Best is to adapt them according to your needs and what you have gathered.
Dimensions (length x width x thickness ) in mm/
x1 Board (740 x 400 x12 )
x 5 vertical cleat ( 708 x 16 x 45 ) (left on the drawing)
x 2 horizontal cleat (785 x 16 x 45 ) (right on the drawing)
Length was determined to match the board length, width was determined according to the wheel’s axle length ( depends for each wheel! ).


Étape 3 - fix the wheels (1/2)
To fix the wheels, we use a similar technique than is done on bikes - using metal brackets. I bought 4 mounting brackets, which had an existing 10 mm hole ( which fits the bike axle)
- Avec une scie en métal couper l'équerre de façon à ce que l'axe de la roue puisse être glissé dans le trou (voir photo).
- Répéter x4 - 2 pour chaque roue.
- On peut ensuite accrocher les roues en glissant l'axe puis en serra avec un écrou et une rondelle, comme sur un vélo.
- With a metal saw, I cut the bracket so we can slide in the wheel axle (see the picture).
- Repeat for each bracket.
- We can clamp the wheels axle to the brackets using the washers and nuts, like on a bike.


Étape 4 - fix the wheels (2/2)
To easily screw and unscrew the wheels - if you need to change the inner tube - we create a slot in the beams surrounding the wheels, allowing to access the axle (see picture)
- With a 20 mm drill bit, make a hole aligning with the bracket notch.
- With a saw, open the hole to form a slot.
- Attach the bracket with small screws.


Étape 5 - making holes (optional)
I decided to make a grid of holes on the trolley board. It bears several functions - but is optional.
the holes allow to remove some materials - making the structure lighter. It also allows to create modular fixation systems, which adapt to the trolley’s cargo. It is also an aesthetic choice, which create coherency.
- 4 x 7 holes of 20mm , with 100mm distance.
- Holes are reported on the cleats, aligned with the ones on the board.


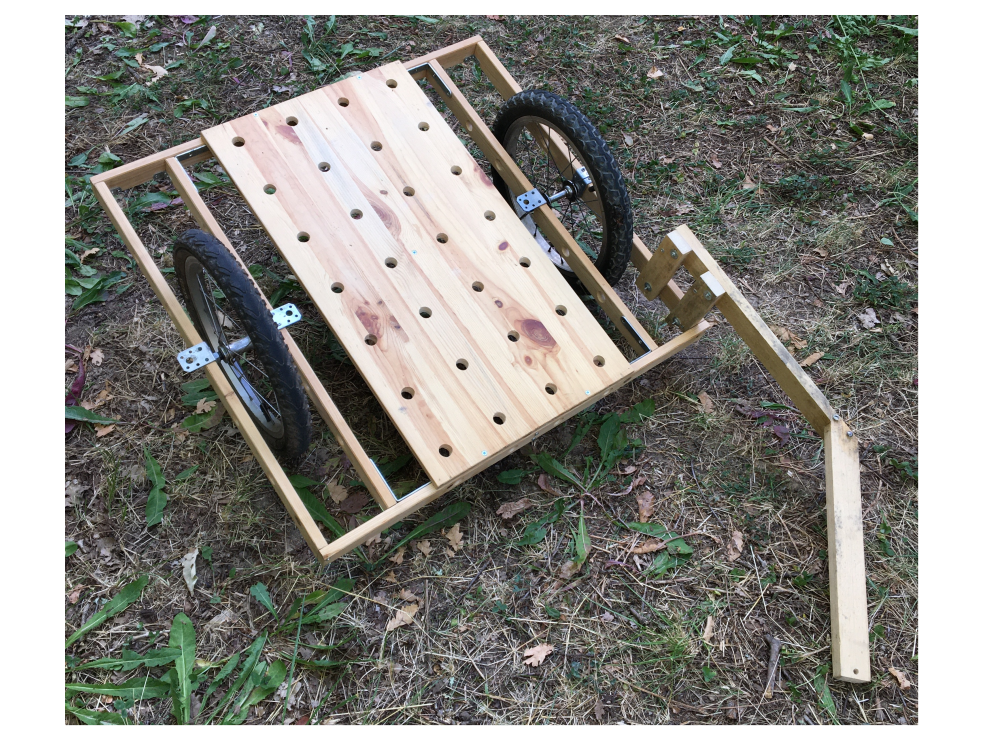
Étape 6 - assembling the frame
Frame is ready for assembly.
- Attach vertical cleats to the back cleat with the small brackets.
- Keep in mind the space for the wheels
- Attach the front cleat
- Secure with additional screws (using pre holes to prevent splits)
- Attach the wheels.
- done!


Étape 7 - Fix trolley to bike (1/2)
Now that the frame is done, we need to attach it to the bike.
We used a bike wheel fixation: it uses less material than fixing it to the saddle and adapts to bike which have a rear bike-rack.
Let’s start by the part on the bike. I used a piece of wood, secured by a bolt and a metal ring to the frame. (ring comes from on old bell, see picture). Some piece of inner tube serve as a buffer.
The 8 mm hole with a wing nut will attach the trolley arm.


Étape 8 - Fix trolley to bike (2/2)
To keep in mind:
In order to make sure that the trolley stays straight when pulled, we need to raise the trolley arm to match the bike wheel axle’s height.
- The arm is attached on the side, so that it doesn’t touch the wheel during turns. We use a 130° angle. the front part of the arm needs to be longer than the wheels radius, so that the joint sits after the wheels during sharp turns.
- Rotation point as close as possible to the wheel.
- The arm is the most fragile part of the trolley, make sure to sue strong wood, and lock nuts and bolts.
Steps:
- Measure the height difference between the trolley frame and the wheel axle. (for us 120mm)
- Cut 2/4 vertical cleats to raise the arm.
- Attach the cleats to the frame with bolts + screws.
- Cut a 45mm cleats (straight part of the arm) and create a notch to joint the diagonal cleats at around 130°.
- Glue the tassels, add screws. Attach to the frame.
- Make an 8mm hole at the end of the arm to attach to the bike piece with a wingnut (not too tight, to allows to trolley to turn) .Step 9 - Done!


Étape 9 - Done!
The trolley is done!
Make sure to tighten the nuts, to prevent vibrations.
In the future, I would like to add a small wooden stand and paint the frame to make it last!
**stay tuned for updates**


Notes et références
Checkout my design practice, centered around low-tech questions and awareness + accessibility concerning technology, on my instagram and my website. Get in touch at marie@verdeil.net !
Published
 Français
 English
 Deutsch
 Español
 Italiano
 Português