
(Page créée avec « *25mm straight drain ») |
|||
| Ligne 153 : | Ligne 153 : | ||
|Step_Content='''Materials''' | |Step_Content='''Materials''' | ||
| − | *25mm straight drain | + | *25mm straight sink drain |
|Step_Picture_00=Meuble_lavabo_low_tech_IMG_20200726_120503.jpg | |Step_Picture_00=Meuble_lavabo_low_tech_IMG_20200726_120503.jpg | ||
|Step_Picture_01=Meuble_lavabo_low_tech_IMG_20200726_120515.jpg | |Step_Picture_01=Meuble_lavabo_low_tech_IMG_20200726_120515.jpg | ||
Version du 29 août 2020 à 00:14


Difficulté
Moyen
Durée
6 heure(s)
Coût
190 EUR (€)
Description
Autonomous sink for children and adults
Sommaire
Sommaire
- 1 Description
- 2 Sommaire
- 3 Introduction
- 4 Étape 1 - Assembling the shelf
- 5 Étape 2 - Inserting the sink into the shelf
- 6 Étape 3 - Installing the fitting for the clean water bucket
- 7 Étape 4 - Connecting the tubes
- 8 Étape 5 - Leak testing the connections
- 9 Étape 6 - Attaching the swivel spout tap to the board
- 10 Étape 7 - Threading the drain to the sink
- 11 Étape 8 - Installer écrou de chaînette de lavabo (facultatif)
- 12 Étape 9 - Installer l'évacuation des eaux usées
- 13 Étape 10 - Système anti-bascule
- 14 Étape 11 - Fixer la pompe à pied
- 15 Étape 12 - Traitement du bois
- 16 Notes et références
- 17 Commentaires
Introduction
This "autonomous" sink was originally created for a nursery school classroom.
The classroom doesn't have a water line connection and we didn't want the sink to depend on an electrical outlet. This idea emerged in the period of Covid and of concern with sanitation.
We conceived of this sink with the idea that it could equally serve in other contexts, an isolated workshop for example.
We opted, then, for a shelving system that could be adjusted in height, permitting the user to adjust it to the desired size.


Matériaux
See the list of materials at the end of the tutorial.
Outils
- Jigsaw
- Step drill bit
- Wood drill and bit sets
- Screwdriver sets
- Utility knife
- Ruler
- Square
- Tape measure
- Needle nose pliers
- Brush
- Rags
Étape 1 - Assembling the shelf
For the shelf, the most autonomy would obviously be to do it yourself, but we are focused on assembly from existing materials.
So, to assemble this shelf, refer to the manual provided by Ikea.

Étape 2 - Inserting the sink into the shelf
Materials
- Masking tape
- Ruler
- Square
- Tape Measure
- Drill
- 10mm drill bit
- Jigsaw
Directions
- Plot the outline of the part of the sink to be inserted on the non-visible side of the board (the underside).
- Drill a hole on each of the 4 corners of the outline
- Cut out the outline with the jigsaw
- Insert the sink
- Install the shelf with the sink at the desired height according to the size of the children or adults


Étape 3 - Installing the fitting for the clean water bucket
Materials
- Auer plastic food safe bucket - 30 liters
- Masking tape
- Ruler
- Tape measure
- Step drill bit
- Fitting - 12mm diameter, 1/2" straight threading
Directions
- Mark the location of the fitting in the lowest part of the bucket.
- Drill the bucket with the step drill bit.
- Screw the fitting in. Attach the gasket and nut to the fitting inside the bucket.


Étape 4 - Connecting the tubes
Materials
- Clear tubing 16/12mm (120cm + 20cm)
- Clear tubing 12/10mm (40cm)
- Plastic reducing adapter 12/10mm
- Foot pump
- Swivel spout tap
Directions
- Connect the clean water bucket to the foot pump. Attach the 16/12 (1.2 meters) tube to the nozzle of the clean water bucket. Then, connect the 16/12 tube to the foot pump (The nozzle on the right when viewed from the bottom (water intake)).
- Connect the foot pump to the swivel spout tap. Link the 16/12 (20cm) tube from the foot pump to the adapter and then to the 10/12 (40cm) clear tube which goes toward the swivel spout tap.


Étape 5 - Leak testing the connections
Using 5 litres of water placed in the clean water bucket, test the watertightness of the system in place.

Étape 6 - Attaching the swivel spout tap to the board
Materials
- Drill
- Drill bits
- Swivel spout tap
Directions
- Mark the location and drill a hole using a size 18 flat wood bit
- Make a countersink hole using a size 39 flat wood bit on the bottom of the board.
- Screw the base of the tap into the board and install the spout.


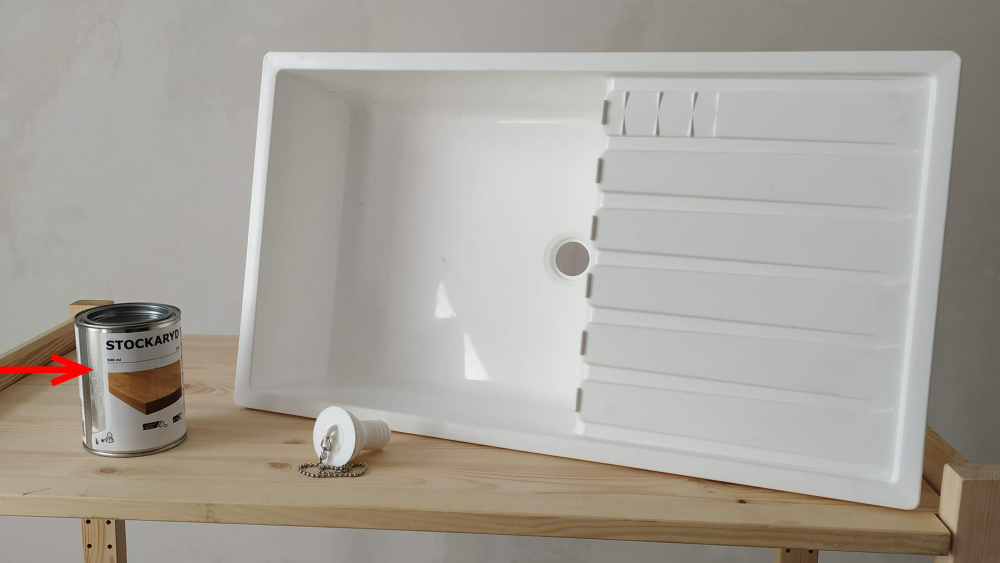
Étape 7 - Threading the drain to the sink
Materials
- 25mm straight sink drain


Étape 8 - Installer écrou de chaînette de lavabo (facultatif)


Étape 9 - Installer l'évacuation des eaux usées
Matériel
- Jerrican 20 litres
- Tuyau d'eau annelé diamètre 25mm longueur 90 centimètres
- Perceuse avec mèche à étages
- Bonde droite complète 25 mm
- Fixation PVC 40 mm. Vis 4 x 30
Mise en œuvre
- Percer le bouchon du jerrican 32 mm avec la perceuse avec mèche à étages.
- Raccorder l'évacuation du lavabo au jerrican.
- Installer une fixation PVC diam. 40 mm pour le tuyau d'évacuation. (Quand le jerrican est plein et qu’il faut le vider, cette fixation permet de maintenir le tuyau d’évacuation en hauteur, ce qui évite à l’eau restant dans ce tuyau de se répandre sur le sol, ce qui est arrivé à la première utilisation…)
- Installer et tester le circuit d'eau.


Étape 10 - Système anti-bascule
Matériel
- Planche bois 64 cm x 14 cm x 22 mm
- 2 équerres 40 mm
- 4 vis à bois 4 x 20
Deux choix possibles, soit fixer la planche aux les pieds de l’étagère, soit, pour les plus bricoleurs faire une découpe pour encastrer les pieds de l’étagère à la planche anti bascule. Nous vous présentons le deuxième choix.
- Tracer et découper les emplacement des pieds de l'étagère en perçant puis en découpant à la scie sauteuse les découpes.
- Fixer la planche à l'étagère avec 2 équerres.


Étape 11 - Fixer la pompe à pied
Matériel
- 2 Vis inox à tête fraisée M5 x 30 mm

Étape 12 - Traitement du bois
Afin de protéger le bois des éclaboussures, celui-ci a été traité avec une huile dure en 2 couches.
Notes et références
Liste du matériel et liens vers les fournisseurs : Google Docs
Published
 Français
 English
 Deutsch
 Español
 Italiano
 Português