
(Page créée avec « '''Ventilation:''' ») |
(Mise à jour pour être en accord avec la nouvelle version de la source de la page) |
||
| (58 révisions intermédiaires par 2 utilisateurs non affichées) | |||
| Ligne 1 : | Ligne 1 : | ||
{{Tuto Details | {{Tuto Details | ||
| − | |Main_Picture= | + | |Main_Picture=Culture_de_pleurotes_NDM-mushrooms-IMG_6537-_Sidonie_Frances_-_Low-tech_Lab.jpg |
| + | |Main_Picture_annotation={"version":"3.5.0","objects":[{"type":"image","version":"3.5.0","originX":"left","originY":"top","left":-1,"top":-136,"width":3804,"height":5325,"fill":"rgb(0,0,0)","stroke":null,"strokeWidth":0,"strokeDashArray":null,"strokeLineCap":"butt","strokeDashOffset":0,"strokeLineJoin":"miter","strokeMiterLimit":4,"scaleX":0.16,"scaleY":0.16,"angle":0,"flipX":false,"flipY":false,"opacity":1,"shadow":null,"visible":true,"clipTo":null,"backgroundColor":"","fillRule":"nonzero","paintFirst":"fill","globalCompositeOperation":"source-over","transformMatrix":null,"skewX":0,"skewY":0,"crossOrigin":"","cropX":0,"cropY":0,"src":"https://wiki.lowtechlab.org/images/7/78/Culture_de_pleurotes_NDM-mushrooms-IMG_6537-_Sidonie_Frances_-_Low-tech_Lab.jpg","filters":[]}],"height":450.34965034965035,"width":600} | ||
|Licences=Attribution-ShareAlike (CC BY-SA) | |Licences=Attribution-ShareAlike (CC BY-SA) | ||
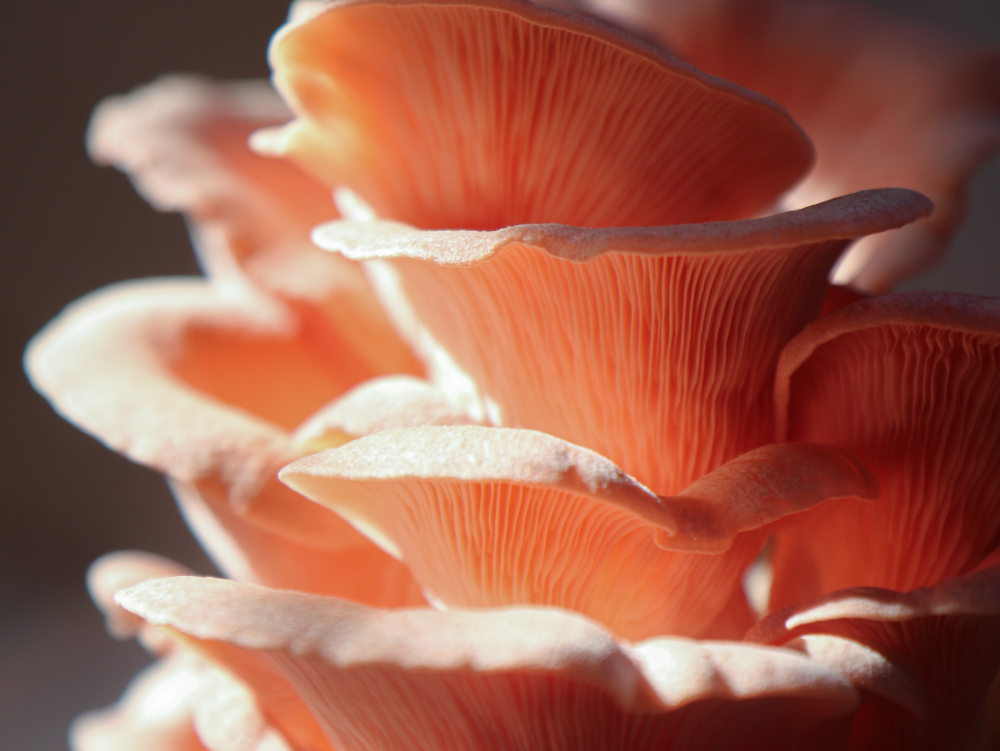
|Description=Domestic cultivation of edible mushrooms. | |Description=Domestic cultivation of edible mushrooms. | ||
| Ligne 26 : | Ligne 27 : | ||
*Nutrition : | *Nutrition : | ||
| − | Oyster mushrooms are not among the most nutritious foods, however they are a source of several interesting elements: vitamins [https://en.wikipedia.org/wiki/Vitamin_B3] (niacin), [https://en.wikipedia.org/wiki/Riboflavin], [https://en.wikipedia.org/wiki/Pantothenic_acid], minerals (copper, phosphorus, potassium, iron, zinc), and oyster mushrooms contain more protein than most vegetables. Click [http://www.passeportsante.net/fr/Nutrition/EncyclopedieAliments/Fiche.aspx?doc=pleurote_nu | + | Oyster mushrooms are not among the most nutritious foods, however they are a source of several interesting elements: vitamins [https://en.wikipedia.org/wiki/Vitamin_B3 B3] (niacin), [https://en.wikipedia.org/wiki/Riboflavin B2], [https://en.wikipedia.org/wiki/Pantothenic_acid B5], minerals (copper, phosphorus, potassium, iron, zinc), and oyster mushrooms contain more protein than most vegetables. Click [http://www.passeportsante.net/fr/Nutrition/EncyclopedieAliments/Fiche.aspx?doc=pleurote_nu here] for more information on the nutritional values of oyster mushrooms. |
'''Stage of cultivation''' : | '''Stage of cultivation''' : | ||
| Ligne 35 : | Ligne 36 : | ||
*Fruiting and harvesting: When the substrate is completely invaded, it is necessary to cause a change in the environmental conditions (T°C, light, CO2 concentration) and allow fruiting, which is the appearance of the part of the fungus that is consumed (foot and cap). All you have to do is harvest your mushrooms and eat them. | *Fruiting and harvesting: When the substrate is completely invaded, it is necessary to cause a change in the environmental conditions (T°C, light, CO2 concentration) and allow fruiting, which is the appearance of the part of the fungus that is consumed (foot and cap). All you have to do is harvest your mushrooms and eat them. | ||
| + | }} | ||
| + | {{TutoVideo | ||
| + | |VideoType=Youtube | ||
| + | |VideoURLYoutube=https://www.youtube.com/watch?v=iJV5JHbSpFw | ||
}} | }} | ||
{{Materials | {{Materials | ||
| Ligne 55 : | Ligne 60 : | ||
* Cut out pieces of cardboard 3 cm side. | * Cut out pieces of cardboard 3 cm side. | ||
* Sterilize the pieces of cardboard by soaking them in boiling water for example. | * Sterilize the pieces of cardboard by soaking them in boiling water for example. | ||
| − | {{Idea|If you have one available, you can use a microwave to sterilize your jars and cartons. Moisten the cartons well, without soaking them before placing them in the microwave.}}<br /> | + | {{Idea|If you have one available, you can use a microwave to sterilize your jars and cartons. Moisten the cartons well, without soaking them before placing them in the microwave.}} |
| + | |||
| + | * Then place your pieces of cardboard in glass jars or Petri dishes. The cardboard must be well moistened but not completely soaked with water (let it drain for a few moments)<br /> | ||
* Meticulously wash the mushroom | * Meticulously wash the mushroom | ||
* Dip the scalpel/knife in alcohol and then heat it in red with a flame (no smoke). | * Dip the scalpel/knife in alcohol and then heat it in red with a flame (no smoke). | ||
| − | * Let cool for 10 seconds | + | * Let it cool for 10 seconds |
* Cut the oyster mushrooms lengthwise and take a small piece from the neck of the oyster mushrooms (see photo). | * Cut the oyster mushrooms lengthwise and take a small piece from the neck of the oyster mushrooms (see photo). | ||
* Place the oyster mushroom pieces on the cardboard in your Petri dishes. Inoculate at least 5 Petri dishes for a better chance of success. | * Place the oyster mushroom pieces on the cardboard in your Petri dishes. Inoculate at least 5 Petri dishes for a better chance of success. | ||
| − | * Place the Petri dishes in an incubator where there is no light with a temperature between 25-30°C. You must then wait for the mycelium to invade the entire box | + | * Place the Petri dishes in an incubator where there is no light with a temperature between 25-30°C. You must then wait for the mycelium to invade the entire box 7-15 days before inoculating your bottles with substrate. |
|Step_Picture_00=Culture_de_pleurotes_IMG_0835.JPG | |Step_Picture_00=Culture_de_pleurotes_IMG_0835.JPG | ||
|Step_Picture_01=Culture_de_pleurotes_IMG_0868.JPG | |Step_Picture_01=Culture_de_pleurotes_IMG_0868.JPG | ||
| Ligne 72 : | Ligne 79 : | ||
{{Tuto Step | {{Tuto Step | ||
|Step_Title=Preparation and sterilization of substrate bottles | |Step_Title=Preparation and sterilization of substrate bottles | ||
| − | |Step_Content=The mushrooms we intend to grow for consumption must be able to colonize the substrate before other fungi and bacteria. To this end, we sterilize the substrate and the bottle to which we will add the previously cultivated mycelium (free of any contaminants). | + | |Step_Content=The mushrooms we intend to grow for consumption must be able to colonize the substrate before other fungi and bacteria. To this end, we sterilize the substrate and the bottle to which we will add the previously cultivated mycelium (free of any contaminants). This technique gives the cultivated mushroom a head start over the others. |
| − | + | * Put the wood chips in a container. | |
| − | * | + | * Add water until the chips are completely covered<br /> |
| − | + | * Add about 3% of the weight of the shavings in [https://en.wikipedia.org/wiki/Calcium_carbonate calcium carbonate] (chalk or crushed shells of crustaceans). | |
| − | + | * Cover the mixture and let it stand for one day to allow [https://en.wikipedia.org/wiki/Endospore pathogen endospores] to develop and be more easily removed afterwards. | |
* Fill the plastic bottles with your substrate. It must have a moisture content of 60-65%. Pierce the caps of the bottles and put a cotton plug at the neck, which allows gas exchange while preventing unwanted germs from entering. Close with the perforated caps. | * Fill the plastic bottles with your substrate. It must have a moisture content of 60-65%. Pierce the caps of the bottles and put a cotton plug at the neck, which allows gas exchange while preventing unwanted germs from entering. Close with the perforated caps. | ||
| − | <span></span> | + | '''Note''': To know the right level of humidity, press a pellet of sawdust, a few droplets should flow and not a trickle of water.<span></span> |
| − | + | * Sterilize the bottles containing the substrate. Here we left them in a solar oven for one day. It is also possible to use a microwave. Let them cool down. | |
<span></span> | <span></span> | ||
| − | + | <span></span> | |
<span></span> | <span></span> | ||
| Ligne 112 : | Ligne 119 : | ||
|Step_Content=In the forest, the mycelium lodges under the bark in the semi-darkness; in autumn, when it starts raining and the temperature drops, this causes stress that pushes it to bear fruit in order to reproduce. | |Step_Content=In the forest, the mycelium lodges under the bark in the semi-darkness; in autumn, when it starts raining and the temperature drops, this causes stress that pushes it to bear fruit in order to reproduce. | ||
| − | + | Cette '''initiation fructifère''' est de loin l’étape la plus délicate lors de la culture de champignon. Le cultivateur doit mettre en place une ''stratégie d’initiation'' afin de produire un '''changement des variables environnementales''' pour déclencher la '''formation des primordias''' (ébauches de champignons). | |
| − | + | Les quatre principaux facteurs environnementaux à contrôler lors de l’initiation fructifère sont: '''l’humidité''', '''l’aération''', '''la température''' et la '''lumière'''. | |
| − | ''' | + | '''L’humidité:''' |
| − | + | Une humidité élevée comprise entre 95% et 100% doit être apporté par un '''arrosage léger''' et '''régulier'''. Le substrat doit être placé dans des conditions proches du brouillard lorsqu’il arrive dans la chambre de fructification. Lorsque les primordias commencent à se former, une légère '''diminution de l’humidité''' jusqu’à 90% est généralement bénéfique. | |
| − | ''' | + | '''L’aération:''' |
Une bonne aération favorise l'apparition de primordias. Grâce à l’aération, le taux de dioxyde de carbone (CO2) diminue rapidement alors que l’oxygène (O2) augmente. | Une bonne aération favorise l'apparition de primordias. Grâce à l’aération, le taux de dioxyde de carbone (CO2) diminue rapidement alors que l’oxygène (O2) augmente. | ||
| Ligne 126 : | Ligne 133 : | ||
'''La température:''' | '''La température:''' | ||
| − | De nombreuses espèces ne formeront pas de champignons tant que la température n’aura pas ''' | + | De nombreuses espèces ne formeront pas de champignons tant que la température n’aura pas '''diminué'''. Le moment idéal pour faire varier la température (et les autres facteurs) est lorsque le '''substrat est complètement colonisé'''. Lorsque la température est changée, il faudra attendre entre 24 et 72 heures pour que la température à l’intérieur du substrat soit égale à celle de l’air ambiant. |
'''Pour les pleurotes:''' | '''Pour les pleurotes:''' | ||
| − | + | T°C d'apparition des primordias: 10-15°C | |
| − | + | T°C de fructification: 10-21°C | |
'''La lumière:''' | '''La lumière:''' | ||
| − | Dans la nature, la | + | Dans la nature, la lumière agit comme une alerte signalant au mycélium qu’il devrait former des champignons afin que leurs spores soient dispersées dans un environnement dégagé. La lumière joue une rôle sur l’allongement du pied et le développement du chapeau du champignon. Les conditions idéales d’éclairage (intensité et longueur d’onde) varient selon les espèces. La '''''lumière''''' indirect du soleil, ou la lumière filtrée par la canopée forestière, sont considérées comme idéales pour les champignons des bois. La photopériode et les longueurs d’ondes spécifiques n’ont pas encore étaient établies pour toutes les espèces de champignons. La lumière directe du soleil ou une lumière de forte intensité est nuisible pour le mycélium. Les néons ne nuisent pas au mycélium et peuvent être utilisés pour une culture intérieur. |
<br /> | <br /> | ||
| − | *Une fois que le mycélium a colonisé tout le substrat et que la bouteille est blanche, | + | * Une fois que le mycélium a colonisé tout le substrat et que la bouteille est blanche, entreposer les bouteilles dans un endroit à la lumière (indirecte), bien ventilé et si possible en 10 et 15°C. |
| − | + | * Percer des trous d’1,5 cm de diamètre quand vous sentez ou voyez des boules de primordias à travers la bouteille. | |
| − | *Bien arroser les primordias (3-4x/j en spray diffus). Dès qu’on a des primordias, elles doublent de volume chaque jour. Dans de bonnes conditions on peut obtenir des pleurotes prêts en 3-4jours. | + | * Bien arroser les primordias (3-4x/j en spray diffus). Dès qu’on a des primordias, elles doublent de volume chaque jour. Dans de bonnes conditions on peut obtenir des pleurotes prêts en 3-4jours. |
| − | + | * Récolter les pleurotes avant que leur chapeau ne se retourne vers le haut. Récolter la grappe en la tournant intégralement avec la main, le tout en une fois. | |
| − | *Récolter les pleurotes avant que leur chapeau ne se retourne vers le haut. Récolter la grappe en la tournant intégralement avec la main, le tout en une fois. | ||
'''Récolte potentielle''': de 750g à 2kg de champignons pour 1kg de substrat selon la maturité des champignons et le nombre de récolte. Dans de bonnes conditions, on peut obtenir 3 à 4 récoltes espacées de 7 à 14 jours sur une période de 45 et 55 jours. | '''Récolte potentielle''': de 750g à 2kg de champignons pour 1kg de substrat selon la maturité des champignons et le nombre de récolte. Dans de bonnes conditions, on peut obtenir 3 à 4 récoltes espacées de 7 à 14 jours sur une période de 45 et 55 jours. | ||
| Ligne 155 : | Ligne 161 : | ||
}} | }} | ||
{{Notes | {{Notes | ||
| − | |Notes=*[http://jontrot.free.fr/champignons/agrodok41.pdf Tutoriel généraliste sur culture de champignon à petite échelle] | + | |Notes=Comme tout le travail du Low-tech Lab, '''ce tutoriel est participatif''', n'hésitez pas à ajouter les modifications qui vous semblent importantes, et à partager vos réalisations en commentaires. |
| + | |||
| + | <br /> | ||
| + | |||
| + | *[http://jontrot.free.fr/champignons/agrodok41.pdf Tutoriel généraliste sur culture de champignon à petite échelle] | ||
*[http://champignonscomestibles.com/pleurote-en-huitre-pleurotus-ostreatus Conditions environnementales idéales pour la culture de pleurotes] | *[http://champignonscomestibles.com/pleurote-en-huitre-pleurotus-ostreatus Conditions environnementales idéales pour la culture de pleurotes] | ||
*[http://champignonscomestibles.com/influence-de-la-temperature-et-de-humidite-sur-la-formatiohttp://champignonscomestibles.com/influence-de-la-temperature-et-de-humidite-sur-la-formation-des-champignonsn-des-champignons Effets de la température et de l'humidité sur la formation de champignons] | *[http://champignonscomestibles.com/influence-de-la-temperature-et-de-humidite-sur-la-formatiohttp://champignonscomestibles.com/influence-de-la-temperature-et-de-humidite-sur-la-formation-des-champignonsn-des-champignons Effets de la température et de l'humidité sur la formation de champignons] | ||
Version du 6 septembre 2022 à 17:15

Difficulté
Moyen
Durée
1 mois
Coût
40 EUR (€)
Description
Domestic cultivation of edible mushrooms.
Sommaire
Sommaire
- 1 Description
- 2 Sommaire
- 3 Introduction
- 4 Video d'introduction
- 5 Étape 1 - Sterilization and preparation of mother spawn
- 6 Étape 2 - Preparation and sterilization of substrate bottles
- 7 Étape 3 - Substrate inoculation
- 8 Étape 4 - Fruiting and harvesting of mushrooms
- 9 Notes et références
- 10 Commentaires
Introduction
This leaflet deals with the domestic cultivation of edible mushrooms, in this case grey oyster mushrooms "[1]".
Advantages of growing gray oyster mushrooms
- Ecology/Save Money :
Fungi are one of the few organisms that feed on lignin and cellulose. These elements are present in many wastes from agriculture and other activities (straw, coffee grounds, sawdust, etc.). It is therefore an excellent way to recover these wastes. At the end of mushroom cultivation, it is possible to reintegrate the mycelium and substrate used for cultivation into the compost. Mushroom growing can therefore provide additional income for producers of this type of waste. As an example, une jeune entreprise de paris a produit 2,5T de pleurotes sur 30m² en 6 mois en réutilisant du marc de café
- Nutrition :
Oyster mushrooms are not among the most nutritious foods, however they are a source of several interesting elements: vitamins B3 (niacin), B2, B5, minerals (copper, phosphorus, potassium, iron, zinc), and oyster mushrooms contain more protein than most vegetables. Click here for more information on the nutritional values of oyster mushrooms.
Stage of cultivation :
- The mother spawn: The starter spawn (or mother spawn) is made from a fresh and healthy mushroom or can be bought from a "spawn" producer. The "spawn" is the mycelium of the mushroom grown in a sterile medium that is used for propagation. The mother crop is like "a seed" which allows to start several mushroom cultures.
- The invasion of the spawn: With the spawn of the mother culture we can then inoculate recipients that contain the substrate, the mycelium will invade the entire substrate. Once the substrate is completely colonized by the spawn, the last phase begins.
- Fruiting and harvesting: When the substrate is completely invaded, it is necessary to cause a change in the environmental conditions (T°C, light, CO2 concentration) and allow fruiting, which is the appearance of the part of the fungus that is consumed (foot and cap). All you have to do is harvest your mushrooms and eat them.
Youtube
Matériaux
- Petri dish
- Alcohol
- Cardboard
- Plastic bottles
- Fresh mushrooms
- Cotton
- Substrate (wood chips, coffee grounds, sawdust, straw,...)
Outils
- Scalpel, knife
- Sterilization, pasteurization tools
- Sterilize your petri dishes, knife, cardboard.
Étape 1 - Sterilization and preparation of mother spawn
Note : Cardboard has the advantage of being a "selective" culture medium because it is low in nutrients and sugar. Most contaminants need sugar in the substrate to grow, whereas mycelium (of species growing on wood) can be satisfied with cardboard.
- Sterilize the Petri dishes (with 70% ethanol and/or under UV) or glass jars (boil them for 15-20min.)
- Cut out pieces of cardboard 3 cm side.
- Sterilize the pieces of cardboard by soaking them in boiling water for example.
- Then place your pieces of cardboard in glass jars or Petri dishes. The cardboard must be well moistened but not completely soaked with water (let it drain for a few moments)
- Meticulously wash the mushroom
- Dip the scalpel/knife in alcohol and then heat it in red with a flame (no smoke).
- Let it cool for 10 seconds
- Cut the oyster mushrooms lengthwise and take a small piece from the neck of the oyster mushrooms (see photo).
- Place the oyster mushroom pieces on the cardboard in your Petri dishes. Inoculate at least 5 Petri dishes for a better chance of success.
- Place the Petri dishes in an incubator where there is no light with a temperature between 25-30°C. You must then wait for the mycelium to invade the entire box 7-15 days before inoculating your bottles with substrate.


Étape 2 - Preparation and sterilization of substrate bottles
The mushrooms we intend to grow for consumption must be able to colonize the substrate before other fungi and bacteria. To this end, we sterilize the substrate and the bottle to which we will add the previously cultivated mycelium (free of any contaminants). This technique gives the cultivated mushroom a head start over the others.
- Put the wood chips in a container.
- Add water until the chips are completely covered
- Add about 3% of the weight of the shavings in calcium carbonate (chalk or crushed shells of crustaceans).
- Cover the mixture and let it stand for one day to allow pathogen endospores to develop and be more easily removed afterwards.
- Fill the plastic bottles with your substrate. It must have a moisture content of 60-65%. Pierce the caps of the bottles and put a cotton plug at the neck, which allows gas exchange while preventing unwanted germs from entering. Close with the perforated caps.
Note: To know the right level of humidity, press a pellet of sawdust, a few droplets should flow and not a trickle of water.
- Sterilize the bottles containing the substrate. Here we left them in a solar oven for one day. It is also possible to use a microwave. Let them cool down.


Étape 3 - Substrate inoculation
- Open the sterilized bottles to inoculate them with your mother spawn, rich in mycelium, delicate passage because it is necessary to be fast enough to limit the risks of contamination during the opening of the bottles. It is important to work in a sterile environment during this operation (clean hands, clean clothes, etc...).
- Using tweezers previously sterilized in rubbing alcohol, place the ends of cardboard boxes covered with mycelium on the substrate of your bottles.
- Close the bottles immediately and put them in your incubator at a temperature of 20-30°C, without light.
- Using tweezers previously sterilized in alcohol at 70°C, place the ends of cardboard boxes covered with mycelium on the substrate of your bottles.
- Close the bottles immediately and put them in your incubator at a temperature of 20-30°C, without light.


Étape 4 - Fruiting and harvesting of mushrooms
In the forest, the mycelium lodges under the bark in the semi-darkness; in autumn, when it starts raining and the temperature drops, this causes stress that pushes it to bear fruit in order to reproduce.
Cette initiation fructifère est de loin l’étape la plus délicate lors de la culture de champignon. Le cultivateur doit mettre en place une stratégie d’initiation afin de produire un changement des variables environnementales pour déclencher la formation des primordias (ébauches de champignons).
Les quatre principaux facteurs environnementaux à contrôler lors de l’initiation fructifère sont: l’humidité, l’aération, la température et la lumière.
L’humidité:
Une humidité élevée comprise entre 95% et 100% doit être apporté par un arrosage léger et régulier. Le substrat doit être placé dans des conditions proches du brouillard lorsqu’il arrive dans la chambre de fructification. Lorsque les primordias commencent à se former, une légère diminution de l’humidité jusqu’à 90% est généralement bénéfique.
L’aération:
Une bonne aération favorise l'apparition de primordias. Grâce à l’aération, le taux de dioxyde de carbone (CO2) diminue rapidement alors que l’oxygène (O2) augmente.
La température:
De nombreuses espèces ne formeront pas de champignons tant que la température n’aura pas diminué. Le moment idéal pour faire varier la température (et les autres facteurs) est lorsque le substrat est complètement colonisé. Lorsque la température est changée, il faudra attendre entre 24 et 72 heures pour que la température à l’intérieur du substrat soit égale à celle de l’air ambiant.
Pour les pleurotes:
T°C d'apparition des primordias: 10-15°C
T°C de fructification: 10-21°C
La lumière:
Dans la nature, la lumière agit comme une alerte signalant au mycélium qu’il devrait former des champignons afin que leurs spores soient dispersées dans un environnement dégagé. La lumière joue une rôle sur l’allongement du pied et le développement du chapeau du champignon. Les conditions idéales d’éclairage (intensité et longueur d’onde) varient selon les espèces. La lumière indirect du soleil, ou la lumière filtrée par la canopée forestière, sont considérées comme idéales pour les champignons des bois. La photopériode et les longueurs d’ondes spécifiques n’ont pas encore étaient établies pour toutes les espèces de champignons. La lumière directe du soleil ou une lumière de forte intensité est nuisible pour le mycélium. Les néons ne nuisent pas au mycélium et peuvent être utilisés pour une culture intérieur.
- Une fois que le mycélium a colonisé tout le substrat et que la bouteille est blanche, entreposer les bouteilles dans un endroit à la lumière (indirecte), bien ventilé et si possible en 10 et 15°C.
- Percer des trous d’1,5 cm de diamètre quand vous sentez ou voyez des boules de primordias à travers la bouteille.
- Bien arroser les primordias (3-4x/j en spray diffus). Dès qu’on a des primordias, elles doublent de volume chaque jour. Dans de bonnes conditions on peut obtenir des pleurotes prêts en 3-4jours.
- Récolter les pleurotes avant que leur chapeau ne se retourne vers le haut. Récolter la grappe en la tournant intégralement avec la main, le tout en une fois.
Récolte potentielle: de 750g à 2kg de champignons pour 1kg de substrat selon la maturité des champignons et le nombre de récolte. Dans de bonnes conditions, on peut obtenir 3 à 4 récoltes espacées de 7 à 14 jours sur une période de 45 et 55 jours.
Informations traduites de l’ouvrage de Paul Stamets: Growing gourmet and medicinal mushroom.


Notes et références
Comme tout le travail du Low-tech Lab, ce tutoriel est participatif, n'hésitez pas à ajouter les modifications qui vous semblent importantes, et à partager vos réalisations en commentaires.
- Tutoriel généraliste sur culture de champignon à petite échelle
- Conditions environnementales idéales pour la culture de pleurotes
- Effets de la température et de l'humidité sur la formation de champignons
Published
 Français
 English
 Deutsch
 Español
 Italiano
 Português