
(Mise à jour pour être en accord avec la nouvelle version de la source de la page) |
(Mise à jour pour être en accord avec la nouvelle version de la source de la page) |
||
| Ligne 119 : | Ligne 119 : | ||
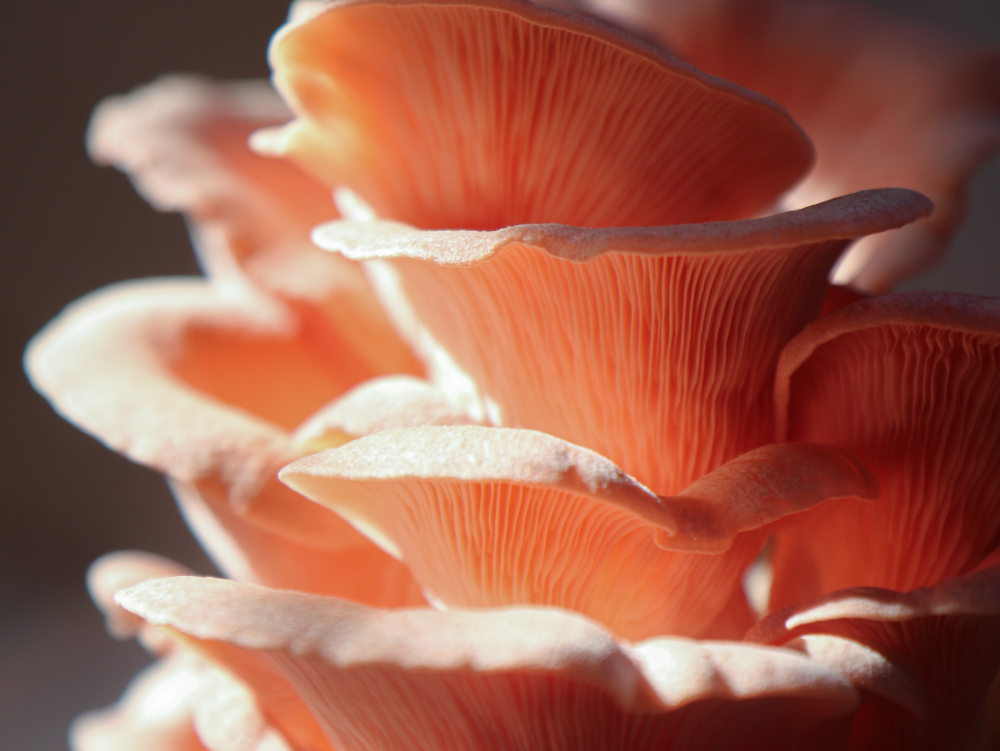
The four main '''environmental factors''' to be controlled during fruit initiation are: '''humidity''', '''aeration''', '''temperature''' and '''light'''. | The four main '''environmental factors''' to be controlled during fruit initiation are: '''humidity''', '''aeration''', '''temperature''' and '''light'''. | ||
| − | ===== '''L’humidité''': ===== | + | ====='''L’humidité''':===== |
High humidity between 95% and 100% should be provided by light and regular watering. The substrate must be placed in conditions close to fog when it arrives in the fruiting chamber. When the '''primordias''' begin to form, a ''' gradual ''' decrease in '''moisture''' to '''90%''' is generally beneficial. | High humidity between 95% and 100% should be provided by light and regular watering. The substrate must be placed in conditions close to fog when it arrives in the fruiting chamber. When the '''primordias''' begin to form, a ''' gradual ''' decrease in '''moisture''' to '''90%''' is generally beneficial. | ||
| − | ===== '''L’aération:''' ===== | + | ====='''L’aération:'''===== |
Good aeration favours the appearance of primordias. Thanks to aeration, the carbon dioxide (CO2) content decreases rapidly while oxygen (O2) increases. | Good aeration favours the appearance of primordias. Thanks to aeration, the carbon dioxide (CO2) content decreases rapidly while oxygen (O2) increases. | ||
| − | ===== '''La température:''' ===== | + | ====='''La température:'''===== |
| + | <div class="mw-translate-fuzzy"> | ||
Many species will not form fungi until the temperature '''decreases'''. The ideal time to vary the temperature (and other factors) is when the '''substrate is completely colonized'''. When the temperature is changed, it will take between 24 and 72 hours for the temperature inside the substrate to equal that of the ambient air. | Many species will not form fungi until the temperature '''decreases'''. The ideal time to vary the temperature (and other factors) is when the '''substrate is completely colonized'''. When the temperature is changed, it will take between 24 and 72 hours for the temperature inside the substrate to equal that of the ambient air. | ||
| + | </div> | ||
| − | ===== '''Pour les pleurotes:''' ===== | + | ====='''Pour les pleurotes:'''===== |
'''T°C of apparition of primordias: 10-15°C''' | '''T°C of apparition of primordias: 10-15°C''' | ||
| Ligne 137 : | Ligne 139 : | ||
'''T°C of fructification: 10-21°C''' | '''T°C of fructification: 10-21°C''' | ||
| − | ===== '''La lumière:''' ===== | + | ====='''La lumière:'''===== |
In nature, '''light''' acts as a warning to the mycelium that it should form fungi so that their spores are dispersed in an open environment. Light plays a role in the elongation of the foot and the development of the cap of the fungus. Ideal lighting conditions (intensity and wavelength) vary from species to species. Indirect sunlight, or light filtered by the forest canopy, is considered '''ideal''' for woodland mushrooms. The photoperiod and specific wavelengths have not yet been established for all species of fungi. Direct sunlight or high intensity light is '''harmful''' to the mycelium. Neon lights are not harmful to the mycelium and can be used for indoor cultivation. | In nature, '''light''' acts as a warning to the mycelium that it should form fungi so that their spores are dispersed in an open environment. Light plays a role in the elongation of the foot and the development of the cap of the fungus. Ideal lighting conditions (intensity and wavelength) vary from species to species. Indirect sunlight, or light filtered by the forest canopy, is considered '''ideal''' for woodland mushrooms. The photoperiod and specific wavelengths have not yet been established for all species of fungi. Direct sunlight or high intensity light is '''harmful''' to the mycelium. Neon lights are not harmful to the mycelium and can be used for indoor cultivation. | ||
Version du 17 février 2022 à 10:55

Difficulté
Moyen
Durée
1 mois
Coût
40 EUR (€)
Description
Domestic cultivation of edible mushrooms.
Introduction
This leaflet deals with the domestic cultivation of edible mushrooms, in this case grey oyster mushrooms "[1]".
Advantages of growing gray oyster mushrooms
- Ecology/Save Money :
Fungi are one of the few organisms that feed on lignin and cellulose. These elements are present in many wastes from agriculture and other activities (straw, coffee grounds, sawdust, etc.). It is therefore an excellent way to recover these wastes. At the end of mushroom cultivation, it is possible to reintegrate the mycelium and substrate used for cultivation into the compost. Mushroom growing can therefore provide additional income for producers of this type of waste. As an example, une jeune entreprise de paris a produit 2,5T de pleurotes sur 30m² en 6 mois en réutilisant du marc de café
- Nutrition :
Oyster mushrooms are not among the most nutritious foods, however they are a source of several interesting elements: vitamins B3 (niacin), B2, B5, minerals (copper, phosphorus, potassium, iron, zinc), and oyster mushrooms contain more protein than most vegetables. Click here for more information on the nutritional values of oyster mushrooms.
Stage of cultivation :
- The mother spawn: The starter spawn (or mother spawn) is made from a fresh and healthy mushroom or can be bought from a "spawn" producer. The "spawn" is the mycelium of the mushroom grown in a sterile medium that is used for propagation. The mother crop is like "a seed" which allows to start several mushroom cultures.
- The invasion of the spawn: With the spawn of the mother culture we can then inoculate recipients that contain the substrate, the mycelium will invade the entire substrate. Once the substrate is completely colonized by the spawn, the last phase begins.
- Fruiting and harvesting: When the substrate is completely invaded, it is necessary to cause a change in the environmental conditions (T°C, light, CO2 concentration) and allow fruiting, which is the appearance of the part of the fungus that is consumed (foot and cap). All you have to do is harvest your mushrooms and eat them.
Matériaux
- Petri dish
- Alcohol
- Cardboard
- Plastic bottles
- Fresh mushrooms
- Cotton
- Substrate (wood chips, coffee grounds, sawdust, straw,...)
Outils
- Scalpel, knife
- Sterilization, pasteurization tools
- Sterilize your petri dishes, knife, cardboard.
Étape 1 - Sterilization and preparation of mother spawn
Note : Cardboard has the advantage of being a "selective" culture medium because it is low in nutrients and sugar. Most contaminants need sugar in the substrate to grow, whereas mycelium (of species growing on wood) can be satisfied with cardboard.
- Sterilize the Petri dishes (with 70% ethanol and/or under UV) or glass jars (boil them for 15-20min.)
- Cut out pieces of cardboard 3 cm side.
- Sterilize the pieces of cardboard by soaking them in boiling water for example.
- Then place your pieces of cardboard in glass jars or Petri dishes. The cardboard must be well moistened but not completely soaked with water (let it drain for a few moments)
- Meticulously wash the mushroom
- Dip the scalpel/knife in alcohol and then heat it in red with a flame (no smoke).
- Let it cool for 10 seconds
- Cut the oyster mushrooms lengthwise and take a small piece from the neck of the oyster mushrooms (see photo).
- Place the oyster mushroom pieces on the cardboard in your Petri dishes. Inoculate at least 5 Petri dishes for a better chance of success.
- Place the Petri dishes in an incubator where there is no light with a temperature between 25-30°C. You must then wait for the mycelium to invade the entire box 7-15 days before inoculating your bottles with substrate.


Étape 2 - Preparation and sterilization of substrate bottles
The mushrooms we intend to grow for consumption must be able to colonize the substrate before other fungi and bacteria. To this end, we sterilize the substrate and the bottle to which we will add the previously cultivated mycelium (free of any contaminants). This technique gives the cultivated mushroom a head start over the others.
- Put the wood chips in a container.
- Add water until the chips are completely covered
- Add about 3% of the weight of the shavings in calcium carbonate (chalk or crushed shells of crustaceans).
- Cover the mixture and let it stand for one day to allow pathogen endospores to develop and be more easily removed afterwards.
- Fill the plastic bottles with your substrate. It must have a moisture content of 60-65%. Pierce the caps of the bottles and put a cotton plug at the neck, which allows gas exchange while preventing unwanted germs from entering. Close with the perforated caps.
Note: To know the right level of humidity, press a pellet of sawdust, a few droplets should flow and not a trickle of water.
- Sterilize the bottles containing the substrate. Here we left them in a solar oven for one day. It is also possible to use a microwave. Let them cool down.


Étape 3 - Substrate inoculation
- Open the sterilized bottles to inoculate them with your mother spawn, rich in mycelium, delicate passage because it is necessary to be fast enough to limit the risks of contamination during the opening of the bottles. It is important to work in a sterile environment during this operation (clean hands, clean clothes, etc...).
- Using tweezers previously sterilized in rubbing alcohol, place the ends of cardboard boxes covered with mycelium on the substrate of your bottles.
- Close the bottles immediately and put them in your incubator at a temperature of 20-30°C, without light.
- Using tweezers previously sterilized in alcohol at 70°C, place the ends of cardboard boxes covered with mycelium on the substrate of your bottles.
- Close the bottles immediately and put them in your incubator at a temperature of 20-30°C, without light.


Étape 4 - Fruiting and harvesting of mushrooms


Notes et références
Comme tout le travail du Low-tech Lab, ce tutoriel est participatif, n'hésitez pas à ajouter les modifications qui vous semblent importantes, et à partager vos réalisations en commentaires.
- Tutoriel généraliste sur culture de champignon à petite échelle
- Conditions environnementales idéales pour la culture de pleurotes
- Effets de la température et de l'humidité sur la formation de champignons
Published
 Français
 English
 Deutsch
 Español
 Italiano
 Português