(Page créée avec « To adapt any container or tin you may have available to use as the outside casing, it is possible to make the combustion chamber from sheet metal, ideally stainless steel... ») |
(Mise à jour pour être en accord avec la nouvelle version de la source de la page) |
||
| (21 révisions intermédiaires par 2 utilisateurs non affichées) | |||
| Ligne 1 : | Ligne 1 : | ||
| − | {{ | + | {{Tuto Details |
| − | | | + | |Main_Picture=Cuiseur_micro_gazéificateur_DSC_0024 (sans logo).jpg |
| − | | | + | |Licences=Attribution-ShareAlike (CC BY-SA) |
| − | | | + | |Description=How to make an inexpensive portable wood cooking system. |
| + | |Area=Food, Energy | ||
|Type=Tutorial | |Type=Tutorial | ||
| − | |||
| − | |||
|Difficulty=Very easy | |Difficulty=Very easy | ||
| + | |Duration=1 | ||
| + | |Duration-type=hour(s) | ||
|Cost=0 | |Cost=0 | ||
|Currency=EUR (€) | |Currency=EUR (€) | ||
| − | |||
| − | |||
| − | |||
| − | |||
|SourceLanguage=fr | |SourceLanguage=fr | ||
|Language=en-gb | |Language=en-gb | ||
|IsTranslation=1 | |IsTranslation=1 | ||
}} | }} | ||
| − | {{ | + | {{Introduction |
|Introduction=Factors relating to cooking remains one of the biggest challenges in the areas of health and energy. In many developing countries, the classic three-stone cooking fire is the technology that is most commonly used.This is extremely inefficient (with a thermal yield of 10 to 15% if sheltered from the wind and 5% if exposed) and releases toxic smoke into dwellings.There are two concerns with this: | |Introduction=Factors relating to cooking remains one of the biggest challenges in the areas of health and energy. In many developing countries, the classic three-stone cooking fire is the technology that is most commonly used.This is extremely inefficient (with a thermal yield of 10 to 15% if sheltered from the wind and 5% if exposed) and releases toxic smoke into dwellings.There are two concerns with this: | ||
| − | * Energy output is so poor that a | + | * Energy output is so poor that a large amount of wood is needed to cook one meal. |
This leads to extensive deforestation in certain parts of the world. | This leads to extensive deforestation in certain parts of the world. | ||
* Evidently, this creates certain problems with regards to health: smoke given off causes respiratory problems for people in the community and the reduces their quality of life. A technology that uses the same biomass but has a higher output | * Evidently, this creates certain problems with regards to health: smoke given off causes respiratory problems for people in the community and the reduces their quality of life. A technology that uses the same biomass but has a higher output | ||
| Ligne 26 : | Ligne 23 : | ||
The micro gasifier which is a low-tech and very economical way of cooking and, if well-made, has an output higher than a three stone stove (thermal output of approximately 35%). Output is even higher with the enhanced industrial version (which has a thermal output in the order of 45%) | The micro gasifier which is a low-tech and very economical way of cooking and, if well-made, has an output higher than a three stone stove (thermal output of approximately 35%). Output is even higher with the enhanced industrial version (which has a thermal output in the order of 45%) | ||
| − | It is possible to make a very basic model out of tin cans, but this will have a limited number of features. However, this can be very useful for instance for heating water, cooking small quantities of food and for doing demonstrations/teaching purposes. | + | It is possible to make a very basic model out of tin cans, but this will have a limited number of features. However, this can be very useful, for instance, for heating water, cooking small quantities of food and for doing demonstrations/teaching purposes. |
More complex models do exist which, although more costly, tend to last longer and allow control over the power you can get from the flame. | More complex models do exist which, although more costly, tend to last longer and allow control over the power you can get from the flame. | ||
}} | }} | ||
| − | {{ | + | {{Materials |
| − | |Material=* A large tin can (in terms of height and width) (1): for the external chamber; | + | |Material=* A large tin can (in terms of both height and width) (1): for the external chamber; |
* A tin can which is slightly shorter and thinner (2): for the combustion chamber; | * A tin can which is slightly shorter and thinner (2): for the combustion chamber; | ||
| − | * A tin can | + | * A tin can with the same diameter as the combustion chamber (3): for the stand on which the pan sits. |
|Tools=* Marker | |Tools=* Marker | ||
| − | * | + | * Tin snips |
| − | For drilling, there are 2 options: | + | For drilling, there are 2 options: |
* A drill and 2 drill bits:11mm and 7mm respectively | * A drill and 2 drill bits:11mm and 7mm respectively | ||
* A hammer and a large nail (or a metal punch) | * A hammer and a large nail (or a metal punch) | ||
* A wooden block, a part of which can be inserted inside the tin can. | * A wooden block, a part of which can be inserted inside the tin can. | ||
| + | |Tuto_Attachments={{Tuto Attachments | ||
| + | |Attachment=Cuiseur_micro_gaz_ificateur_Affiche_RechaudPyrolyse_FR.pdf | ||
| + | }} | ||
}} | }} | ||
| − | {{ | + | {{Tuto Step |
| − | |||
| − | |||
| − | |||
|Step_Title=How it Works | |Step_Title=How it Works | ||
| − | |Step_Content=This is based on the concept of gasification: Wood is heated in an environment containing very little oxygen, giving off combustible gases known as “Syngas” which are then burnt in the upper part of the stove. | + | |Step_Content=This is based on the concept of gasification: Wood is heated in an environment containing very little oxygen, giving off combustible gases known as “Syngas” which are then burnt in the upper part of the stove. |
The micro-gasifier is lit from the top. | The micro-gasifier is lit from the top. | ||
| Ligne 59 : | Ligne 56 : | ||
It is light, compact, reliable, uses little fuel and, in the right circumstances, produces reusable charcoal which can be used in other applications. This system is therefore extremely low-tech and very efficient compared to conventional systems used throughout the world. | It is light, compact, reliable, uses little fuel and, in the right circumstances, produces reusable charcoal which can be used in other applications. This system is therefore extremely low-tech and very efficient compared to conventional systems used throughout the world. | ||
| − | + | As a comparison, the diagram opposite shows the energy performances of various systems. The micro-gasifier here is called “wood gas stove”. | |
| + | |Step_Picture_00=Cuiseur_micro_gazéificateur_Schéma fonctionnement.jpg | ||
| + | |Step_Picture_01=Thermal efficiency.png | ||
}} | }} | ||
| − | {{ | + | {{Tuto Step |
| − | |||
|Step_Title=External Chamber | |Step_Title=External Chamber | ||
| − | |Step_Content=- Mark the positions of a approximately 10 holes, spread out evenly all around the upper part of tin can (1). | + | |Step_Content=- Mark the positions of a approximately 10 holes, spread out evenly all around the upper part of tin can (1). |
- then drill where marked using a 12mm drill bit (or with a hammer and nail) | - then drill where marked using a 12mm drill bit (or with a hammer and nail) | ||
(For a cleaner finish, we recommend that you make pilot holes with a 7mm drill bit before tackling it with a 12mm drill bit). | (For a cleaner finish, we recommend that you make pilot holes with a 7mm drill bit before tackling it with a 12mm drill bit). | ||
| − | Note:To make things cleaner and easier, you can clamp the wooden block onto a vice and use it as a support when making the holes in the tin can. | + | '''Note''':To make things cleaner and easier, you can clamp the wooden block onto a vice and use it as a support when making the holes in the tin can. |
| − | Cut the bottom out of the large tin can (1). The opening must be of a slightly smaller diameter to that of the small tin can (so that it can | + | - Cut the bottom out of the large tin can (1). The opening must be of a slightly smaller diameter to that of the small tin can (so that it can sit inside it) |
| + | |Step_Picture_00=Fabrication Chambre externe.jpg | ||
}} | }} | ||
| − | {{ | + | {{Tuto Step |
| − | |||
|Step_Title=Combustion Chamber | |Step_Title=Combustion Chamber | ||
| − | |Step_Content=- Mark the position of approximately 15 holes spread out over the whole surface | + | |Step_Content=- Mark the position of approximately 15 holes spread out over the whole surface of the bottom of the tin can (2). |
- Mark the positions of a approximately 10 holes, spread out evenly all around the upper part of tin can (2). | - Mark the positions of a approximately 10 holes, spread out evenly all around the upper part of tin can (2). | ||
- then drill where marked using a 7mm drill bit (or with a hammer and nail) | - then drill where marked using a 7mm drill bit (or with a hammer and nail) | ||
| + | |Step_Picture_00=Fabrication Chambre interne.jpg | ||
}} | }} | ||
| − | {{ | + | {{Tuto Step |
| − | |||
|Step_Title=Pan Support | |Step_Title=Pan Support | ||
| − | |Step_Content=- Mark the positions of approximately 10 holes spread out evenly all the way around the small tin can (3). | + | |Step_Content=- Mark the positions of approximately 10 holes spread out evenly all the way around the small tin can (3). |
- then drill where marked using a 12mm drill bit (or a hammer and nail) | - then drill where marked using a 12mm drill bit (or a hammer and nail) | ||
| Ligne 91 : | Ligne 89 : | ||
- NB: For ease of use, you can cut out a large hole on the side of the small can (3): this makes it easier for the fire to catch the wood | - NB: For ease of use, you can cut out a large hole on the side of the small can (3): this makes it easier for the fire to catch the wood | ||
| + | |Step_Picture_00=Support du plat.jpg | ||
}} | }} | ||
| − | {{ | + | {{Tuto Step |
| − | |||
|Step_Title= Final Assembly | |Step_Title= Final Assembly | ||
|Step_Content=- Put tin can (2) into the large tin can (1) as shown in the diagram. | |Step_Content=- Put tin can (2) into the large tin can (1) as shown in the diagram. | ||
| Ligne 100 : | Ligne 98 : | ||
- The pyrolytic stove is now ready for you to use ! | - The pyrolytic stove is now ready for you to use ! | ||
| + | |Step_Picture_00=Montage.jpg | ||
}} | }} | ||
| − | {{ | + | {{Tuto Step |
| − | |||
|Step_Title=Directions for Use | |Step_Title=Directions for Use | ||
|Step_Content=Despite this type of cooker being more environmentally friendly than the “three stoned” ones, it still gives off smoke. For this reason, it needs to be used in a well-ventilated area. | |Step_Content=Despite this type of cooker being more environmentally friendly than the “three stoned” ones, it still gives off smoke. For this reason, it needs to be used in a well-ventilated area. | ||
| − | To light the stove, fill up and light it in the upper part. | + | To light the stove, fill up and light it in the upper part. |
To ‘turn off’ the stove, simply wait until all the wood has burnt down and the casing has cooled down, | To ‘turn off’ the stove, simply wait until all the wood has burnt down and the casing has cooled down, | ||
THE TEMPERATURE OF WOOD AND GASES WHEN BURNT CAN REACH UP TO ALMOST 1200°C. HANDLE THE STOVE WITH EXTREME CARE : DO NOT MOVE THE STOVE WHEN LIT. | THE TEMPERATURE OF WOOD AND GASES WHEN BURNT CAN REACH UP TO ALMOST 1200°C. HANDLE THE STOVE WITH EXTREME CARE : DO NOT MOVE THE STOVE WHEN LIT. | ||
| + | |Step_Picture_00=Cuiseur_micro_gazéificateur_Utilisation.jpg | ||
}} | }} | ||
| − | {{ | + | {{Tuto Step |
|Step_Title=Comments | |Step_Title=Comments | ||
| − | |Step_Content=This is a very simple system and does not, for example, allow control over the size of the flame. | + | |Step_Content=This is a very simple system and does not, for example, allow control over the size of the flame. |
Due to the materials used, the stove has a very limited service life. | Due to the materials used, the stove has a very limited service life. | ||
| − | Improved versions of this system are currently being tested/validated in various urban settings thanks to initiatives taken by Paul Anderson, an expert in micro-gasifiers. | + | Improved versions of this system are currently being tested/validated in various urban settings thanks to initiatives taken by Paul Anderson, an expert in micro-gasifiers. |
Trials have been carried out in India but have not been hugely successful as the reality is that it is quite a complicated operation finding pellets or biomass chips in this area and the price of the enhanced micro-gasifier is approaching that of the cost of cooking with gas but without all the advantages that comes with it. | Trials have been carried out in India but have not been hugely successful as the reality is that it is quite a complicated operation finding pellets or biomass chips in this area and the price of the enhanced micro-gasifier is approaching that of the cost of cooking with gas but without all the advantages that comes with it. | ||
}} | }} | ||
| − | {{ | + | {{Tuto Step |
| + | |Step_Title=How to make a bigger stove | ||
| + | |Step_Content=To adapt any container or tin you may have available to use as the outside casing, it is possible to make the combustion chamber from sheet metal, ideally stainless steel. It must be of a thickness of 1mm maximum so that you are able to cut it with tin snips. It is important to cut out the tabs and drill the holes whilst the sheet metal is still flat before rolling up and fastening the ends together. Using stainless steel will make the stove last longer. | ||
| + | The photos opposite show how to make the stove from a paint pot and a 1mm thick sheet of stainless steel. The metal sheet should be machined flat before being rolled and fastened (to fasten: fold back approx 5mm of both of the two edges of the sheet metal in opposite directions and then fix the two together by hammering one flap inside the other). To avoid cuts to hands, wear gloves! | ||
|Step_Picture_00=Cuiseur_micro_gaz_ificateur_IMG_6375.JPG | |Step_Picture_00=Cuiseur_micro_gaz_ificateur_IMG_6375.JPG | ||
|Step_Picture_01=Cuiseur_micro_gaz_ificateur_IMG_6365.JPG | |Step_Picture_01=Cuiseur_micro_gaz_ificateur_IMG_6365.JPG | ||
| Ligne 128 : | Ligne 130 : | ||
|Step_Picture_03=Cuiseur_micro_gaz_ificateur_IMG_6368.JPG | |Step_Picture_03=Cuiseur_micro_gaz_ificateur_IMG_6368.JPG | ||
|Step_Picture_04=Cuiseur_micro_gaz_ificateur_IMG_6376.JPG | |Step_Picture_04=Cuiseur_micro_gaz_ificateur_IMG_6376.JPG | ||
| − | |||
| − | |||
| − | |||
}} | }} | ||
| − | {{ {{ | + | {{Tuto Step |
| − | |Notes= | + | |Step_Title=Contenu pédagogique à télécharger |
| + | |Step_Content=Vous pouvez télécharger une fiche pédagogique créée par le Low-tech Lab dans la partie "Fichiers" du tutoriel (onglet au niveau de la section "Outils-Matériaux") | ||
| + | |Step_Picture_00=Cuiseur_micro_gaz_ificateur_pyrolyse.JPG | ||
| + | }} | ||
| + | {{Notes | ||
| + | |Notes=To download the tutorial: [http://lowtechlab.org/wp-content/uploads/2016/09/LE-LAB-Micro-Gazeificateur.pdf ici] | ||
| + | |||
| + | To see report by Planète Bois (in French) comparing different types of stoves: http://www.planetebois.org/glossaire/cuiseur-domestique-econome-cde/ | ||
| − | + | The Mirco-gasifier expert, Dr Paul Anderson’s website (in English) : http://www.drtlud.com/ | |
| − | + | Please share the tutorial and give feedback, or add any comments that may be helpful for making any improvements. | |
| − | + | Low-Tech Lab team also recommend you consult their Biblilowtech. | |
| − | + | This English translation has been possible thanks to the PerMondo project: Free translation of website and documents for non-profit organisations. A project managed by Mondo Agit. Translator: Gill Barringer. (Whilst great efforts have been made to ensure the quality of this translation, the translator makes no guarantees and will accept no liability for any claims made against her in the event of any misinterpretation, errors or omissions thereof) | |
| + | }} | ||
| + | {{PageLang | ||
}} | }} | ||
| − | {{ | + | {{Tuto Status |
| − | |Complete= | + | |Complete=Published |
}} | }} | ||
| + | {{Separator}} | ||
Version du 26 mars 2021 à 13:36
Description
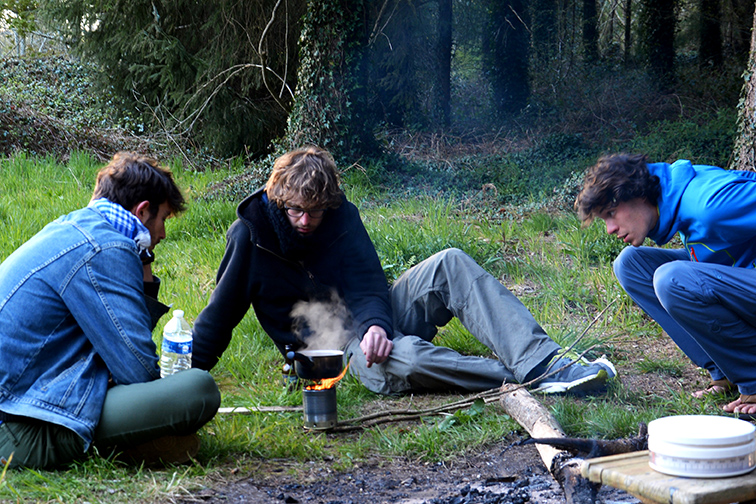
How to make an inexpensive portable wood cooking system.
Sommaire
Sommaire
- 1 Description
- 2 Sommaire
- 3 Introduction
- 4 Étape 1 - How it Works
- 5 Étape 2 - External Chamber
- 6 Étape 3 - Combustion Chamber
- 7 Étape 4 - Pan Support
- 8 Étape 5 - Final Assembly
- 9 Étape 6 - Directions for Use
- 10 Étape 7 - Comments
- 11 Étape 8 - How to make a bigger stove
- 12 Étape 9 - Contenu pédagogique à télécharger
- 13 Notes et références
- 14 Commentaires
Introduction
Factors relating to cooking remains one of the biggest challenges in the areas of health and energy. In many developing countries, the classic three-stone cooking fire is the technology that is most commonly used.This is extremely inefficient (with a thermal yield of 10 to 15% if sheltered from the wind and 5% if exposed) and releases toxic smoke into dwellings.There are two concerns with this:
- Energy output is so poor that a large amount of wood is needed to cook one meal.
This leads to extensive deforestation in certain parts of the world.
- Evidently, this creates certain problems with regards to health: smoke given off causes respiratory problems for people in the community and the reduces their quality of life. A technology that uses the same biomass but has a higher output
is:
The micro gasifier which is a low-tech and very economical way of cooking and, if well-made, has an output higher than a three stone stove (thermal output of approximately 35%). Output is even higher with the enhanced industrial version (which has a thermal output in the order of 45%)
It is possible to make a very basic model out of tin cans, but this will have a limited number of features. However, this can be very useful, for instance, for heating water, cooking small quantities of food and for doing demonstrations/teaching purposes.
More complex models do exist which, although more costly, tend to last longer and allow control over the power you can get from the flame.
Matériaux
- A large tin can (in terms of both height and width) (1): for the external chamber;
- A tin can which is slightly shorter and thinner (2): for the combustion chamber;
- A tin can with the same diameter as the combustion chamber (3): for the stand on which the pan sits.
Outils
- Marker
- Tin snips
For drilling, there are 2 options:
- A drill and 2 drill bits:11mm and 7mm respectively
- A hammer and a large nail (or a metal punch)
- A wooden block, a part of which can be inserted inside the tin can.
Étape 1 - How it Works
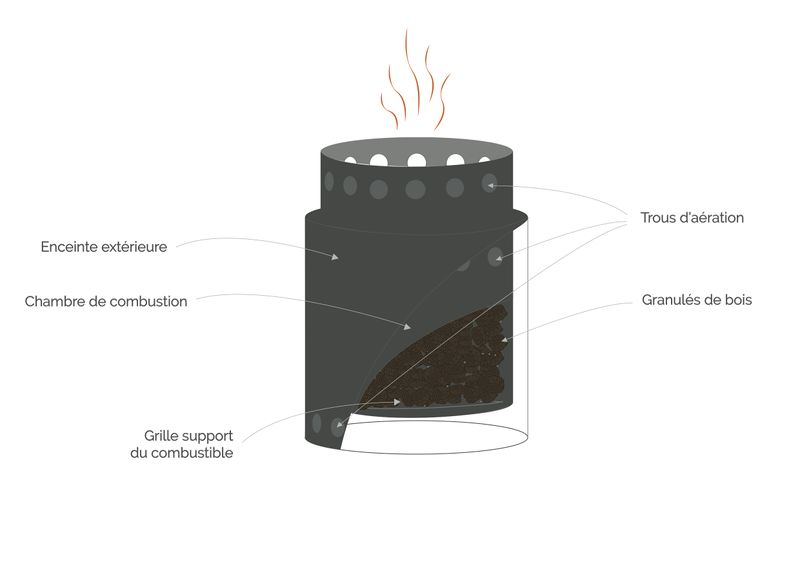
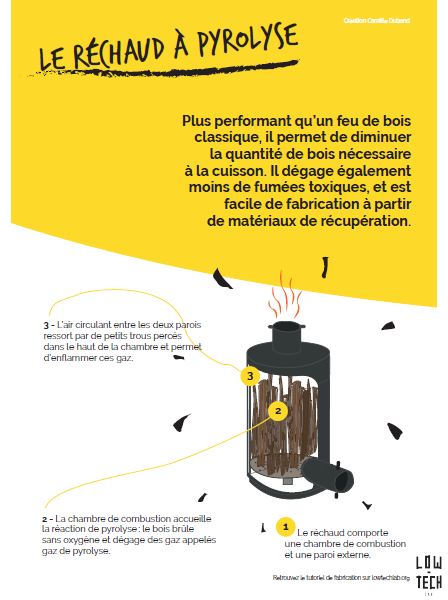
This is based on the concept of gasification: Wood is heated in an environment containing very little oxygen, giving off combustible gases known as “Syngas” which are then burnt in the upper part of the stove.
The micro-gasifier is lit from the top. Primary air, flowing into the lower part, passes through the mass of combustible fuel, maintaining a pyrolysis layer which then drops as the combustible gases are released. Secondary air is forced into the top of the stove, supplying the oxygen that is needed for combustion of gases emitting in an upward direction.
Better results are obtained with forced convection, using an integrated fan under the grid which supports the fuel. However you will need a reliable supply of electricity for this.
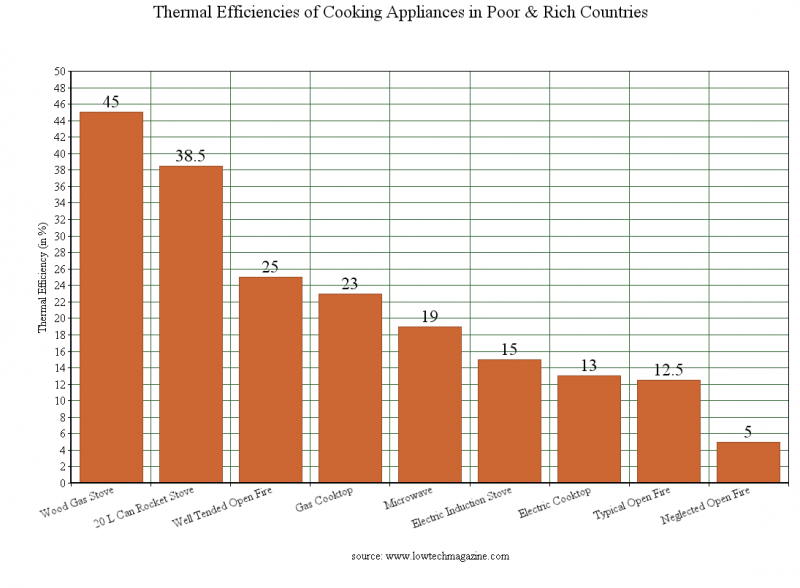
The temperature at which combustion takes place is around 800°C and thermal yields are between 30 to 45% depending on how well it is made and the quality of the insulation.
It is light, compact, reliable, uses little fuel and, in the right circumstances, produces reusable charcoal which can be used in other applications. This system is therefore extremely low-tech and very efficient compared to conventional systems used throughout the world.
As a comparison, the diagram opposite shows the energy performances of various systems. The micro-gasifier here is called “wood gas stove”.
Étape 2 - External Chamber
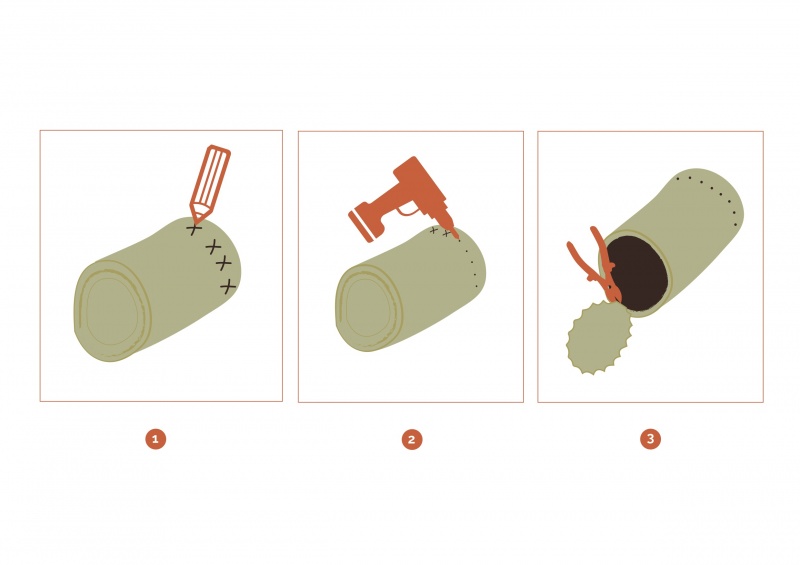
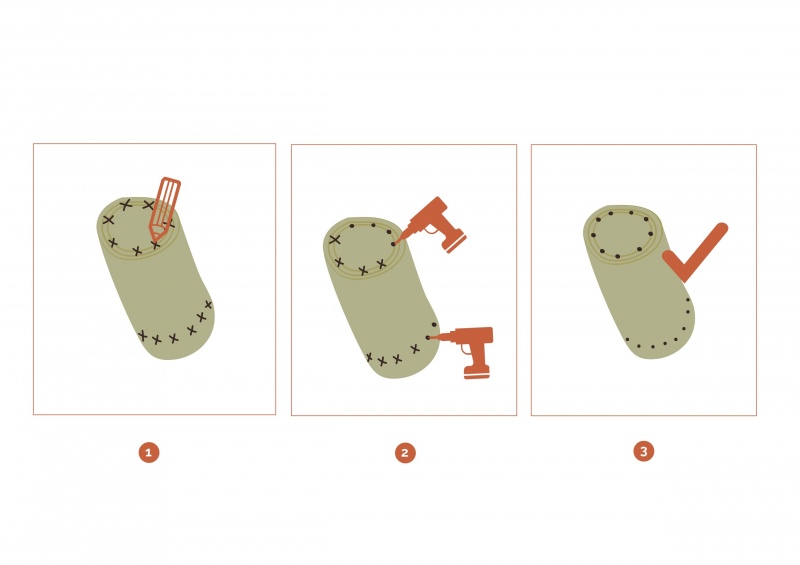
- Mark the positions of a approximately 10 holes, spread out evenly all around the upper part of tin can (1).
- then drill where marked using a 12mm drill bit (or with a hammer and nail) (For a cleaner finish, we recommend that you make pilot holes with a 7mm drill bit before tackling it with a 12mm drill bit).
Note:To make things cleaner and easier, you can clamp the wooden block onto a vice and use it as a support when making the holes in the tin can.
- Cut the bottom out of the large tin can (1). The opening must be of a slightly smaller diameter to that of the small tin can (so that it can sit inside it)
Étape 3 - Combustion Chamber
- Mark the position of approximately 15 holes spread out over the whole surface of the bottom of the tin can (2). - Mark the positions of a approximately 10 holes, spread out evenly all around the upper part of tin can (2).
- then drill where marked using a 7mm drill bit (or with a hammer and nail)
Étape 4 - Pan Support
- Mark the positions of approximately 10 holes spread out evenly all the way around the small tin can (3).
- then drill where marked using a 12mm drill bit (or a hammer and nail)
- Cut out the bottom of the can.
- NB: For ease of use, you can cut out a large hole on the side of the small can (3): this makes it easier for the fire to catch the wood
Étape 5 - Final Assembly
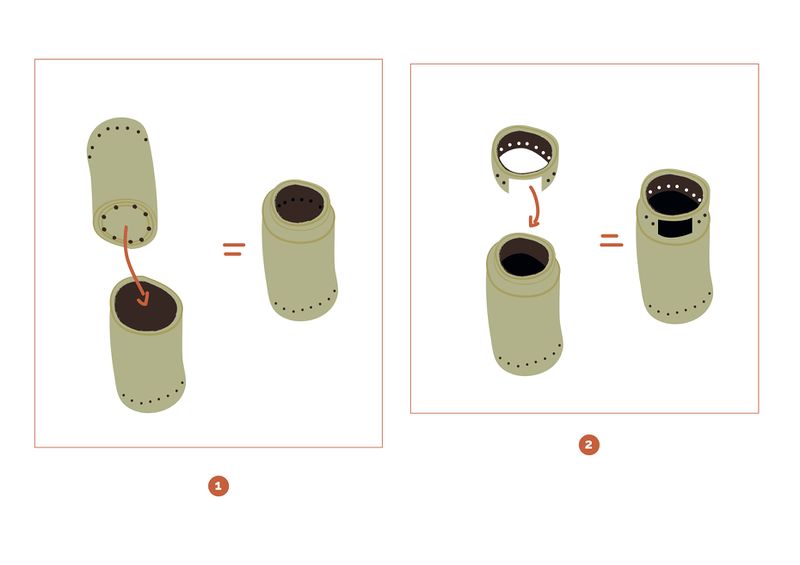
- Put tin can (2) into the large tin can (1) as shown in the diagram.
- Place tin can (3) on top of the two other tin cans which have been nested one inside the other.
- The pyrolytic stove is now ready for you to use !
Étape 6 - Directions for Use
Despite this type of cooker being more environmentally friendly than the “three stoned” ones, it still gives off smoke. For this reason, it needs to be used in a well-ventilated area.
To light the stove, fill up and light it in the upper part.
To ‘turn off’ the stove, simply wait until all the wood has burnt down and the casing has cooled down,
THE TEMPERATURE OF WOOD AND GASES WHEN BURNT CAN REACH UP TO ALMOST 1200°C. HANDLE THE STOVE WITH EXTREME CARE : DO NOT MOVE THE STOVE WHEN LIT.
Étape 7 - Comments
This is a very simple system and does not, for example, allow control over the size of the flame.
Due to the materials used, the stove has a very limited service life.
Improved versions of this system are currently being tested/validated in various urban settings thanks to initiatives taken by Paul Anderson, an expert in micro-gasifiers.
Trials have been carried out in India but have not been hugely successful as the reality is that it is quite a complicated operation finding pellets or biomass chips in this area and the price of the enhanced micro-gasifier is approaching that of the cost of cooking with gas but without all the advantages that comes with it.
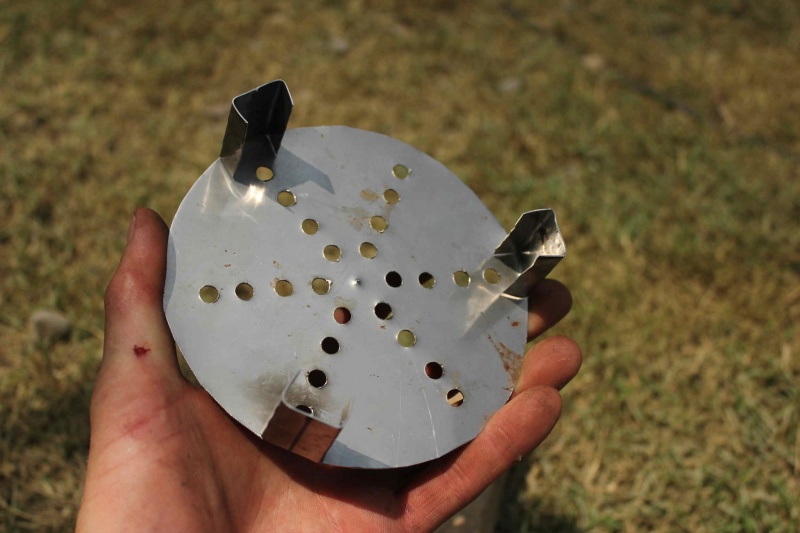
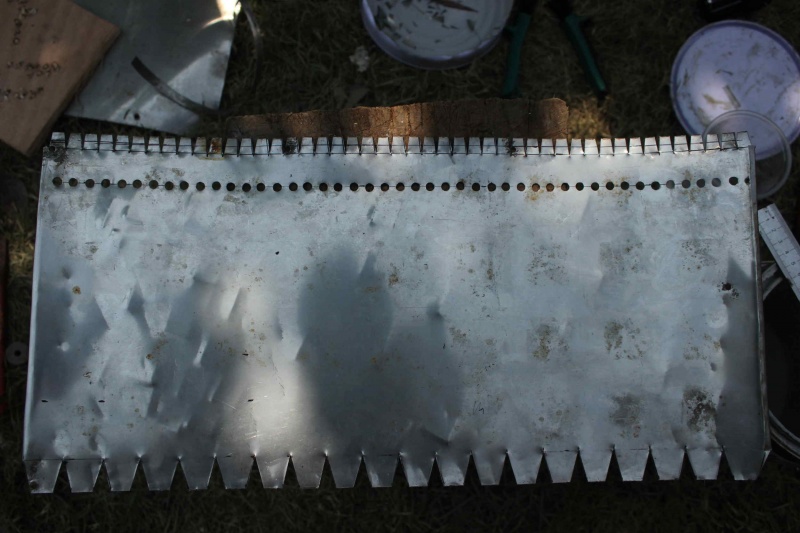
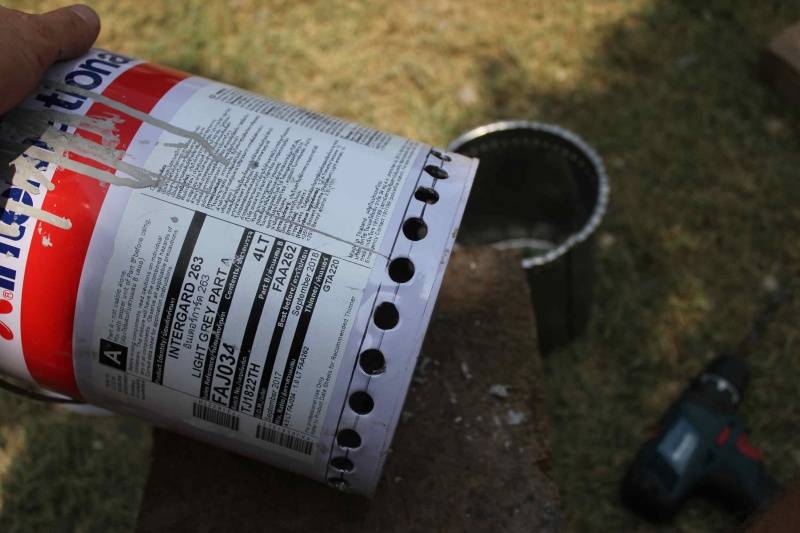
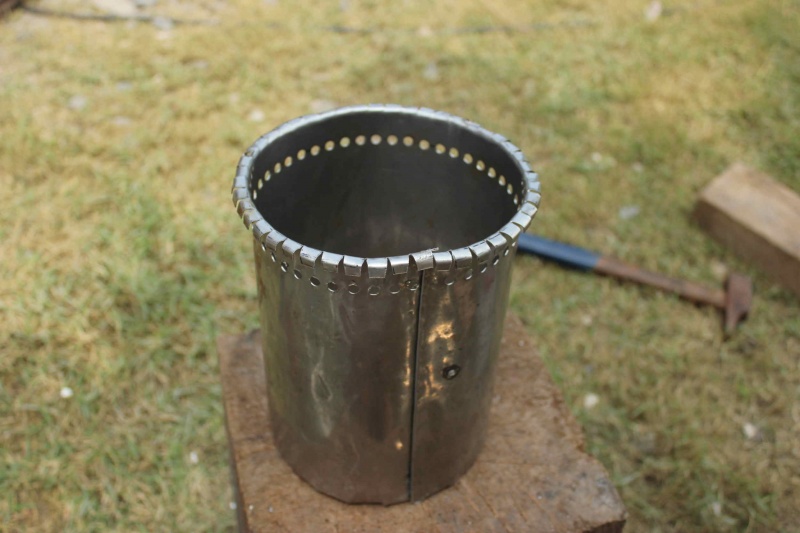
Étape 8 - How to make a bigger stove
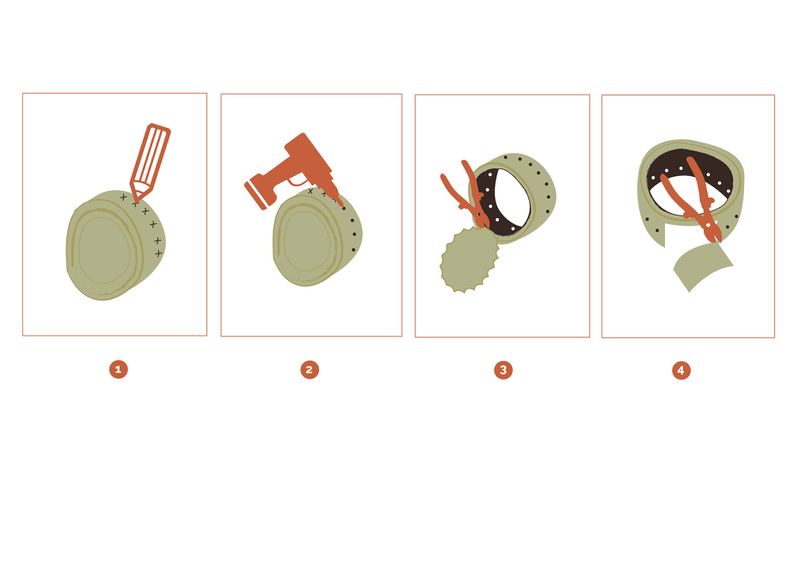
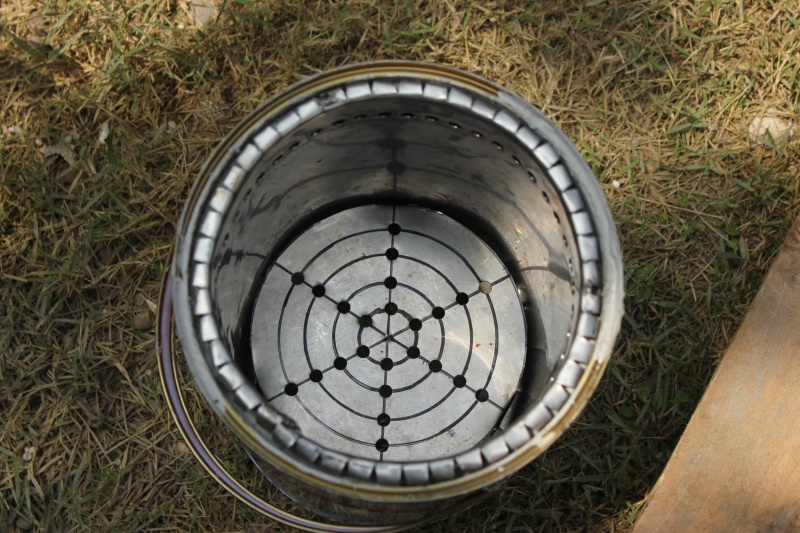
To adapt any container or tin you may have available to use as the outside casing, it is possible to make the combustion chamber from sheet metal, ideally stainless steel. It must be of a thickness of 1mm maximum so that you are able to cut it with tin snips. It is important to cut out the tabs and drill the holes whilst the sheet metal is still flat before rolling up and fastening the ends together. Using stainless steel will make the stove last longer. The photos opposite show how to make the stove from a paint pot and a 1mm thick sheet of stainless steel. The metal sheet should be machined flat before being rolled and fastened (to fasten: fold back approx 5mm of both of the two edges of the sheet metal in opposite directions and then fix the two together by hammering one flap inside the other). To avoid cuts to hands, wear gloves!
Étape 9 - Contenu pédagogique à télécharger
Vous pouvez télécharger une fiche pédagogique créée par le Low-tech Lab dans la partie "Fichiers" du tutoriel (onglet au niveau de la section "Outils-Matériaux")
Notes et références
To download the tutorial: ici
To see report by Planète Bois (in French) comparing different types of stoves: http://www.planetebois.org/glossaire/cuiseur-domestique-econome-cde/
The Mirco-gasifier expert, Dr Paul Anderson’s website (in English) : http://www.drtlud.com/
Please share the tutorial and give feedback, or add any comments that may be helpful for making any improvements.
Low-Tech Lab team also recommend you consult their Biblilowtech.
This English translation has been possible thanks to the PerMondo project: Free translation of website and documents for non-profit organisations. A project managed by Mondo Agit. Translator: Gill Barringer. (Whilst great efforts have been made to ensure the quality of this translation, the translator makes no guarantees and will accept no liability for any claims made against her in the event of any misinterpretation, errors or omissions thereof)
Published
 Français
 English
 Deutsch
 Español
 Italiano
 Português