(Page créée avec « One of the major energy and health issues of our time concerns cooking. In many developing countries, the most widely used technology is the three classic stone fireplace.... ») |
(update property name) |
||
| (49 révisions intermédiaires par un autre utilisateur non affichées) | |||
| Ligne 1 : | Ligne 1 : | ||
| − | {{ | + | {{Tuto Details |
|SourceLanguage=fr | |SourceLanguage=fr | ||
|Language=en | |Language=en | ||
| Ligne 17 : | Ligne 17 : | ||
|IsTranslation=1 | |IsTranslation=1 | ||
}} | }} | ||
| − | {{ | + | {{Introduction |
|Introduction=One of the major energy and health issues of our time concerns cooking. In many developing countries, the most widely used technology is the three classic stone fireplace. It offers catastrophic yields (10 to 15% thermal efficiency sheltered from the wind, 5% without wind shelter) and releases a lot of toxic fumes into homes. | |Introduction=One of the major energy and health issues of our time concerns cooking. In many developing countries, the most widely used technology is the three classic stone fireplace. It offers catastrophic yields (10 to 15% thermal efficiency sheltered from the wind, 5% without wind shelter) and releases a lot of toxic fumes into homes. | ||
Two concerns arise from this: | Two concerns arise from this: | ||
| Ligne 24 : | Ligne 24 : | ||
Some technologies use the same biomass but with higher yields. Here is one : | Some technologies use the same biomass but with higher yields. Here is one : | ||
| − | + | The micro gasifier is a low-tech and very economical cooking technology. It offers higher yields than a conventional three-stone fireplace (around 35% thermal efficiency) when well manufactured, and even better in its optimized industrial version (thermal efficiency of around 45%). | |
| − | + | It is possible to manufacture very simple but not optimized models, with tin cans. It will be useful for example for heating water, cooking small amounts of food and for demonstration/pedagogy. | |
| − | + | More complex models exist, more expensive but allowing to manage the power of the flame with an improved duration. | |
}} | }} | ||
| − | {{ | + | {{Materials |
| − | |Material=* | + | |Material=*A large and tall can (1): this will be the outer chamber; |
| − | * | + | *A can slightly narrower and slightly lower (2): this will be the combustion chamber; |
| − | * | + | *A can of the same diameter as the combustion chamber (3): this will be the support for the pan. |
| − | |Tools=* | + | |Tools=* A marker |
| − | * | + | * Cutting pliers |
| − | + | For drilling, two possibilities: | |
| − | * | + | *One drill with two drill bits: 11 mm and 7 mm |
| − | * | + | *A hammer and a big nail (or a punch) |
| − | * | + | *A wooden block whose section can fit into the tin can |
}} | }} | ||
| − | {{ | + | {{Separator}} |
| − | {{ | + | {{Tuto Step |
|Step_Picture_00=Cuiseur_micro_gazéificateur_Schéma fonctionnement.jpg | |Step_Picture_00=Cuiseur_micro_gazéificateur_Schéma fonctionnement.jpg | ||
|Step_Picture_01=Thermal efficiency.png | |Step_Picture_01=Thermal efficiency.png | ||
| − | |Step_Title= | + | |Step_Title=How it works |
| − | |Step_Content= | + | |Step_Content=It is based on the principle of gasification: The wood is heated in a low oxygen atmosphere, which will allow the release of flammable gases called "Syngas", which will then be burned in the upper part of the stove. |
| − | + | The micro gasifier lights up from above. | |
| − | + | The primary air introduced in the lower part passes through the mass of the fuel and makes it possible to maintain a pyrolysis bed which goes down as the combustible gases are released. The secondary air is injected in the upper part to provide oxygen necessary for the combustion of the gases that are released upwards. | |
| − | + | Better results are obtained in forced convection with the use of an integrated fan under the fuel support grid, but this induces a reliable supply of electricity. | |
| − | + | The combustion temperature is around 800°C, and the thermal yields range from 30 to 45%, depending on the quality of manufacture of the system and its insulation. | |
| − | + | It is light, compact, reliable, uses little fuel and generates, at best, reusable coal for other applications. It is thus a very low-tech system and very powerful compared to the traditional systems used in the world. | |
| − | + | For comparison, the graph opposite shows the energy performance of different systems. The micro gasifier is called here "wood gas stove". | |
}} | }} | ||
| − | {{ | + | {{Tuto Step |
|Step_Picture_00=Fabrication Chambre externe.jpg | |Step_Picture_00=Fabrication Chambre externe.jpg | ||
| − | |Step_Title= | + | |Step_Title=External chamber |
|Step_Content=1 - En partie haute de la grande boite de conserve (1), marquez l'emplacement d'une dizaine de trou, répartis équitablement tout autour de la boite. | |Step_Content=1 - En partie haute de la grande boite de conserve (1), marquez l'emplacement d'une dizaine de trou, répartis équitablement tout autour de la boite. | ||
| − | 2 - | + | 2 - Then drill at the marked locations with a 12mm drill bit (or with hammer and nail). |
| − | ( | + | (For a cleaner result it is recommended to pre-drill with the 7 mm drill bit before attacking with the 12 mm drill bit). |
| − | + | Note: For ease and cleanliness, it is possible to clamp the wooden wedge on a vice and use it as a support to make the holes in the box. | |
| − | 3 - | + | 3 - Cut the bottom of the large tin can (1). The hole must have a slightly smaller diameter than the small tin can (so that it can be embedded in it). |
}} | }} | ||
| − | {{ | + | {{Tuto Step |
|Step_Picture_00=Fabrication Chambre interne.jpg | |Step_Picture_00=Fabrication Chambre interne.jpg | ||
| − | |Step_Title= | + | |Step_Title=Combustion chamber |
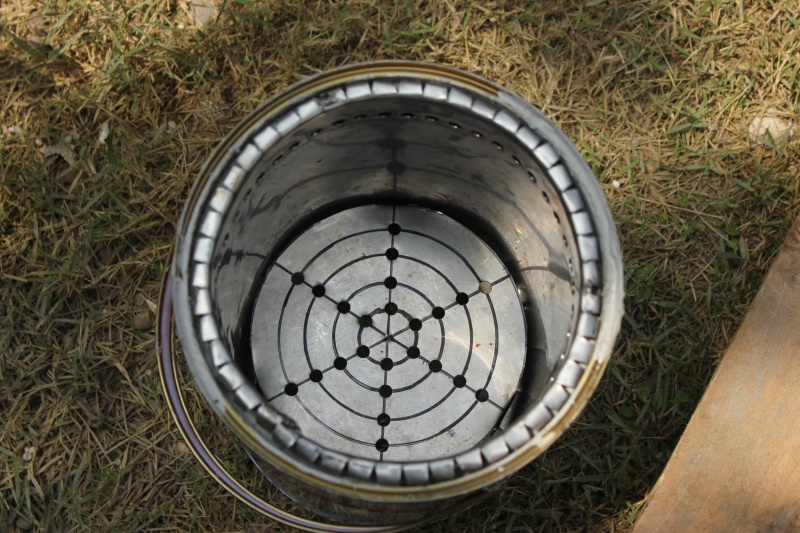
| − | |Step_Content=1 - | + | |Step_Content=1 - On the bottom of the box (2), mark the location of about fifteen holes distributed over the entire surface. |
| − | + | In the upper part of the box (2), mark the location of about ten holes, evenly distributed around the can. | |
| − | 2 - | + | 2 - Then drill at the marked locations with a 7 mm drill bit (or with the hammer and nail). |
}} | }} | ||
| − | {{ | + | {{Tuto Step |
|Step_Picture_00=Support du plat.jpg | |Step_Picture_00=Support du plat.jpg | ||
| − | |Step_Title= | + | |Step_Title=Dish support |
| − | |Step_Content=1 - | + | |Step_Content=1 - Mark the location of about ten holes evenly distributed around the small can (3). |
| − | 2 - | + | 2 - Then drill at the marked locations with a 12mm drill bit (or with hammer and nail). |
| − | 3 - | + | 3 - Cut the bottom of the can. |
| − | 4 - NB : | + | 4 - NB: For ease of use, you can cut a large hole on the side of the small box (3): it will easily feed the wood fire! |
}} | }} | ||
| − | {{ | + | {{Tuto Step |
|Step_Picture_00=Montage.jpg | |Step_Picture_00=Montage.jpg | ||
| − | |Step_Title= | + | |Step_Title=Final assembly |
| − | |Step_Content=1 - | + | |Step_Content=1 - Insert the box (2) into the large box (1) as shown in the diagram. |
| − | 2 - | + | 2 - Place the box (3) on the other two flush-mounted boxes. |
| − | + | Your pyrolysis stove is ready! | |
}} | }} | ||
| − | {{ | + | {{Tuto Step |
|Step_Picture_00=Cuiseur_micro_gazéificateur_Utilisation.jpg | |Step_Picture_00=Cuiseur_micro_gazéificateur_Utilisation.jpg | ||
| − | |Step_Title= | + | |Step_Title=Use |
| − | |Step_Content= | + | |Step_Content=Even though this type of cooker is cleaner than the "three stone" cookers, it still emits smoke. This is why it must be used in a highly ventilated environment. |
| − | + | The stove works with wood pellets or biomass chips. | |
| − | + | To light the stove, fill the stove and light in the upper part. | |
| − | + | To turn off the stove, simply wait until all the wood is consumed and the enclosure has cooled. | |
| − | '''ATTENTION : | + | '''ATTENTION: THE COMBUSTION TEMPERATURE OF WOOD AND GASES IS AROUND 1200°C. THE STOVE IS TO BE USED WITH GREAT CARE: DO NOT TRY TO MOVE THE STOVE WHEN IT IS ON''' |
}} | }} | ||
| − | {{ | + | {{Tuto Step |
| − | |Step_Title= | + | |Step_Title=Remarks |
| − | |Step_Content= | + | |Step_Content=The system presented here is very simplified and therefore does not allow to manage for example the size of the flame. |
| − | + | Due to the materials used, the life of the stove is rather limited. | |
| − | + | Improved versions of this system are being tested/validated in different urban contexts, due to the efforts of Paul Anderson, a micro gasifier specialist. | |
| − | + | Implementation trials have taken place in India without much success: It is actually complicated to find pellets or biomass chips in these contexts, the price of the optimized micro-gasifier is close to the cost of gas cooking, without having all the advantages. | |
}} | }} | ||
| − | {{ | + | {{Tuto Step |
|Step_Picture_00=Cuiseur_micro_gaz_ificateur_IMG_6375.JPG | |Step_Picture_00=Cuiseur_micro_gaz_ificateur_IMG_6375.JPG | ||
|Step_Picture_01=Cuiseur_micro_gaz_ificateur_IMG_6365.JPG | |Step_Picture_01=Cuiseur_micro_gaz_ificateur_IMG_6365.JPG | ||
| Ligne 129 : | Ligne 129 : | ||
|Step_Picture_03=Cuiseur_micro_gaz_ificateur_IMG_6368.JPG | |Step_Picture_03=Cuiseur_micro_gaz_ificateur_IMG_6368.JPG | ||
|Step_Picture_04=Cuiseur_micro_gaz_ificateur_IMG_6376.JPG | |Step_Picture_04=Cuiseur_micro_gaz_ificateur_IMG_6376.JPG | ||
| − | |Step_Title= | + | |Step_Title=Making a larger stove |
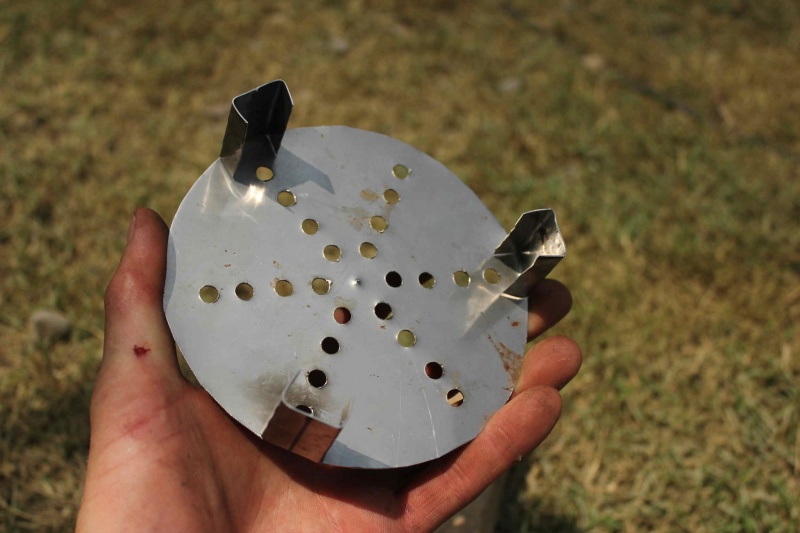
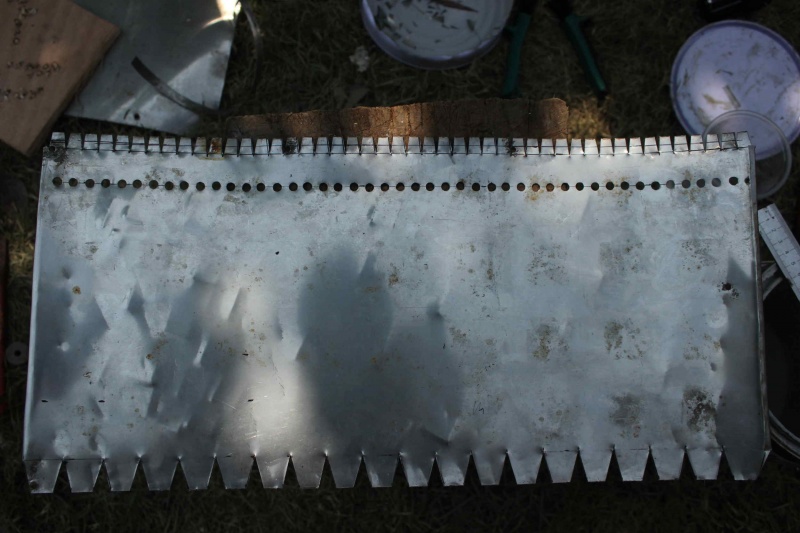
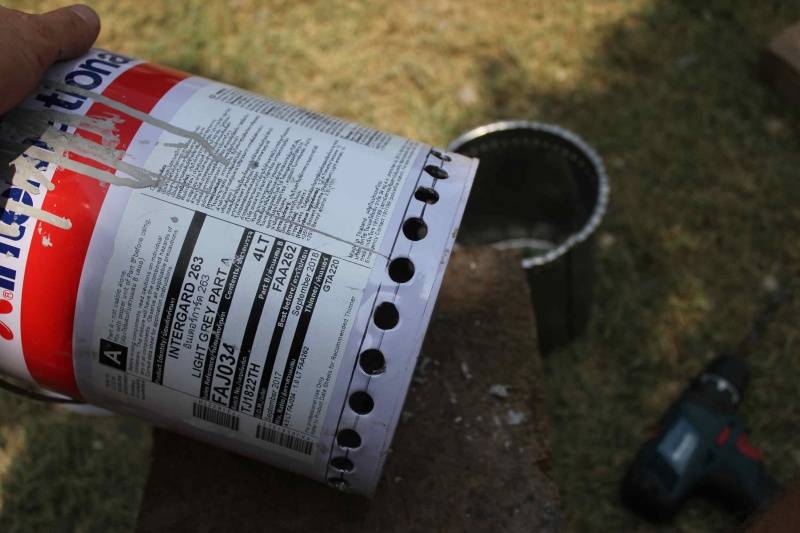
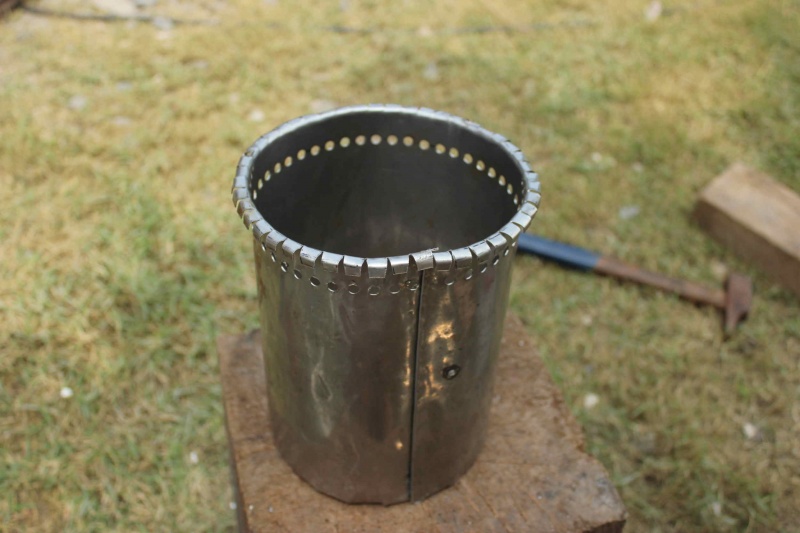
| − | |Step_Content= | + | |Step_Content=In order to adapt to any container or can available used as an external enclosure, it is possible to make the combustion chamber from a sheet, preferably stainless steel. Its thickness must be 1mm maximum for a slitting shear cut. It will be necessary to cut tabs and drill holes in the sheet metal flat before rolling it and closing it with staples. Using stainless steel will extend the life of the stove. |
| − | + | The pictures on the right show the manufacture of a stove from a paint can and a 1mm thick stainless steel sheet. The sheet is machined flat before being rolled and stapled (stapling consists in folding the two edges of one sheet in opposite directions about 5 mm, before hammering them one into the other to lock the whole). Wear gloves to avoid cuts! | |
}} | }} | ||
| − | {{ | + | {{Notes |
| − | |Notes= | + | |Notes=Download the tutorial[http://lowtechlab.org/wp-content/uploads/2016/09/LE-LAB-Micro-Gazeificateur.pdf here] |
| − | + | Comparative report of the different types of cookers by Planète Bois (in French): http://www.planetebois.org/glossaire/cuiseur-domestique-econome-cde/ | |
| − | + | Website of Doctor Paul Anderson, specialist of micro-gasifiers: http://www.drtlud.com/ | |
| − | + | Feel free to comment, share, and enhance the tutorial information useful for its improvement. | |
| − | + | The Low-Tech Lab team also invites you to consult its Biblilowtech. | |
}} | }} | ||
| − | {{ | + | {{Tuto Status |
|Complete=Yes | |Complete=Yes | ||
}} | }} | ||
Version du 22 octobre 2019 à 16:04
Description
Build an economical and transportable wood cooking system.
Sommaire
Introduction
One of the major energy and health issues of our time concerns cooking. In many developing countries, the most widely used technology is the three classic stone fireplace. It offers catastrophic yields (10 to 15% thermal efficiency sheltered from the wind, 5% without wind shelter) and releases a lot of toxic fumes into homes. Two concerns arise from this:
- The energy yields are so bad that a large amount of wood is needed to prepare a meal. This causes massive deforestation in certain areas of the world;
- It poses obvious health problems: the smoke released causes respiratory problems in the population and degrades the comfort of living inside homes ;
Some technologies use the same biomass but with higher yields. Here is one :
The micro gasifier is a low-tech and very economical cooking technology. It offers higher yields than a conventional three-stone fireplace (around 35% thermal efficiency) when well manufactured, and even better in its optimized industrial version (thermal efficiency of around 45%).
It is possible to manufacture very simple but not optimized models, with tin cans. It will be useful for example for heating water, cooking small amounts of food and for demonstration/pedagogy.
More complex models exist, more expensive but allowing to manage the power of the flame with an improved duration.
Matériaux
- A large and tall can (1): this will be the outer chamber;
- A can slightly narrower and slightly lower (2): this will be the combustion chamber;
- A can of the same diameter as the combustion chamber (3): this will be the support for the pan.
Outils
- A marker
- Cutting pliers
For drilling, two possibilities:
- One drill with two drill bits: 11 mm and 7 mm
- A hammer and a big nail (or a punch)
- A wooden block whose section can fit into the tin can
Étape 1 - How it works
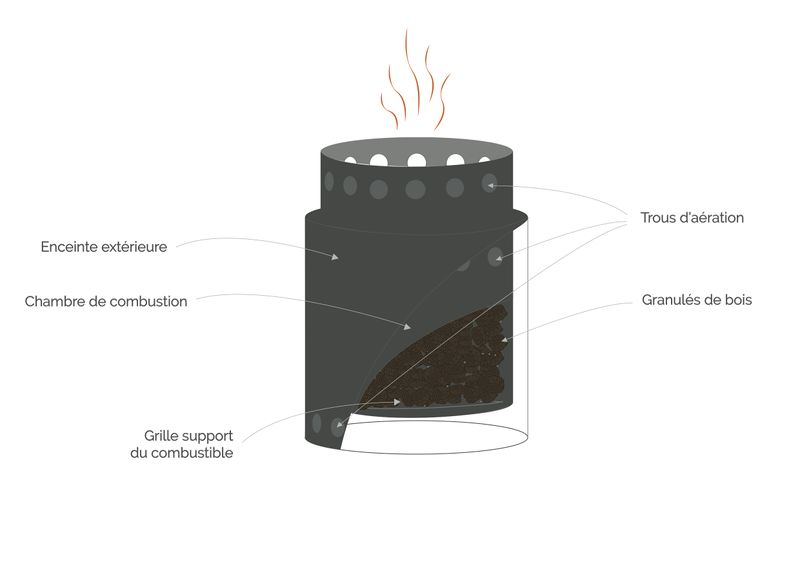
It is based on the principle of gasification: The wood is heated in a low oxygen atmosphere, which will allow the release of flammable gases called "Syngas", which will then be burned in the upper part of the stove.
The micro gasifier lights up from above. The primary air introduced in the lower part passes through the mass of the fuel and makes it possible to maintain a pyrolysis bed which goes down as the combustible gases are released. The secondary air is injected in the upper part to provide oxygen necessary for the combustion of the gases that are released upwards.
Better results are obtained in forced convection with the use of an integrated fan under the fuel support grid, but this induces a reliable supply of electricity.
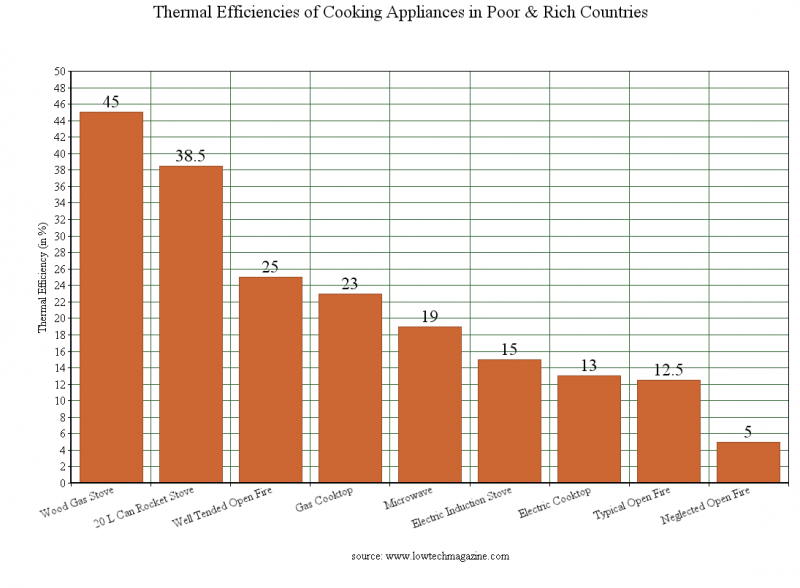
The combustion temperature is around 800°C, and the thermal yields range from 30 to 45%, depending on the quality of manufacture of the system and its insulation.
It is light, compact, reliable, uses little fuel and generates, at best, reusable coal for other applications. It is thus a very low-tech system and very powerful compared to the traditional systems used in the world.
For comparison, the graph opposite shows the energy performance of different systems. The micro gasifier is called here "wood gas stove".
Étape 2 - External chamber
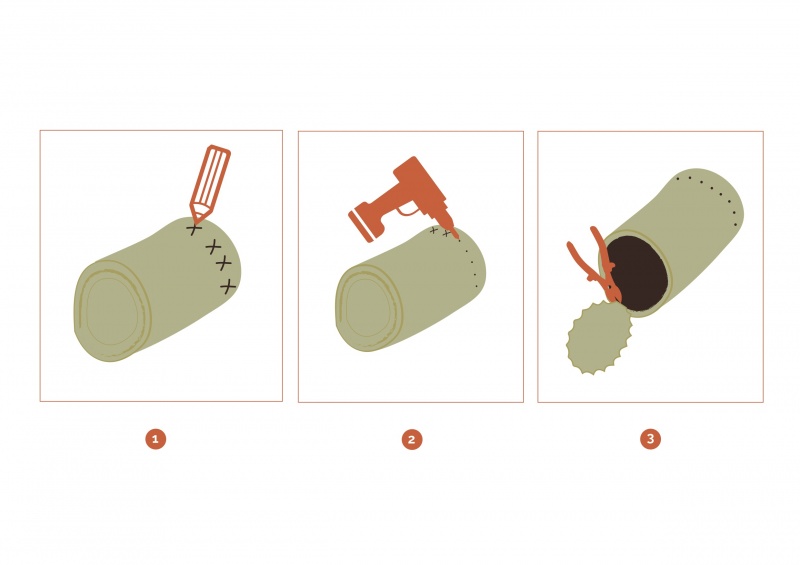
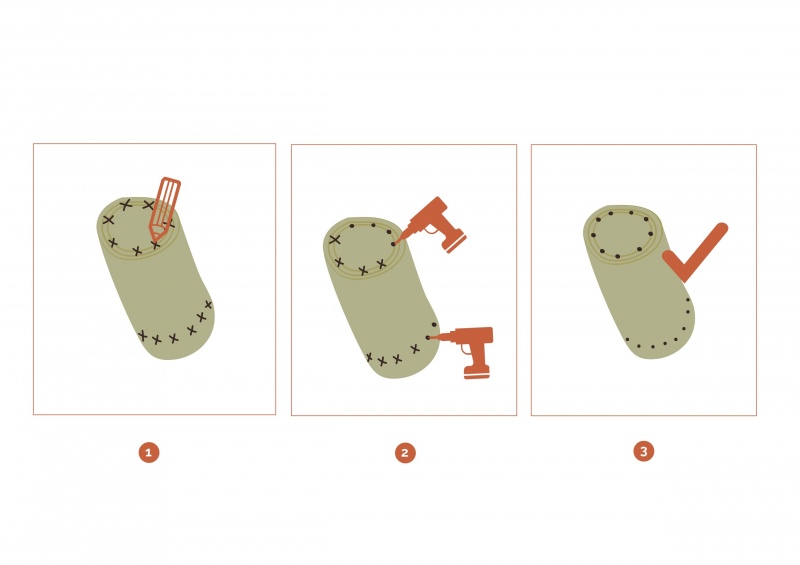
1 - En partie haute de la grande boite de conserve (1), marquez l'emplacement d'une dizaine de trou, répartis équitablement tout autour de la boite.
2 - Then drill at the marked locations with a 12mm drill bit (or with hammer and nail). (For a cleaner result it is recommended to pre-drill with the 7 mm drill bit before attacking with the 12 mm drill bit).
Note: For ease and cleanliness, it is possible to clamp the wooden wedge on a vice and use it as a support to make the holes in the box.
3 - Cut the bottom of the large tin can (1). The hole must have a slightly smaller diameter than the small tin can (so that it can be embedded in it).
Étape 3 - Combustion chamber
1 - On the bottom of the box (2), mark the location of about fifteen holes distributed over the entire surface. In the upper part of the box (2), mark the location of about ten holes, evenly distributed around the can.
2 - Then drill at the marked locations with a 7 mm drill bit (or with the hammer and nail).
Étape 4 - Dish support
1 - Mark the location of about ten holes evenly distributed around the small can (3).
2 - Then drill at the marked locations with a 12mm drill bit (or with hammer and nail).
3 - Cut the bottom of the can.
4 - NB: For ease of use, you can cut a large hole on the side of the small box (3): it will easily feed the wood fire!
Étape 5 - Final assembly
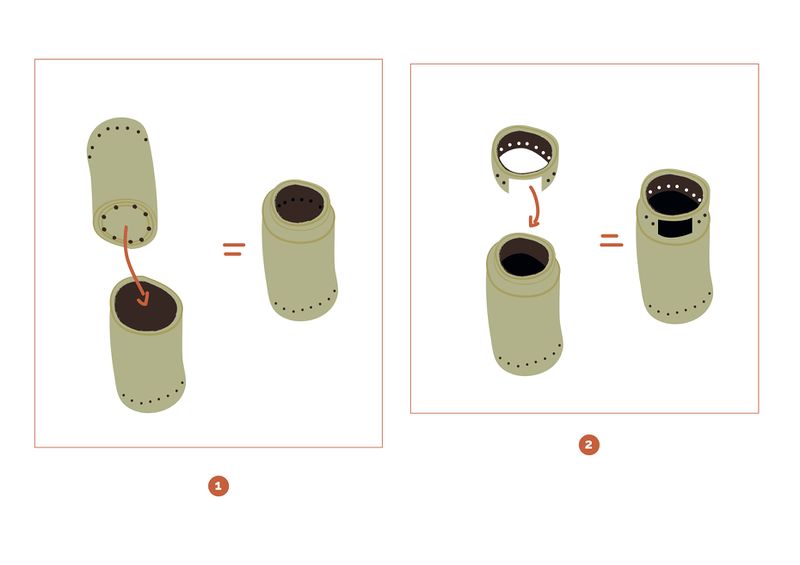
1 - Insert the box (2) into the large box (1) as shown in the diagram.
2 - Place the box (3) on the other two flush-mounted boxes.
Your pyrolysis stove is ready!
Étape 6 - Use
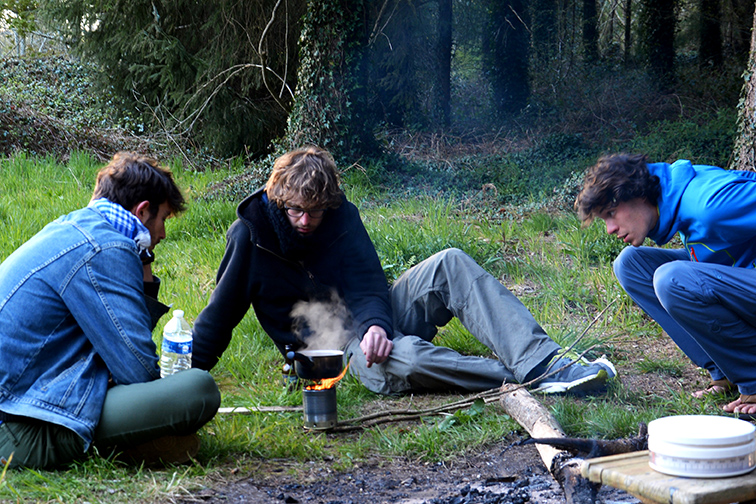
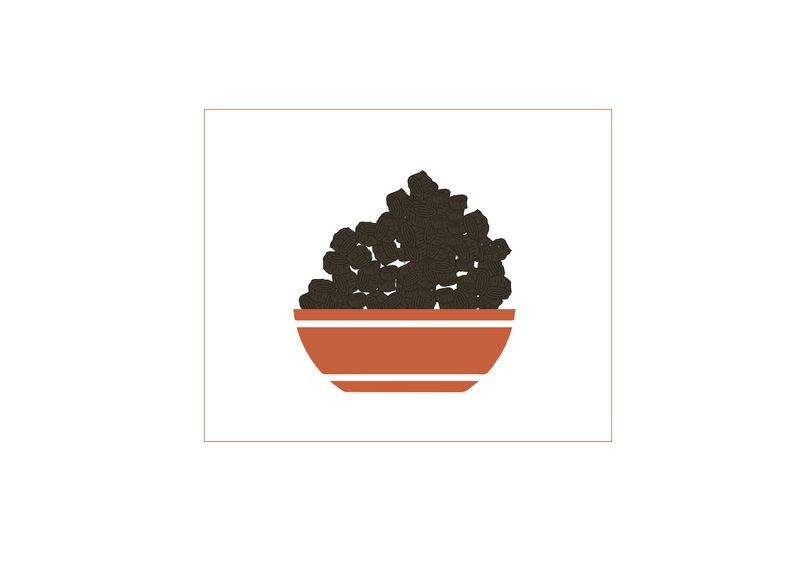
Even though this type of cooker is cleaner than the "three stone" cookers, it still emits smoke. This is why it must be used in a highly ventilated environment.
The stove works with wood pellets or biomass chips. To light the stove, fill the stove and light in the upper part.
To turn off the stove, simply wait until all the wood is consumed and the enclosure has cooled.
ATTENTION: THE COMBUSTION TEMPERATURE OF WOOD AND GASES IS AROUND 1200°C. THE STOVE IS TO BE USED WITH GREAT CARE: DO NOT TRY TO MOVE THE STOVE WHEN IT IS ON
Étape 7 - Remarks
The system presented here is very simplified and therefore does not allow to manage for example the size of the flame.
Due to the materials used, the life of the stove is rather limited.
Improved versions of this system are being tested/validated in different urban contexts, due to the efforts of Paul Anderson, a micro gasifier specialist.
Implementation trials have taken place in India without much success: It is actually complicated to find pellets or biomass chips in these contexts, the price of the optimized micro-gasifier is close to the cost of gas cooking, without having all the advantages.
Étape 8 - Making a larger stove
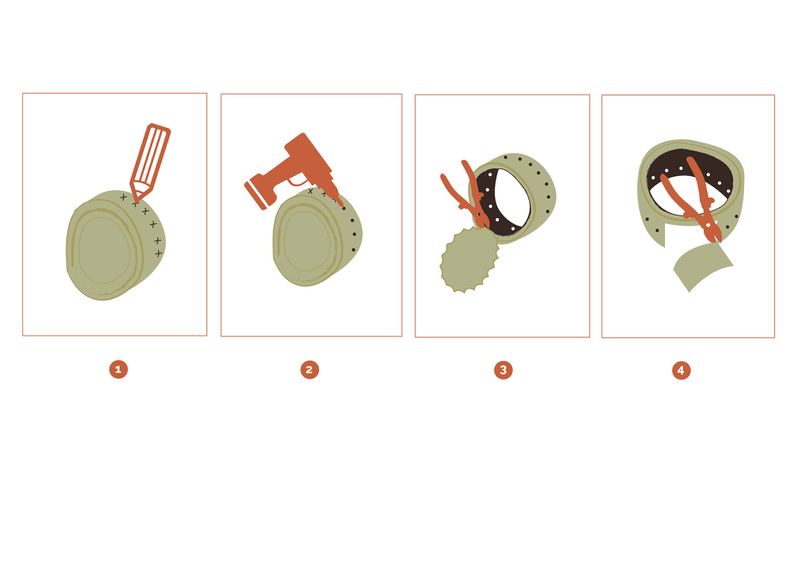
In order to adapt to any container or can available used as an external enclosure, it is possible to make the combustion chamber from a sheet, preferably stainless steel. Its thickness must be 1mm maximum for a slitting shear cut. It will be necessary to cut tabs and drill holes in the sheet metal flat before rolling it and closing it with staples. Using stainless steel will extend the life of the stove. The pictures on the right show the manufacture of a stove from a paint can and a 1mm thick stainless steel sheet. The sheet is machined flat before being rolled and stapled (stapling consists in folding the two edges of one sheet in opposite directions about 5 mm, before hammering them one into the other to lock the whole). Wear gloves to avoid cuts!
Notes et références
Download the tutorialhere
Comparative report of the different types of cookers by Planète Bois (in French): http://www.planetebois.org/glossaire/cuiseur-domestique-econome-cde/
Website of Doctor Paul Anderson, specialist of micro-gasifiers: http://www.drtlud.com/
Feel free to comment, share, and enhance the tutorial information useful for its improvement.
The Low-Tech Lab team also invites you to consult its Biblilowtech.
Yes
 Français
 English
 Deutsch
 Español
 Italiano
 Português