(Page créée avec « Our system has no pumping system. The water circulation is only done thanks to a thermodynamic phenomenon called '''[https://en.wikipedia.org/wiki/Thermosiphon thermosipho... ») |
|||
| (38 révisions intermédiaires par 2 utilisateurs non affichées) | |||
| Ligne 11 : | Ligne 11 : | ||
|Cost=20 | |Cost=20 | ||
|Currency=EUR (€) | |Currency=EUR (€) | ||
| − | |Tags=chauffe-eau, eau chaude, panneau solaire thermique, solar water heater, cellule solaire thermique, NomadeDesMers, | + | |Tags=chauffe-eau, eau chaude, panneau solaire thermique, solar water heater, cellule solaire thermique, NomadeDesMers, récupération, thermosiphon |
}} | }} | ||
{{Introduction | {{Introduction | ||
| − | |Introduction= | + | |Introduction=Domestic hot water, which is used for household and toilet needs, represents a significant consumption. |
| − | This allows the heat from the sun to be collected and used to heat the water that is stored in a hot water tank. | + | * In (drinking) water: the volume of water consumed is strongly influenced by the behaviour of the users. According to [http://www.new-learn.info/packages/tareb/docs/ecb/ecb_ch5_fr.pdf the magazine Plein soleil / C.N.R.S-EcoDev], in France, a standard type 4 dwelling (three bedrooms) uses 100 to 150 litres of hot water (at 60 [°C]) per day. However, there is a constant increase in the need for water, especially hot water, in the order of 3 to 4% per year (Gaz de France survey). |
| + | *In energy: the heating of domestic water accounts for nearly 20% of final energy consumption in the residential sector (according to the Observatoire de l'énergie). | ||
| + | |||
| + | Turning solar energy into heat is simple and efficient. A thermal solar panel has an efficiency 3 to 4 times higher than a photovoltaic panel. However, electricity and fossil fuels are mostly used to heat water. | ||
| + | |||
| + | Solar water heating systems use solar panels, called collectors. This allows the heat from the sun to be collected and used to heat the water that is stored in a hot water tank. | ||
There are two types of solar panels for water heating: | There are two types of solar panels for water heating: | ||
| Ligne 25 : | Ligne 30 : | ||
Vacuum collectors are known to be more efficient because they suffer less leakage (thanks to the air vacuum in the tubes) than flat collectors. They are nevertheless more complicated to realize in low-tech. | Vacuum collectors are known to be more efficient because they suffer less leakage (thanks to the air vacuum in the tubes) than flat collectors. They are nevertheless more complicated to realize in low-tech. | ||
| − | We decided to test a plane-type sensor operating as a thermosiphon, i.e. without pumping system. | + | We decided to test a plane-type sensor operating as a thermosiphon, i.e. without pumping system. n addition, we chose to heat the water directly, without using a heat transfer fluid that would transfer its calories to the water in the tank. |
| + | }} | ||
| + | {{Materials | ||
| + | |Material= | ||
| + | |Tools= | ||
}} | }} | ||
| − | |||
{{Tuto Step | {{Tuto Step | ||
|Step_Title=Thermosyphon Theory | |Step_Title=Thermosyphon Theory | ||
|Step_Content=Our system has no pumping system. The water circulation is only done thanks to a thermodynamic phenomenon called '''[https://en.wikipedia.org/wiki/Thermosiphon thermosiphon]'''. | |Step_Content=Our system has no pumping system. The water circulation is only done thanks to a thermodynamic phenomenon called '''[https://en.wikipedia.org/wiki/Thermosiphon thermosiphon]'''. | ||
| − | + | The principle of the thermosiphon system is that cold water has a higher density than hot water because it is more compact. It is therefore heavier and sinking. However, all systems tend towards a state of thermodynamic equilibrium. There is a movement called [https://en.wikipedia.org/wiki/Convective_heat_transfer thermal convection] to mix hot and cold water. | |
| − | + | For this reason, the solar collector is always mounted underneath the water storage tank, so that the cold water from the tank reaches the collector via a downhill water pipe. When the water in the collector heats up, the hot water rises naturally, pushed up by the cold water and returns to the tank. The cycle tank -> water pipe -> collector heats the water until it reaches an equilibrium temperature. The consumer can then use the hot water from the top of the tank. | |
<br /> | <br /> | ||
|Step_Picture_00=Chauffe-eau_solaire___thermosyphon_thermosiphon.JPG | |Step_Picture_00=Chauffe-eau_solaire___thermosyphon_thermosiphon.JPG | ||
| + | |Step_Picture_01=Chauffe-eau_solaire___thermosiphon_Sch_ma_chauffe_eau_solaire.JPG | ||
}} | }} | ||
{{Tuto Step | {{Tuto Step | ||
| − | |Step_Title= | + | |Step_Title=Frame construction |
| − | |Step_Content= | + | |Step_Content=The measurements are given for information only. They have to be adapted according to the size of your window. |
| − | * | + | * On the 85x85cm plywood plate, screw two 85cm cleats and two 72cm wooden strips to form a frame. Choose strips about 6 cm thick to have a little depth. |
| − | * | + | * Check that your glass fits into the frame. |
| − | * | + | * Add holds inside the frame so that you can rest the glass on it. |
| − | * | + | * Drill two 6mm diameter holes on one side of the frame. These will be used to lead the copper pipes outwards. |
|Step_Picture_00=Chauffe-eau_solaire___thermosyphon_IMG_5184.jpg | |Step_Picture_00=Chauffe-eau_solaire___thermosyphon_IMG_5184.jpg | ||
|Step_Picture_01=Chauffe-eau_solaire___thermosyphon_IMG_5193.jpg | |Step_Picture_01=Chauffe-eau_solaire___thermosyphon_IMG_5193.jpg | ||
| Ligne 55 : | Ligne 64 : | ||
{{Tuto Step | {{Tuto Step | ||
|Step_Title=Isolation | |Step_Title=Isolation | ||
| − | |Step_Content= | + | |Step_Content='''In order to retain maximum heat inside the water heater, it is important that the frame is insulated as much as possible. ''' This is not the case for this prototype. |
| + | |||
| + | Air leakage and thermal bridges must be avoided. We have therefore insulated the bottom of the frame. | ||
| − | + | - Cut cardboard (or other insulation) to fit the bottom of the frame perfectly. | |
| − | + | - Cover the cardboard with 2 layers of aluminium foil. The purpose of this is to distribute the heat evenly over the surface in contact with the copper tube. | |
|Step_Picture_00=Chauffe-eau_solaire___thermosyphon_IMG_5209.jpg | |Step_Picture_00=Chauffe-eau_solaire___thermosyphon_IMG_5209.jpg | ||
}} | }} | ||
{{Tuto Step | {{Tuto Step | ||
| − | |Step_Title= | + | |Step_Title=Water circuit |
| − | |Step_Content= | + | |Step_Content=In this system, there is no heat exchanger as in a conventional hot water tank. The water in the tank passes directly through the copper pipe and heats up on contact with it. We will therefore form a circuit in order to maximize the exchange surface between the pipe and the water. |
| − | * | + | * Using a bending tool, form a circuit with the copper pipe. |
| − | ''' | + | '''Note''': It is important to use a suitable tool to make a nice bend and not to make a bend in the pipe. At this diameter, the pipe tends to bend quickly and will eventually break. |
<br /> | <br /> | ||
| − | * | + | * Make sure to keep a good straight length at the ends and take them out through the 2 holes provided for this purpose in the frame. |
| − | * | + | * In order to maximize the exchange surface between the circuit and the bottom of the frame covered with aluminium foil, fix the circuit with screws and hooks (see photos). |
|Step_Picture_00=Chauffe-eau_solaire___thermosyphon_IMG_5217.jpg | |Step_Picture_00=Chauffe-eau_solaire___thermosyphon_IMG_5217.jpg | ||
|Step_Picture_01=Chauffe-eau_solaire___thermosyphon_IMG_5222.jpg | |Step_Picture_01=Chauffe-eau_solaire___thermosyphon_IMG_5222.jpg | ||
| Ligne 81 : | Ligne 92 : | ||
}} | }} | ||
{{Tuto Step | {{Tuto Step | ||
| − | |Step_Title= | + | |Step_Title=Glass pose |
| − | |Step_Content=* | + | |Step_Content=* Place the glass on the frame holds. Make sure that it is tightly fitted and sealed. If necessary, fill the gaps with cardboard, fabric or silicone for insulation. |
| − | * | + | * To fix the glass to the frame, screw strips on the edges. |
|Step_Picture_00=Chauffe-eau_solaire___thermosyphon_IMG_5211.jpg | |Step_Picture_00=Chauffe-eau_solaire___thermosyphon_IMG_5211.jpg | ||
|Step_Picture_01=Chauffe-eau_solaire___thermosyphon_IMG_5213.jpg | |Step_Picture_01=Chauffe-eau_solaire___thermosyphon_IMG_5213.jpg | ||
| Ligne 89 : | Ligne 100 : | ||
}} | }} | ||
{{Tuto Step | {{Tuto Step | ||
| − | |Step_Title= | + | |Step_Title=Connection to the water tank |
| − | |Step_Content= | + | |Step_Content=For the water tank, we have chosen a 30L waste bin with a lid. Ideally, the tank should be insulated to conserve heat. |
| − | * | + | * Cut the copper pipes coming out of the frame leaving 2-3cm. |
| − | * | + | * Attach a silicone or latex tube to each of the outlets using hose clamps. Make sure that the connection is airtight by blowing into the silicone/latex tubes when the circuit is filled with water, for example. |
| − | ''' | + | '''Note''': Be careful not to over-tighten the hose clamps which will eventually tear the silicone/latex hoses. |
<br /> | <br /> | ||
| − | * | + | * Dip both hoses into the tank. |
|Step_Picture_00=Chauffe-eau_solaire___thermosyphon_IMG_5216.jpg | |Step_Picture_00=Chauffe-eau_solaire___thermosyphon_IMG_5216.jpg | ||
|Step_Picture_01=Chauffe-eau_solaire___thermosyphon_IMG_5162.jpg | |Step_Picture_01=Chauffe-eau_solaire___thermosyphon_IMG_5162.jpg | ||
}} | }} | ||
{{Tuto Step | {{Tuto Step | ||
| − | |Step_Title= | + | |Step_Title=How it works |
|Step_Content= | |Step_Content= | ||
}} | }} | ||
{{Notes | {{Notes | ||
| − | |Notes= | + | |Notes=*Hot water and solar heating R.Espic, J.P.Isoardi, M.Moreau Sedit |
| + | *[http://www.onebus.fr/Face/ecs_solaire.pdf Very complete theoretical document (in French)] regarding sanitary hot water and thermal solar water heater, by Thierry Cabriol, Albert Pelissou et Daniel Roux | ||
| + | *[https://www.new-learn.info/packages/tareb/docs/ecb/ecb_ch5_en.pdf European TAREB project report] | ||
| + | * [https://lowtechlab.org/assets/files/rapport-experimentation-habitat-low-tech-low-tech-lab.pdf Low-tech Lab's Sustainable Habitat Project Report] | ||
}} | }} | ||
{{PageLang | {{PageLang | ||
Version actuelle datée du 8 juin 2023 à 16:22
Introduction
Domestic hot water, which is used for household and toilet needs, represents a significant consumption.
- In (drinking) water: the volume of water consumed is strongly influenced by the behaviour of the users. According to the magazine Plein soleil / C.N.R.S-EcoDev, in France, a standard type 4 dwelling (three bedrooms) uses 100 to 150 litres of hot water (at 60 [°C]) per day. However, there is a constant increase in the need for water, especially hot water, in the order of 3 to 4% per year (Gaz de France survey).
- In energy: the heating of domestic water accounts for nearly 20% of final energy consumption in the residential sector (according to the Observatoire de l'énergie).
Turning solar energy into heat is simple and efficient. A thermal solar panel has an efficiency 3 to 4 times higher than a photovoltaic panel. However, electricity and fossil fuels are mostly used to heat water.
Solar water heating systems use solar panels, called collectors. This allows the heat from the sun to be collected and used to heat the water that is stored in a hot water tank.
There are two types of solar panels for water heating:
- vacuum tubes;
- flat collectors, which can be mounted on a wall or a roof.
Vacuum collectors are known to be more efficient because they suffer less leakage (thanks to the air vacuum in the tubes) than flat collectors. They are nevertheless more complicated to realize in low-tech.
We decided to test a plane-type sensor operating as a thermosiphon, i.e. without pumping system. n addition, we chose to heat the water directly, without using a heat transfer fluid that would transfer its calories to the water in the tank.Étape 1 - Thermosyphon Theory
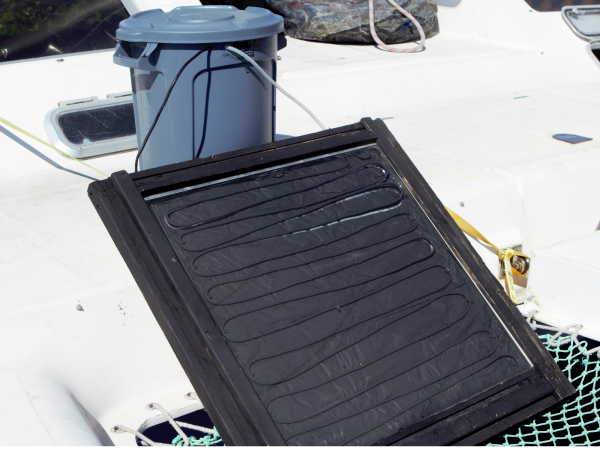
Our system has no pumping system. The water circulation is only done thanks to a thermodynamic phenomenon called thermosiphon.
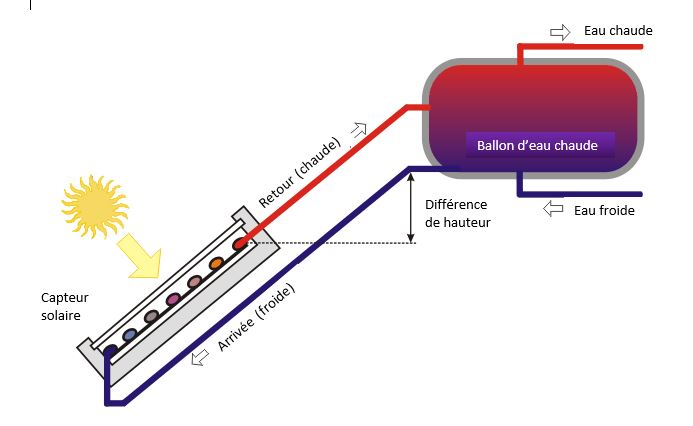
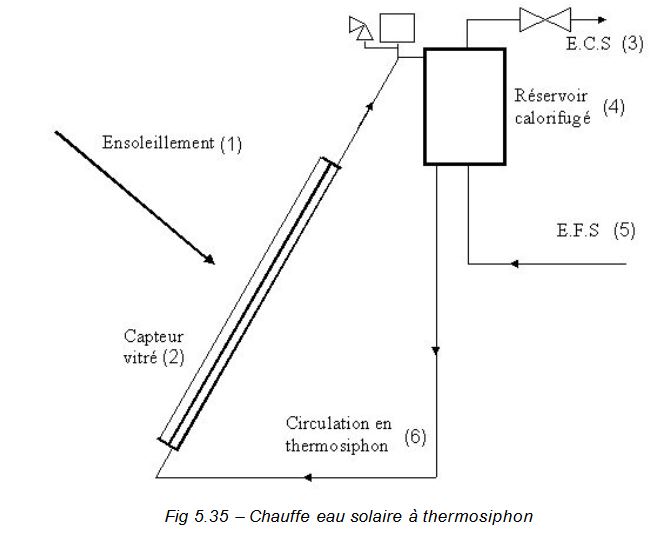
The principle of the thermosiphon system is that cold water has a higher density than hot water because it is more compact. It is therefore heavier and sinking. However, all systems tend towards a state of thermodynamic equilibrium. There is a movement called thermal convection to mix hot and cold water.
For this reason, the solar collector is always mounted underneath the water storage tank, so that the cold water from the tank reaches the collector via a downhill water pipe. When the water in the collector heats up, the hot water rises naturally, pushed up by the cold water and returns to the tank. The cycle tank -> water pipe -> collector heats the water until it reaches an equilibrium temperature. The consumer can then use the hot water from the top of the tank.
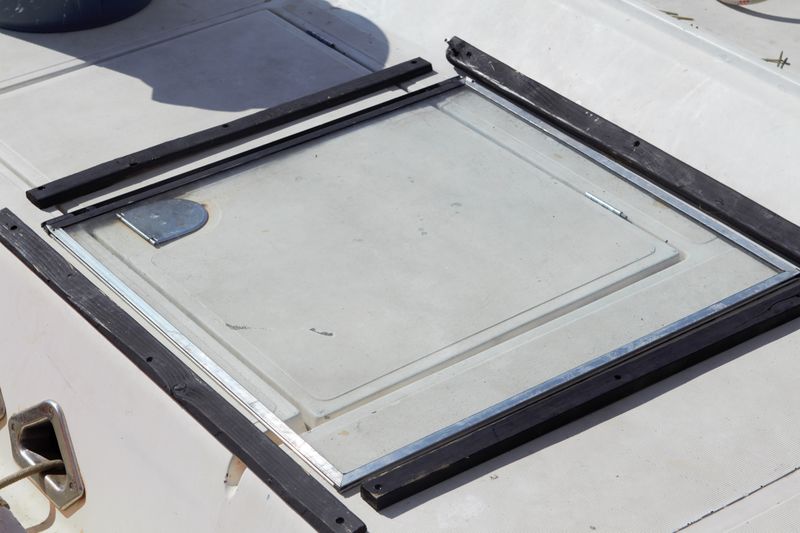
Étape 2 - Frame construction
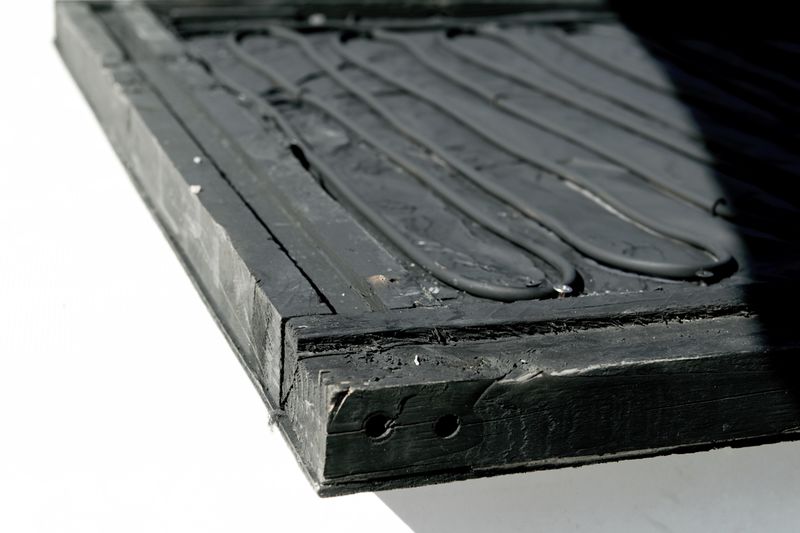
The measurements are given for information only. They have to be adapted according to the size of your window.
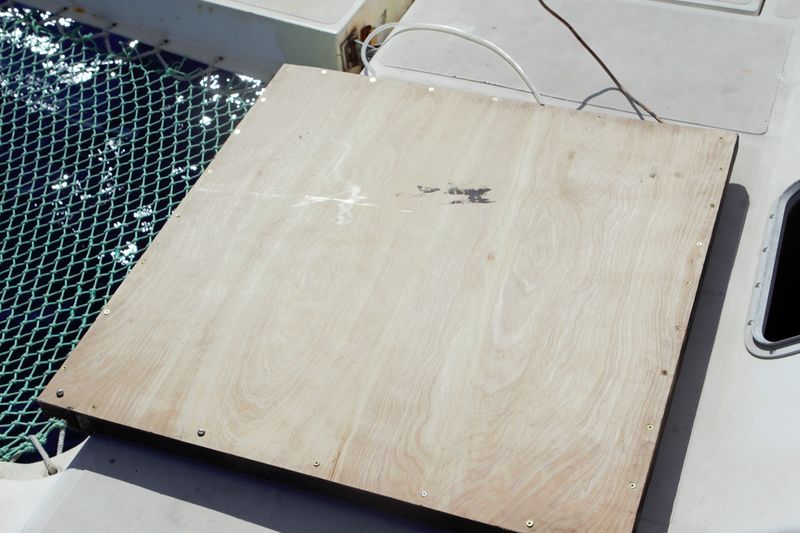
- On the 85x85cm plywood plate, screw two 85cm cleats and two 72cm wooden strips to form a frame. Choose strips about 6 cm thick to have a little depth.
- Check that your glass fits into the frame.
- Add holds inside the frame so that you can rest the glass on it.
- Drill two 6mm diameter holes on one side of the frame. These will be used to lead the copper pipes outwards.
Étape 3 - Isolation
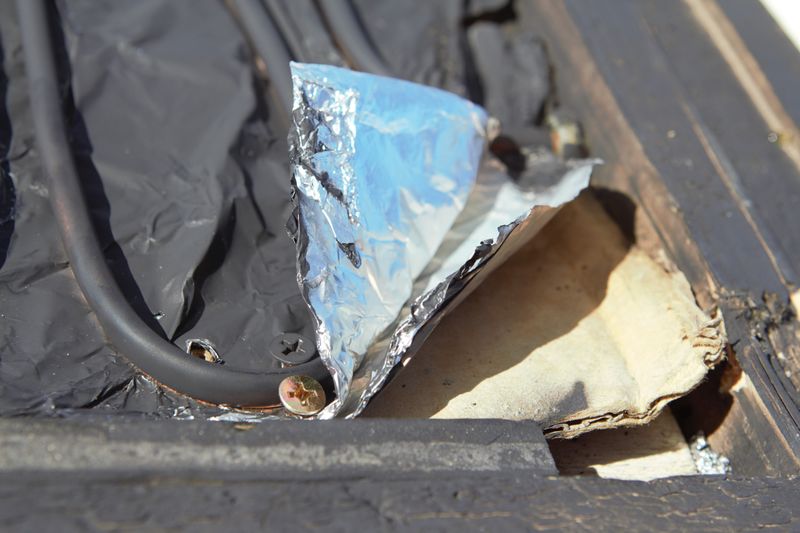
In order to retain maximum heat inside the water heater, it is important that the frame is insulated as much as possible. This is not the case for this prototype.
Air leakage and thermal bridges must be avoided. We have therefore insulated the bottom of the frame.
- Cut cardboard (or other insulation) to fit the bottom of the frame perfectly.
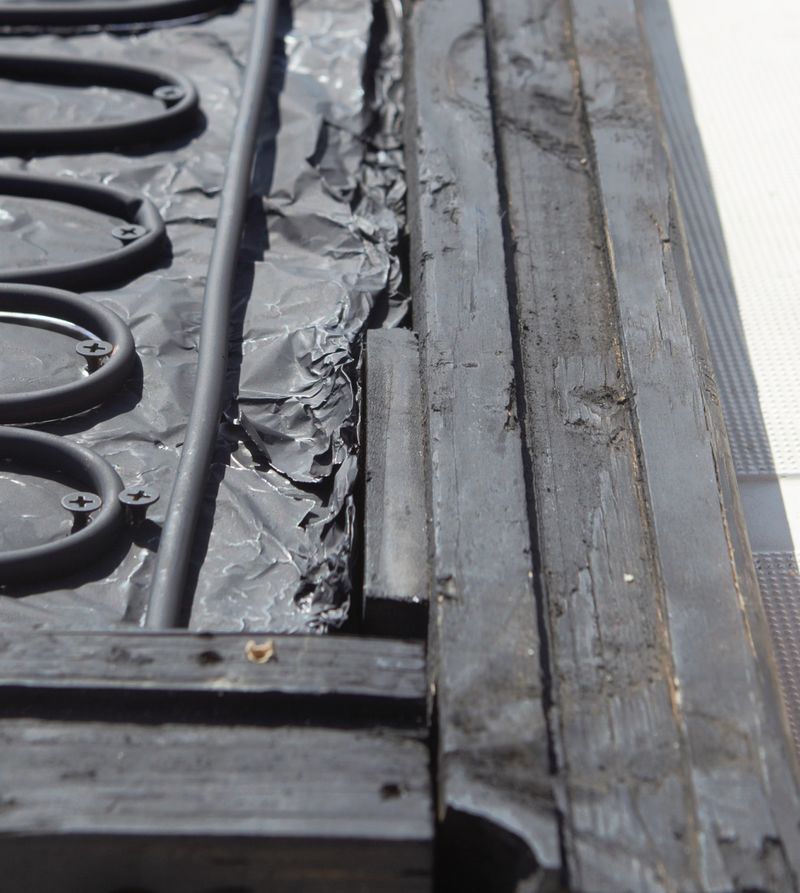
- Cover the cardboard with 2 layers of aluminium foil. The purpose of this is to distribute the heat evenly over the surface in contact with the copper tube.
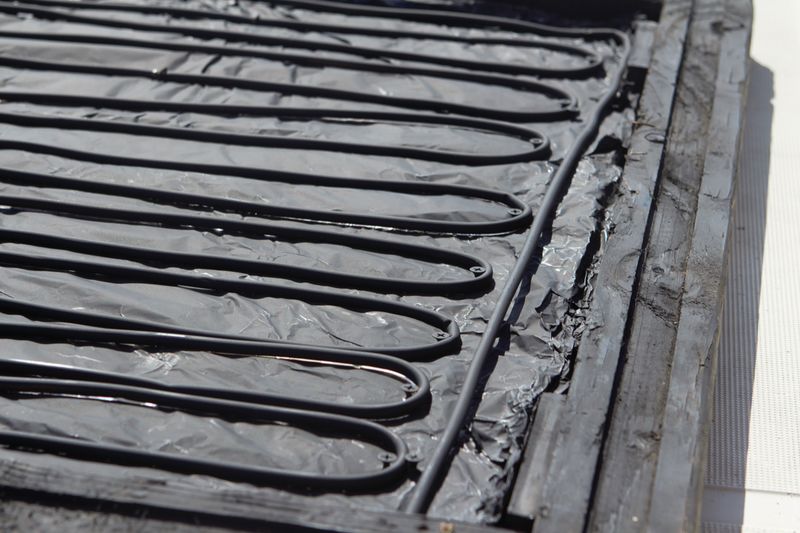
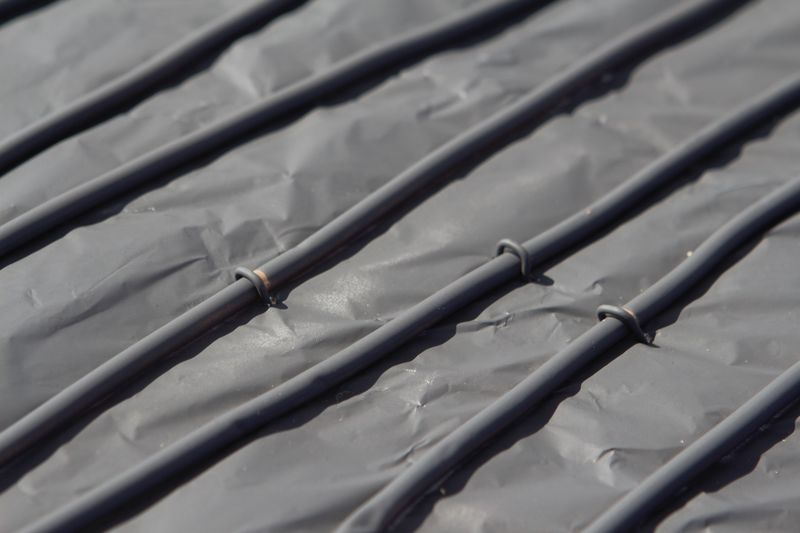
Étape 4 - Water circuit
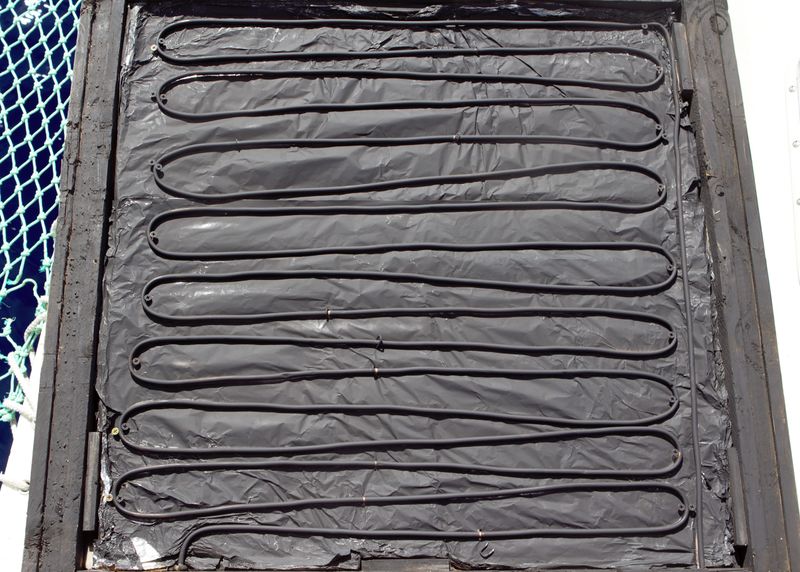
In this system, there is no heat exchanger as in a conventional hot water tank. The water in the tank passes directly through the copper pipe and heats up on contact with it. We will therefore form a circuit in order to maximize the exchange surface between the pipe and the water.
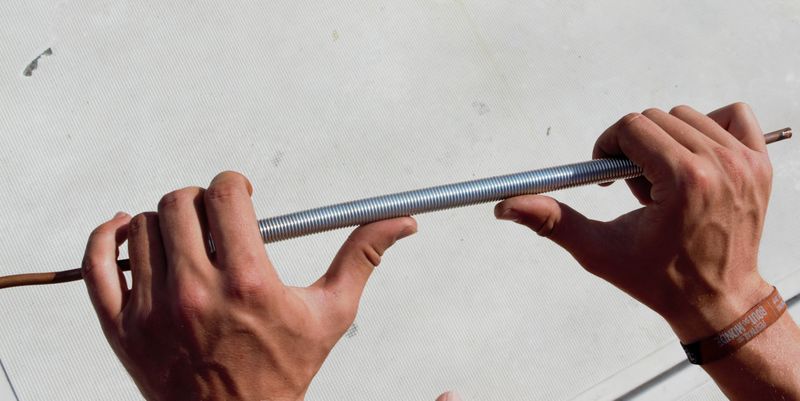
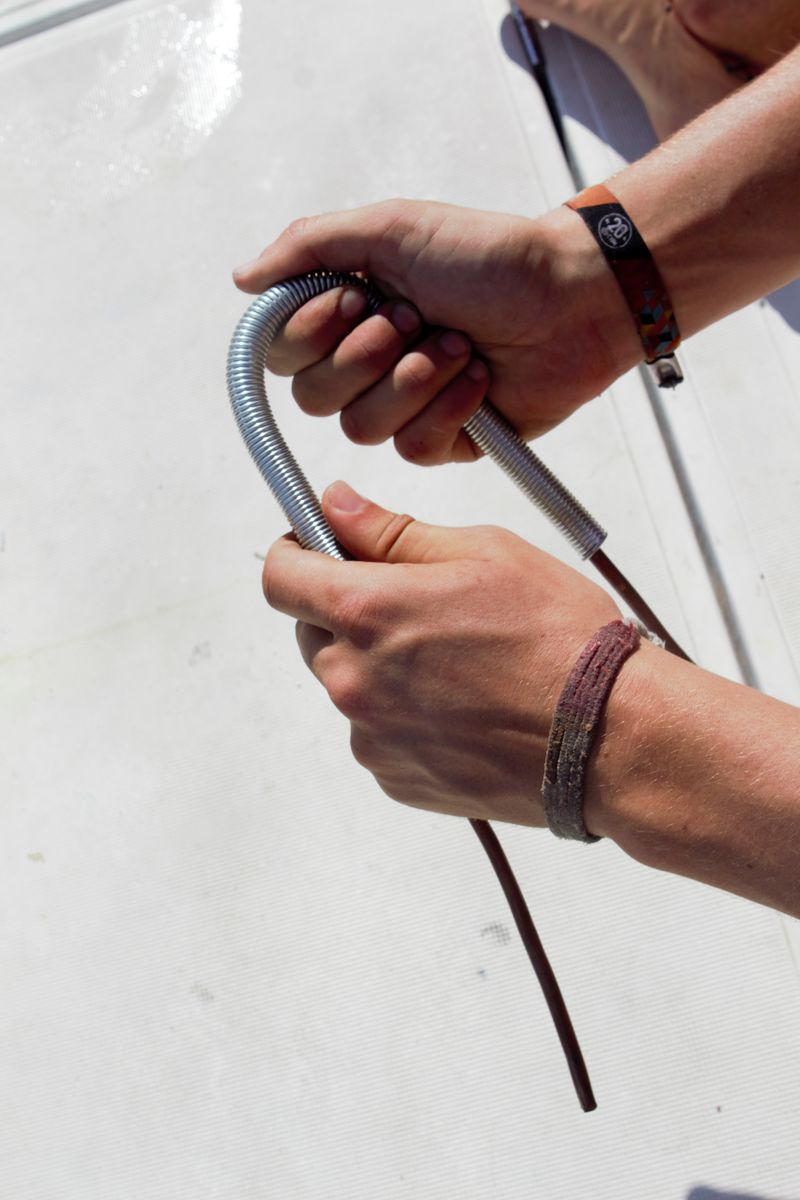
- Using a bending tool, form a circuit with the copper pipe.
Note: It is important to use a suitable tool to make a nice bend and not to make a bend in the pipe. At this diameter, the pipe tends to bend quickly and will eventually break.
- Make sure to keep a good straight length at the ends and take them out through the 2 holes provided for this purpose in the frame.
- In order to maximize the exchange surface between the circuit and the bottom of the frame covered with aluminium foil, fix the circuit with screws and hooks (see photos).
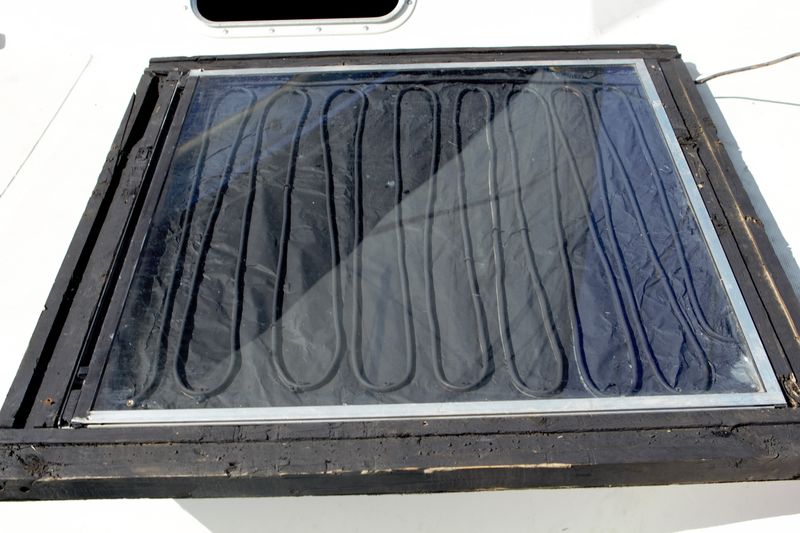
Étape 5 - Glass pose
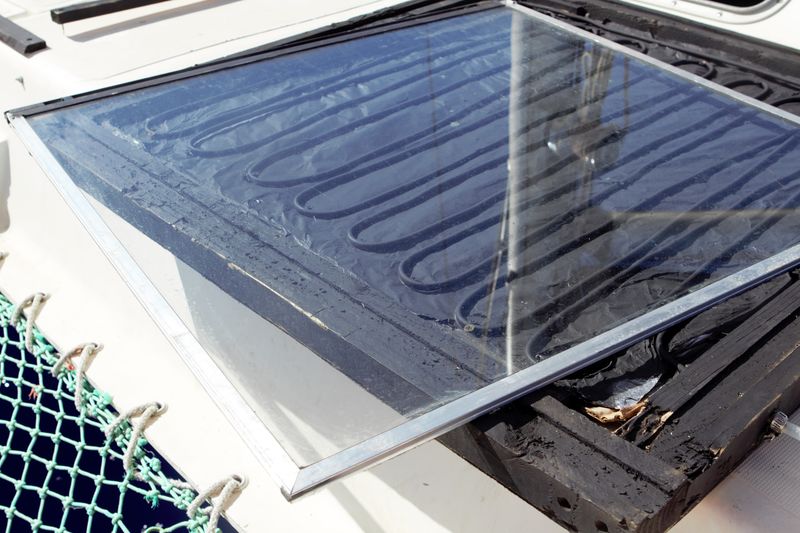
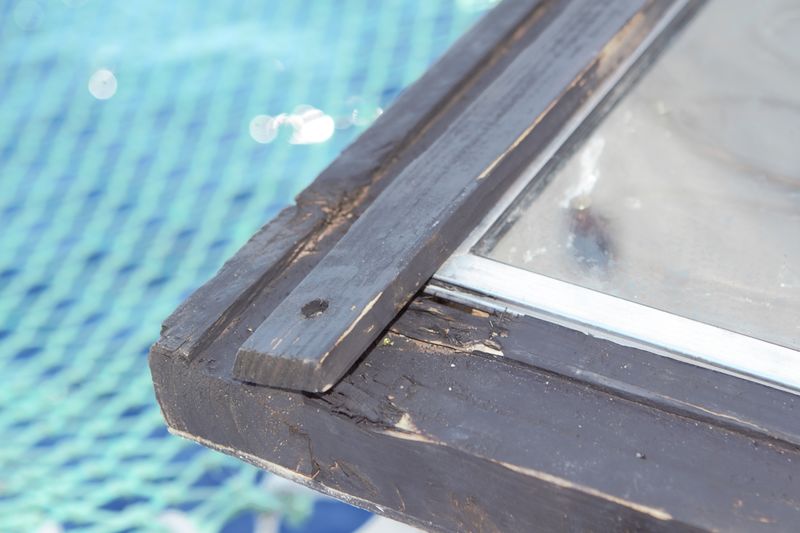
- Place the glass on the frame holds. Make sure that it is tightly fitted and sealed. If necessary, fill the gaps with cardboard, fabric or silicone for insulation.
- To fix the glass to the frame, screw strips on the edges.
Étape 6 - Connection to the water tank
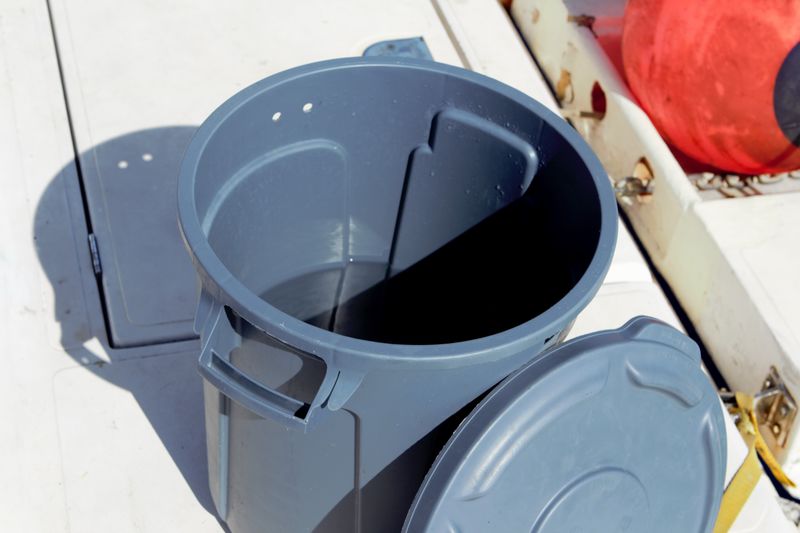
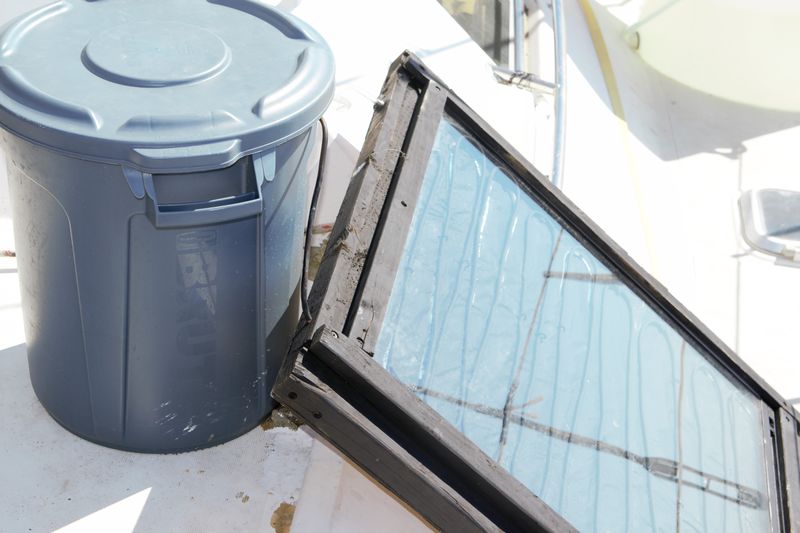
For the water tank, we have chosen a 30L waste bin with a lid. Ideally, the tank should be insulated to conserve heat.
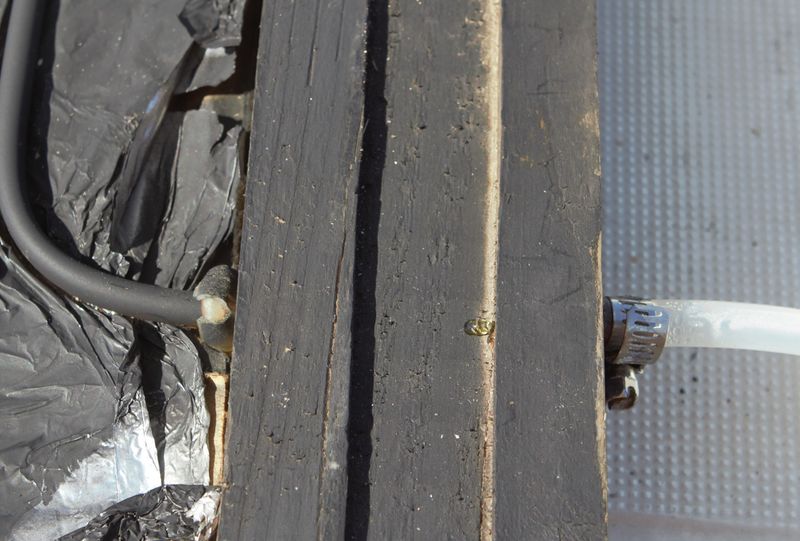
- Cut the copper pipes coming out of the frame leaving 2-3cm.
- Attach a silicone or latex tube to each of the outlets using hose clamps. Make sure that the connection is airtight by blowing into the silicone/latex tubes when the circuit is filled with water, for example.
Note: Be careful not to over-tighten the hose clamps which will eventually tear the silicone/latex hoses.
- Dip both hoses into the tank.
Étape 7 - How it works
Notes et références
- Hot water and solar heating R.Espic, J.P.Isoardi, M.Moreau Sedit
- Very complete theoretical document (in French) regarding sanitary hot water and thermal solar water heater, by Thierry Cabriol, Albert Pelissou et Daniel Roux
- European TAREB project report
- Low-tech Lab's Sustainable Habitat Project Report
Published
 Français
 English
 Deutsch
 Español
 Italiano
 Português