
(Mise à jour pour être en accord avec la nouvelle version de la source de la page) |
(Mise à jour pour être en accord avec la nouvelle version de la source de la page) |
||
| Ligne 73 : | Ligne 73 : | ||
[https://breizh-bell.bzh/produit/kit-du-laborantin/ '''Kit Laborantin'''] | [https://breizh-bell.bzh/produit/kit-du-laborantin/ '''Kit Laborantin'''] | ||
| − | + | * Paires de gants sans talc et masques. | |
| + | * Charlotte ou bonnet propre (ceux de piscine sont tops !). | ||
| + | * Bougies chauffe-plat (Minimum 10 à 20) | ||
| + | * Compresses stériles | ||
| − | |||
| − | + | '''Matériel labo''' | |
| − | - | + | * Essuie-tout |
| + | * Alcool 70° | ||
| + | * [https://breizh-bell.bzh/produit/lot-de-10-sacs-de-cultures-unicorn-3t/ Sacs de culture] | ||
| − | ''' | + | '''Matériel pour la culture liquide :''' |
| − | + | * Un bocal et son couvercle | |
| − | + | * Une perceuse et des forets | |
| − | + | * [https://breizh-bell.bzh/produit/bouchons-pour-cultures-liquides/ Un bouchon auto refermable & un bouchon filtrant] | |
| − | + | * Tube de joint silicone transparent haute température | |
| − | + | * Film aluminium | |
| − | + | * Eau et sucre de betterave | |
| − | |||
| − | |||
| − | |||
| − | |||
| − | |||
| − | |||
| − | [https://breizh-bell.bzh/produit/bouchons-pour-cultures-liquides/ | ||
| − | |||
| − | |||
| − | |||
| − | |||
| − | |||
| − | |||
|Tools=<div class="mw-translate-fuzzy"> | |Tools=<div class="mw-translate-fuzzy"> | ||
– Thermometer | – Thermometer | ||
| Ligne 112 : | Ligne 103 : | ||
We advise you to place yourself in your kitchen, under your hood. It will prevent dust from settling on your crops. | We advise you to place yourself in your kitchen, under your hood. It will prevent dust from settling on your crops. | ||
| − | + | * Nettoyez votre plan de travail et chaque zone de contact potentiel avec de l’alcool à 70° avant chaque manipulation. | |
| − | + | * Lavez vous soigneusement les mains et les bras au savon avant chaque manipulation. Vous pouvez également mettre des gants et nettoyez les à l'alcool à 70°. | |
| − | + | * Attachez vous les cheveux et/ou mettez votre bonnet. | |
| − | |||
| − | |||
We strongly advise you to handle your liquid mycelium out of sunlight, under a soft and weak light (night light for example). | We strongly advise you to handle your liquid mycelium out of sunlight, under a soft and weak light (night light for example). | ||
| Ligne 128 : | Ligne 117 : | ||
The first stopper is self-closing and will allow the insertion of the syringe needle. The second is a filter cap for the respiration of the mycelium in the jar. | The first stopper is self-closing and will allow the insertion of the syringe needle. The second is a filter cap for the respiration of the mycelium in the jar. | ||
| − | + | * Prenez un bocal et réalisez les deux orifices à l'aide d'une perceuse (attention, le diamètre n'est pas le même !). | |
| + | * Placez une légère dose de joint silicone tout autour de l'orifice du bouchon filtrant | ||
| + | * Disposez les bouchons dans les orifices aux diamètres adaptés. | ||
| + | * Laissez le joint sécher pendant une journée | ||
| − | + | <br />Votre bocal est prêt pour l'inoculation liquide ! | |
| − | |||
| − | |||
| − | |||
| − | |||
| − | |||
| − | |||
|Step_Picture_00=Champignon_Inoculation_d_une_culture_liquide_Snapshot_439.png | |Step_Picture_00=Champignon_Inoculation_d_une_culture_liquide_Snapshot_439.png | ||
}} | }} | ||
{{Tuto Step | {{Tuto Step | ||
|Step_Title=Optional, liquid culture copy | |Step_Title=Optional, liquid culture copy | ||
| − | |Step_Content=- Follow step 1 of this tutorial. | + | |Step_Content=<div class="mw-translate-fuzzy"> |
| − | + | - Follow step 1 of this tutorial. | |
| − | + | </div> | |
| − | |||
| − | |||
| − | |||
| − | |||
| − | |||
| − | |||
| − | |||
| − | |||
| − | |||
| − | |||
| − | |||
| − | |||
| − | |||
| − | |||
| − | |||
| − | |||
| − | |||
| − | |||
| − | |||
| − | |||
| − | |||
| − | |||
| − | |||
| − | |||
| − | |||
| − | |||
| − | |||
| − | |||
'''The mycelium will spread.''' | '''The mycelium will spread.''' | ||
Version du 29 avril 2022 à 09:51

Dernière modification le 29/04/2022
Difficulté
Facile
Durée
1 heure(s)
Coût
40 EUR (€)
Description
Discover how easy it is to grow mushrooms! Easy and quick to set up, liquid inoculation consists of depositing a liquid culture on a substrate. The mycelium will propagate during the incubation phase. It is then possible to move on to the fruiting phase to pick the mushrooms.
Sommaire
Sommaire
- 1 Description
- 2 Sommaire
- 3 Introduction
- 4 Video d'introduction
- 5 Étape 1 - Preparation
- 6 Étape 2 - Optional, copy of a liquid culture: manufacture of the jar for inoculation
- 7 Étape 3 - Optional, liquid culture copy
- 8 Étape 4 - Grain inoculation: the rinse, day 1
- 9 Étape 5 - Grain inoculation: sterilization, day 2
- 10 Étape 6 - Grain inoculation: day 3
- 11 Étape 7 - Seed transfer: cloning or fruiting
- 12 Étape 8 - Preparation of your substrate (as soon as your grains are well colonized)
- 13 Étape 9 - Grain transfer
- 14 Commentaires
Introduction
In this tutorial, we are going to learn how to use a mycelium syringe in liquid culture. One of the prerequisites is therefore to have a syringe of liquid culture of the mushroom variety of your choice. It is possible to provide it on the link following. Tutorial produced in partnership with the company Breizh Bell, a company in myciculture and low-tech production of organic mushrooms, in France.
Introduction to the mushroom cycle
What is commonly called "mushroom" is in fact only the temporary and visible "fruiting body": the sporophore (formerly called "carpophore").
It is the result of an organism with a more durable and more discreet character, formed of filaments generally invisible to the naked eye when they are isolated: the A9lium mycelium.
The sporophore is often in the form of a foot wearing a hat .
To cultivate a mushroom, we try to reproduce the natural external conditions. Mushroom cultivation is divided into three main stages.
- Inoculation: addition of mycelium (in the form of spores or in liquid or agar culture) in the substrate
- Incubation: the mycelium propagates in the substrate
- Fructification: the mycelium wants to reproduce by forming a sporophore
Liquid inoculation?
In myciculture, inoculation by liquid culture consists of injecting mycelium contained in sterilized sugar water onto a substrate.
Why is it awesome?
There are several ways to start a mushroom crop. Liquid inoculation is one of the easiest because you just need to spray a substrate with a liquid culture. In addition, the risk of contamination is less than with other methods.
Receiving the liquid inoculation syringe
Upon receipt of the syringe containing the mycelium, place it immediately in the refrigerator, it must be used within two weeks!
You have two choices :
- Liquid culture copy: The goal is to copy the liquid culture to achieve even more culture! The liquid culture copy is optional!
- Grain inoculation: This consists of depositing a liquid culture on a substrate. Seed inoculation can be done in a jar or in a bag
Glossary :
Mycelium: filamentous body of the fungus
Inoculation: injection of the mycelium into the substrate
Liquid culture: mixture of sterilized sugar water with mycelium
Substrate: Food of the fungus (grains, straw, wood...), the mycelium attaches to the substrateYoutube


Matériaux
(Liquid Mycelium syringe: Namekos, blue oyster mushroom, gray oyster mushroom, yellow oyster mushroom, pink oyster mushroom, shiitake mushrooms, red wine stropharia, etc.)
- Paires de gants sans talc et masques.
- Charlotte ou bonnet propre (ceux de piscine sont tops !).
- Bougies chauffe-plat (Minimum 10 à 20)
- Compresses stériles
Matériel labo
- Essuie-tout
- Alcool 70°
- Sacs de culture
Matériel pour la culture liquide :
- Un bocal et son couvercle
- Une perceuse et des forets
- Un bouchon auto refermable & un bouchon filtrant
- Tube de joint silicone transparent haute température
- Film aluminium
- Eau et sucre de betterave
Outils
– Thermometer
Étape 1 - Preparation
It is very important to have the most sterile conditions possible, throughout the manipulations. Indeed, there is a biological struggle between living species. If the environment is contaminated, the fungus will find itself in competition with other organisms, so it will be too fragile and will lose. We will seek to create ideal growing conditions to promote the fungus.
We advise you to place yourself in your kitchen, under your hood. It will prevent dust from settling on your crops.
- Nettoyez votre plan de travail et chaque zone de contact potentiel avec de l’alcool à 70° avant chaque manipulation.
- Lavez vous soigneusement les mains et les bras au savon avant chaque manipulation. Vous pouvez également mettre des gants et nettoyez les à l'alcool à 70°.
- Attachez vous les cheveux et/ou mettez votre bonnet.
We strongly advise you to handle your liquid mycelium out of sunlight, under a soft and weak light (night light for example).
Étape 2 - Optional, copy of a liquid culture: manufacture of the jar for inoculation
In this step, we will make a jar for your liquid culture.
The lid of the jar will have two holes. They will be filled with two plugs.
The first stopper is self-closing and will allow the insertion of the syringe needle. The second is a filter cap for the respiration of the mycelium in the jar.
- Prenez un bocal et réalisez les deux orifices à l'aide d'une perceuse (attention, le diamètre n'est pas le même !).
- Placez une légère dose de joint silicone tout autour de l'orifice du bouchon filtrant
- Disposez les bouchons dans les orifices aux diamètres adaptés.
- Laissez le joint sécher pendant une journée
Votre bocal est prêt pour l'inoculation liquide !

Étape 3 - Optional, liquid culture copy
- Follow step 1 of this tutorial.
The mycelium will spread.
Your culture is good when your jar is filled with a cloud of mycelium! The slightest green, blue or black stain in your jar is a sign of contamination and your culture will then be unusable.
When the mycelium has spread well, we invite you to carry out an inoculation on the grains. The steps are described below


Étape 4 - Grain inoculation: the rinse, day 1
If you want to inoculate grains, they will have to be cleaned on the first day.
- Take out your grains and rinse them thoroughly with cold water, until clear water is obtained.
- Place these grains in a container.
- Take calcium carbonate (CaCO3) and add 2 to 5% of the weight of your grains.
- Fill this bag with hot tap water, slightly above the level of the beans.
- Close your container and let stand overnight.
Étape 5 - Grain inoculation: sterilization, day 2
- Boil water in your saucepan.
- Take out your container of beans and fill it with boiled water (below the level of the beans).
- Fill your vaporizer with the rest of this cooled water.
- Fill your pot with water again and bring to the boil.
- Close the container of your grains and immerse it in your saucepan/pressure cooker.
- Let it boil for 3 hours in your pan, covered.
- Take your container out of the pan and let it cool overnight.
Étape 6 - Grain inoculation: day 3
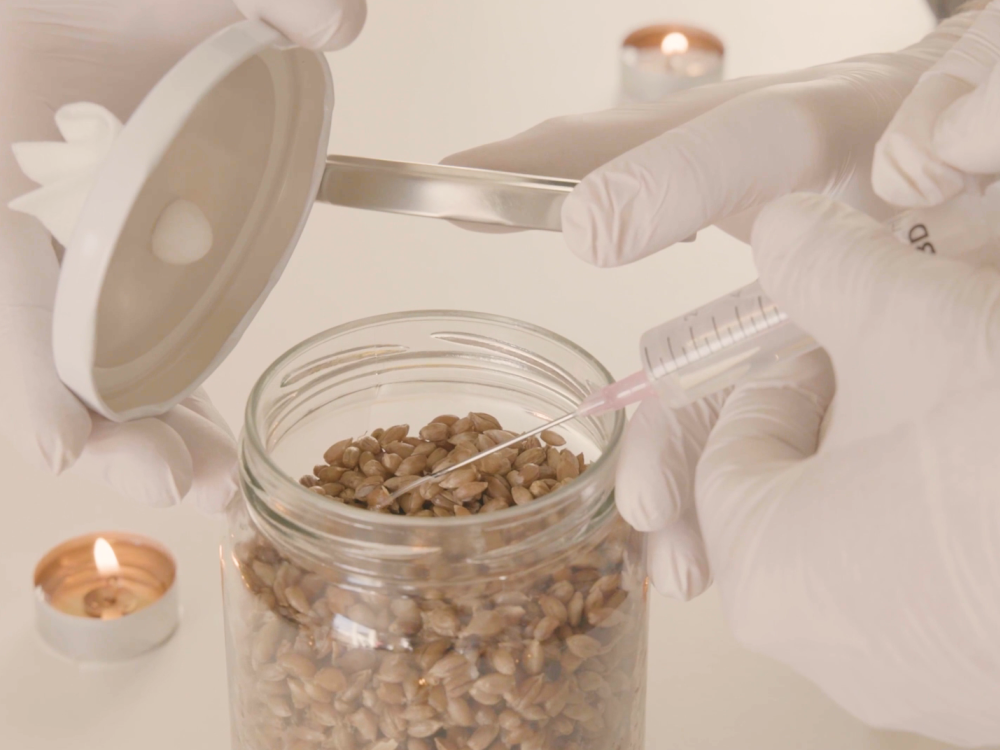
The liquid inoculation is carried out on the clean substrate. Either the substrate is in a jar (as in the pictures) or the substrate is contained in a grow bag. In both cases, the mycelium must be able to breathe.
If you choose a jar, pierce its lid and clean it with 70° alcohol. Then place a sterile compress in the hole.
- In your kitchen, clean your worktop with alcohol.
- Turn on your cooker hood and place tealights all around your work area.
- Light the candles and take your syringe of liquid mycelium out of the refrigerator, clean (alcohol 70°) and place it in the center of the work area.
- Take your syringe and needle out of their bag. Insert the needle.
- Take your bag/jar of sterilized grains, clean the outside of this bag/jar with 70° alcohol and place it in your work area.
(Be careful that the filter/compress does not touch alcohol)
- Take two sterile compresses and soak them in alcohol.
- Place the needle of your syringe on the flame of one of the candles and wait for the tip to turn red.
- Then place it between the two compresses soaked in alcohol.
- Open your bag/jar in the work area and completely empty the mycelium from your syringe onto your seeds.
- Close the bag/jar immediately by folding the top and attaching your clothespins.
- Expel the air and place it in a non-transparent box at the incubation temperature adapted to the variety (information on the Breizh Bell website).
- Wait for the incubation time adapted to the variety (14 days oyster mushrooms, other information on the Breizh Bell website). Write it down in your diary!
(you will be able to see if your mycelium is colonizing your grains correctly after a few days, but be careful with the light!).
The mycelium will spread.
Your crop is ready when your beans turn completely white. The slightest green, blue or black stain in your jar is a sign of contamination and your culture will then be unusable.


Étape 7 - Seed transfer: cloning or fruiting
As soon as your grains are colonized, you have the following two options:
- Transfer your colonized grains to other grains for copy
- Transfer your colonized seeds to a substrate for fruiting
Étape 8 - Preparation of your substrate (as soon as your grains are well colonized)
Attention, the following steps are only valid for oyster mushrooms!
This step will allow the already stronger mycelium to settle on a harder substrate. Oyster mushrooms are fond of sawdust from hardwoods or straw. You can also combine the two.
Natural (non-odorized) rabbit litter is an ideal substrate and easy to find in stores!
- Heat water in your saucepan over low heat, you can add coffee grounds (maximum 1/3 of the volume of the substrate and maximum three days) to this water!
- Take a container and fill it with hardwood sawdust and/or straw.
- Take your thermometer and wait for the hot water to reach 75°C (pasteurization).
- Fill your bag of substrate with this water and reheat the water over low heat.
- Preheat your oven to 75° if you find that your container of substrate is too large for your pan!
- Take your thermometer, and measure the temperature of the water, it should never exceed 93°C!
- To know if your substrate is well moistened, take a good handful of it in your hand and squeeze it. It should come off on its own and not stay in a ball. For a better understanding, we invite you to watch the tutorial video “Wet your substrate well!”
- Close your container (using wooden clothespins in the case of a bag).
- Immerse your container in water, leave it covered for 2 hours and take the water temperature every half hour (<93°C) // Place your container in your oven at 75°C for two hours !
- Leave them to cool overnight and keep them closed.
Étape 9 - Grain transfer
In your kitchen, clean your worktop with alcohol.
- Turn on your cooker hood and place tealights all around your work area.
- Take your container of inoculated grains, the mycelium must have colonized all the grains!
- Clean the outside of the inoculated grain container and the chilled substrate container with alcohol.
- Open your containers in the center of the work area.
- Break your colonized grains to make lumps, be careful that each instrument in contact is cleaned!
- Fill your substrate container with your inoculated seeds. Close it immediately (with the clothespins, expelling the air in the case of a bag).
- Replace the containers in a room at a temperature between 20 and 23°C for three weeks. Loan of a radiator in your bathroom is a clever solution!
If there is a bag, place it in a box isolated from light.
Published
 Français
 English
 Deutsch
 Español
 Italiano
 Português