
Difficulté
Moyen
Durée
3 heure(s)
Coût
5 EUR (€)
Description
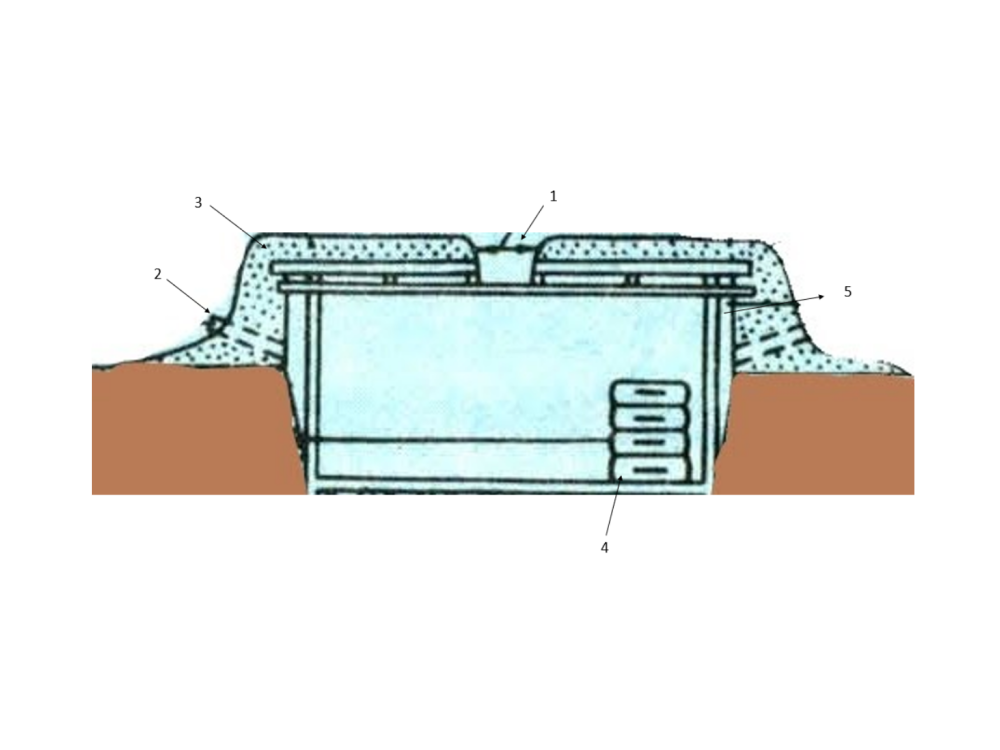
As the drawing shows, it is a semi-underground cellar used to store vegetables and fruit. Thanks to the difficulty of heat transfer in the underground, the cellar is able to have a constant temperature all year round, 0℃- 5℃. In addition, the tightness of the cellar ensures humidity. It is suitable for onions, garlic, zucchini, potatoes, cabbage, etc.

Matériaux
Entrance to the Cellar
Exhaust Vent
Soil
Boxes of vegetables and fruit
Stone walls and ceiling
Outils
Étape 1 - Making a hole
First, we dig a big pit in the ground.
Étape 2 - Construction of the Cellar
And then we build a cellar using stones and cement. Remember to create two exhaust vents. Since in the cellar there are a lot of gases like CO2, CH4, etc. and it lacks O2. So before entering the cellar, we need to open the exhaust vents to have enough O2.
Étape 3 - Creation of a sealed entrance

Étape 4 - Bury the cellar with soil
Étape 5 - Adding water
We have to put some water in the cellar. When it's too cold, water will freeze and produce heat. On the other hand, it will volatilize to absorb the heat.
Notes et références
Advantage:
- Pouvoir éviter le soleil et avoir une température constante toute l’année.
- L’accumulation de CO2 et la manque de O2 permettent de ralentir le pourri des fruits et des légumes.
- De plus, il est assez facile à construire et il sera utilisé pour un long terme.
- Il convient à conserver un grand lot de légumes et de fruits.
- L’écart de hauteur entre l’entrée et le sol permet d’éviter l’entrée de l’eau quand il pleut souvent.
Inconvénients :
- Il va produire du gaz des marais, donc il faut faire attention avant d’entrer le cellier afin d’éviter d’explosion.
- Ne convient pas pour tous les aliments, tels que la viande, le poisson, les bananes, etc.
Draft
 Français
 English
 Deutsch
 Español
 Italiano
 Português