
(Page créée avec « The tube can be solidified using a screw. make sure that the PVC tube is straight. ») |
|||
| (19 révisions intermédiaires par le même utilisateur non affichées) | |||
| Ligne 22 : | Ligne 22 : | ||
| − | Tutorial produced with the help of [https://breizh-bell.bzh/ Breizh Bell], organic mushroom producer in | + | Tutorial produced with the help of [https://breizh-bell.bzh/ Breizh Bell], organic mushroom producer in France. |
}} | }} | ||
{{TutoVideo | {{TutoVideo | ||
| Ligne 63 : | Ligne 63 : | ||
}} | }} | ||
{{Tuto Step | {{Tuto Step | ||
| − | |Step_Title= | + | |Step_Title=Box cutout |
| − | |Step_Content= | + | |Step_Content=It is necessary to make two holes in the cover, the first to accommodate the PVC tube, the second for the fan. |
| − | + | To make a hole in the plastic, it is advisable to draw the hole, then drill along the circle. There have been complications with the hole saw, this system is not recommended. | |
| − | + | The hole can be smoothed and sanded with a rotary tool. | |
|Step_Picture_00=Brumisateur_06.PNG | |Step_Picture_00=Brumisateur_06.PNG | ||
|Step_Picture_01=Brumisateur_07.PNG | |Step_Picture_01=Brumisateur_07.PNG | ||
| Ligne 78 : | Ligne 78 : | ||
}} | }} | ||
{{Tuto Step | {{Tuto Step | ||
| − | |Step_Title= | + | |Step_Title=Fan installation |
| − | |Step_Content= | + | |Step_Content=The IP64 fan can be fitted with the appropriate screws (other types of fans have rusted or the powr cable has not held). |
| − | + | The air must return thanks to the ventilator in the box. | |
|Step_Picture_00=Brumisateur_11.PNG | |Step_Picture_00=Brumisateur_11.PNG | ||
|Step_Picture_01=Brumisateur_12.PNG | |Step_Picture_01=Brumisateur_12.PNG | ||
| Ligne 89 : | Ligne 89 : | ||
}} | }} | ||
{{Tuto Step | {{Tuto Step | ||
| − | |Step_Title= | + | |Step_Title=Sealing of the fogger |
| − | |Step_Content= | + | |Step_Content=In order to ensure the watertightness of the fogger, a joint gun is used to apply the silicone. |
| − | + | To avoid silicone balls, you must orient the gun correctly and exert constant pressure. The silicone must then be smoothed with a spoon or with the gloves. | |
| − | # | + | #Apply the silicone to the top face |
| − | # | + | #Wait 24 hours for the silicone to dry |
| − | # | + | #Apply the silicone to the underside of the cover |
| − | # | + | #Wait 24 hours for the silicone to dry |
|Step_Picture_00=Brumisateur_15.PNG | |Step_Picture_00=Brumisateur_15.PNG | ||
|Step_Picture_01=Brumisateur_16.PNG | |Step_Picture_01=Brumisateur_16.PNG | ||
| Ligne 107 : | Ligne 107 : | ||
}} | }} | ||
{{Tuto Step | {{Tuto Step | ||
| − | |Step_Title= | + | |Step_Title=Assembly |
| − | |Step_Content= | + | |Step_Content=The box can be filled with water, the ultrasonic fogger will land on a float. The system can be supplied with electricity. |
| − | + | In a greenhouse, the number of electronic components must be minimized. | |
| − | + | The only electronic components are the ultrasonic fogger and the fan. | |
|Step_Picture_00=Brumisateur_22.PNG | |Step_Picture_00=Brumisateur_22.PNG | ||
|Step_Picture_01=Brumisateur_23.PNG | |Step_Picture_01=Brumisateur_23.PNG | ||
| Ligne 120 : | Ligne 120 : | ||
}} | }} | ||
{{Tuto Step | {{Tuto Step | ||
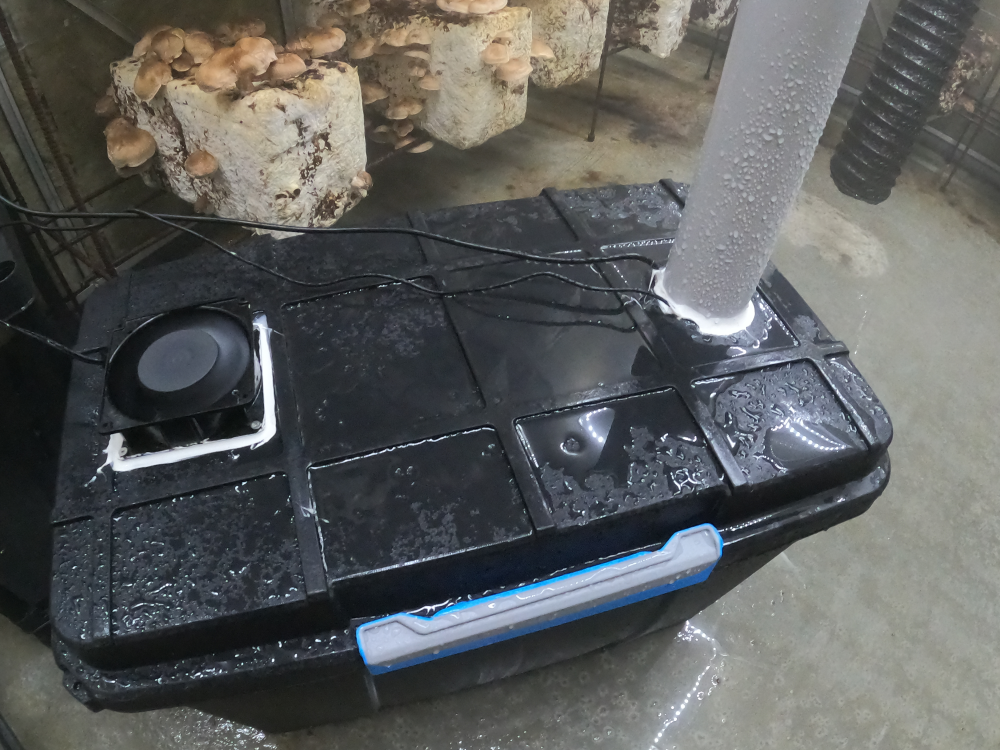
| − | |Step_Title= | + | |Step_Title=To your mushrooms! |
| − | |Step_Content= | + | |Step_Content=The fogger is very useful in any mushroom culture. It makes it possible to obtain an overpressure, in order to avoid an intake of outside air and pollutants. |
| − | + | It also makes it possible to have an atmosphere saturated with humidity at room temperature. It may be necessary to add an extractor hood to the greenhouse. This extraction outlet is ideally located close to the ground, in order to maximize the duration of the mist. | |
| − | + | If the greenhouse is not saturated with the fogger, it is possible to add several foggers in the same box. | |
|Step_Picture_00=Brumisateur_DSC0048.JPG | |Step_Picture_00=Brumisateur_DSC0048.JPG | ||
}} | }} | ||
Version du 6 mai 2022 à 06:52

Difficulté
Moyen
Durée
2 heure(s)
Coût
50 EUR (€)
Description
Fogger allowing to have an atmosphere saturated with humidity and at room temperature. Ideal for fruiting mushrooms.
Introduction
This fogger consists of an ultrasonic fogger, a waterproof box, a fan and a PVC tube. The box contains the water and the ultrasonic fogger, the fan will generate forced convection. The PVC tube allows the mist to be redirected.
The fogger will generate overpressure, so the air will come out of the greenhouse, which prevents the entry of pollutants. Mist is heavier than air. Without a fan and without a PVC tube, the mist will settle at ground level. Instead of using a rigid PVC tube, it is possible to use a flexible tube. The fogger can be installed outside the greenhouse, which facilitates water filling operations. The diameter of the PVC pipe must be large enough for the air flow.
This fogger is very useful for the fruiting phase of mushrooms. The air is now saturated with humidity and at room temperature. In the same box, it is possible to have several ultrasonic foggers. It is advisable to insert an air extractor at mid-height.
Youtube


Matériaux
PVC tube diameter 60
IP64 fan
Ultrasonic fogger (see 2nd image)
Waterproof box
Outils
Saw, Grinder, Cutter
Screwdriver
Seal gun
Multifunction rotary tool
Clamp
Étape 1 - Cutting the PVC tube
The PVC tube must be cut so as to guide the mist. The PVC tube is then inserted into the box, it takes support on the bottom of the box.
This shape allows the passage of water and mist. It helps guide the mist.
The tube can be solidified using a screw. make sure that the PVC tube is straight.


Étape 2 - Box cutout
It is necessary to make two holes in the cover, the first to accommodate the PVC tube, the second for the fan.
To make a hole in the plastic, it is advisable to draw the hole, then drill along the circle. There have been complications with the hole saw, this system is not recommended.
The hole can be smoothed and sanded with a rotary tool.


Étape 3 - Fan installation
The IP64 fan can be fitted with the appropriate screws (other types of fans have rusted or the powr cable has not held).
The air must return thanks to the ventilator in the box.


Étape 4 - Sealing of the fogger
In order to ensure the watertightness of the fogger, a joint gun is used to apply the silicone.
To avoid silicone balls, you must orient the gun correctly and exert constant pressure. The silicone must then be smoothed with a spoon or with the gloves.
- Apply the silicone to the top face
- Wait 24 hours for the silicone to dry
- Apply the silicone to the underside of the cover
- Wait 24 hours for the silicone to dry


Étape 5 - Assembly
The box can be filled with water, the ultrasonic fogger will land on a float. The system can be supplied with electricity.
In a greenhouse, the number of electronic components must be minimized.
The only electronic components are the ultrasonic fogger and the fan.


Étape 6 - To your mushrooms!
The fogger is very useful in any mushroom culture. It makes it possible to obtain an overpressure, in order to avoid an intake of outside air and pollutants.
It also makes it possible to have an atmosphere saturated with humidity at room temperature. It may be necessary to add an extractor hood to the greenhouse. This extraction outlet is ideally located close to the ground, in order to maximize the duration of the mist.
If the greenhouse is not saturated with the fogger, it is possible to add several foggers in the same box.

Published
 Français
 English
 Deutsch
 Español
 Italiano
 Português